Why Getting Your Starlink Mount Right Saves You Money and Frustration
Starlink mounting myths can cost you hundreds in repairs, void your roof warranty, and leave you with frustrating drop-outs just when you need reliable internet most. Many remote residents in Australia are switching to Starlink for high-speed connectivity, but poor mounting choices often undermine performance before the dish even powers on.
Common Starlink Mounting Myths — Quick Facts:
| Myth | Reality |
|---|---|
| "A little tree won't hurt" | Even small obstructions cause constant drop-outs |
| "Any mount will handle the weather" | Australian conditions demand corrosion-resistant materials |
| "DIY is easy with basic hardware" | Wrong screws and sealing methods void roof warranties |
| "The app's first scan is enough" | Seasonal foliage changes require long-term testing |
| "Horizontal mounting is fine" | Starlink must be within 40° of vertical to operate |
The truth is simple: Starlink's performance depends heavily on clear sky access, proper mounting angle, and weather-resistant hardware. A poorly chosen mount can lead to rust, leaks, signal loss, and expensive repairs within months.
I'm Aaron Wroblewski, founder of SpaceTek Australia, and over 25 years in remote communications I've seen how starlink mounting myths lead to costly mistakes across rural and coastal Australia. From real-world installs in harsh Aussie conditions, I've designed mounting solutions that actually hold up where standard hardware fails.
Essential starlink mounting myths terms:
- DIY Starlink Mounting Mistakes to Avoid
- Where should I install my Starlink?
- Starlink mount wind protection
The Truth Behind Common Starlink Mounting Myths
When you invest in Starlink to finally get reliable internet in rural or remote Australia, the last thing you need is a preventable mounting mistake sabotaging your connection. Unfortunately, plenty of well-meaning advice floating around online simply isn't true—and following it can leave you with frustrating drop-outs, expensive repairs, and a roof that's worse for wear.
Let's separate fact from fiction so your Starlink setup works brilliantly from day one.
Understanding Starlink Mounting Myths About Obstructions & Location
One of the most persistent Starlink mounting myths centres on how much clear sky your dish actually needs.
The myth: "A little tree or small obstruction won't hurt—the dish will work around it."
The reality: Even a single branch or a few leaves can wreak havoc on your connection. Starlink dishes need a completely clear 100° cone of sky above them to maintain solid contact with passing satellites. Think of it like trying to have a conversation through a partly closed door—bits get missed, and the whole thing becomes frustrating fast.
This matters because Starlink uses a phased-array antenna that constantly steers its beam across the sky to track multiple satellites. Any obstruction—a tree, chimney, or neighbouring building—causes service interruptions and sluggish speeds. Your mounting location is absolutely critical to performance.
Another common myth: "The Starlink app's first obstruction scan tells you everything you need to know."
The truth is more nuanced. The app's obstruction checker is genuinely helpful and provides a great starting point with its heatmap showing where obstructions might cause signal loss. But a single scan captures just one moment in time, and that's not enough.
We strongly recommend testing your dish in a few different locations for several hours or even days before permanently mounting it. This gives the system time to gather real-world data about potential obstructions you might not notice at first glance.
Here's something many people overlook: seasonal changes. If you're setting up in winter when trees are bare, remember those same trees will be full of leaves come summer. A crystal-clear view in June might turn into an obstruction nightmare by December. Always think ahead to what your chosen spot will look like year-round.
For more detailed guidance on getting your placement spot-on, have a look at our articles on Tips to Navigate Around Dish Obstructions and What Is the Ideal Location for Installing My Starlink Dish?.
Debunking Myths About Weather Resistance and Durability
Australia throws everything at outdoor equipment—scorching sun, coastal salt spray, cyclonic winds, and everything in between. This brings us to some crucial starlink mounting myths about durability.
The myth: "Any mount will handle Australian weather, and once it's up, I can just forget about it."
The reality: This belief leads to rapid deterioration and eventual failure. While Starlink dishes themselves are impressively tough—they even have a built-in heating function to melt snow—the mount supporting your dish faces entirely different challenges.
Standard mounts simply aren't designed for the extremes we experience here. In cyclonic regions or areas prone to severe winds, proper tethering and bracing aren't optional extras—they're essential to prevent your dish ending up in the neighbour's paddock.
Australia presents unique mounting challenges that demand purpose-built solutions. Coastal properties face relentless salt corrosion that turns mild-steel screws into crumbling rust within months. That's why we insist on 316-grade stainless steel or marine-grade aluminium for all our mounting hardware. High-wind areas require mounts engineered to handle significant loads without flexing or failing. And the brutal Australian sun degrades cheaper plastics and coatings faster than you'd believe.
The "set and forget" mentality ignores these long-term realities. A mount that looks fine today might be structurally compromised in six months if it's not built from the right materials. Investing in quality mounting hardware from the start saves you from premature rust, structural fatigue, and the hassle of replacing everything far sooner than you should need to.
Starlink dishes do feature that clever snow-melt function, but remember—it only clears snow from the dish surface itself. If snow accumulates around the dish and blocks its view of the sky, you'll still lose signal. Thoughtful placement matters just as much as the mount quality.
For more insights into protecting your setup against harsh conditions, explore our guides on How to Find Durable Starlink Mounts for Harsh Aussie Conditions and Does Starlink Work During Bad Weather or Bushfire Season?.
More Starlink Mounting Myths: DIY Installs and Hardware
The idea of a quick, simple DIY Starlink installation is tempting—and Starlink certainly makes self-installation possible. But "possible" and "easy with whatever hardware you've got lying around" are two very different things.
The myth: "DIY installation is straightforward with any basic hardware from the shed."
The reality: We've seen countless installations go sideways because someone used the wrong screws, drilled in the wrong spot, or sealed things improperly. These mistakes lead to internet drop-outs, roof damage, and—worst of all—voided warranties.
Using the wrong hardware is one of the most common problems. Mild-steel screws rust out frighteningly fast, especially anywhere near the coast. Every extra hole you drill into your roof is a potential leak waiting to happen. The proper approach is to drill through roof ridges (never valleys), make sure you're hitting rafters for solid support, and seal everything with neutral-cure silicone plus stainless steel screws fitted with EPDM washers.
Roof damage and leaks happen when people don't understand proper drilling and sealing techniques. Here's something many DIYers don't realise: using acidic-cure silicone on Colorbond® roofs can void your roof warranty and cause premature rust. Recent research also shows that ballast blocks sitting on metal roofs can trap moisture underneath, accelerating corrosion and compromising your roof's integrity over time. For more details, check out the latest research on roof ballast issues.
Cable management is another area where DIY installations often go wrong. The Starlink cable isn't rated for direct burial in soil. If you need to run it underground, it must go inside PVC conduit—typically 3/4 inch diameter works well. You'll need to dig a trench at least 18 inches to 2 feet deep, and using a wire fish tape makes pulling the cable through much easier. Skip this step, and moisture, pests, or soil conditions will eventually damage your cable.
Another myth worth addressing: "The Starlink router is all I need for my home network."
For many users, the standard Starlink router is perfectly functional. But it does have limitations in range, features, and customisation. If you have a larger property or specific networking requirements, you'll likely want to bypass the Starlink router and use your own. This is straightforward with the use of an ethernet adapter, giving you improved Wi-Fi range, more robust features, and greater control over your network setup.
For a comprehensive guide on sidestepping these pitfalls, have a read through our 7 Clever Ways to Avoid DIY Starlink Mounting Mistakes.
From Rooftops to the Outback: Finding Your Perfect Mount
Choosing the right mount is paramount, not just for signal integrity but for the longevity and safety of your Starlink system. With various Starlink dish generations (Gen 2, Gen 3, and Mini) and diverse use cases, there’s no one-size-fits-all solution.
Mounts for Stationary Setups (Gen 2 & Gen 3)
For homes and fixed locations, we offer a range of robust mounts designed for optimal performance and durability. The choice largely depends on your roof type and property layout.
- Roof Mounts: These are popular for achieving the clearest line of sight.
-
Tile Roofs: Require specialised mounts like our Tile Roof solutions, which ensure proper sealing and structural integrity.
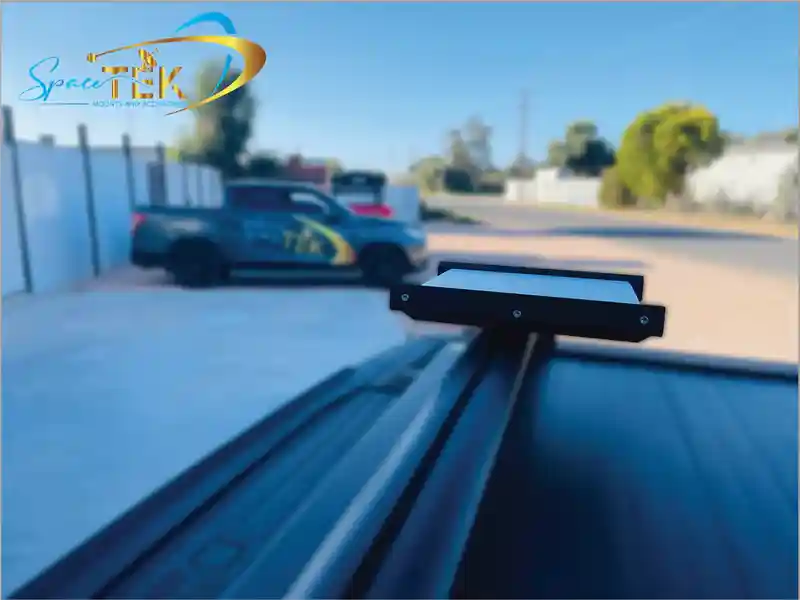
- Tin and Corrugated Roofs: Our mounts are specifically designed to secure Starlink dishes on these surfaces without compromising the roof's waterproofing or warranty.
- Wall Mounts: An excellent alternative if roof mounting isn't feasible or desired. These are typically installed on exterior walls, ensuring the dish has a clear view while keeping it accessible. Our Satellite Wall Mounts Suit- STARLINK GEN2, GEN3 are available in 600mm and 1m sizes, made from full aluminium construction, and can be custom-built to your specifications, requiring the distance from the wall to the outer edge of the gutter.
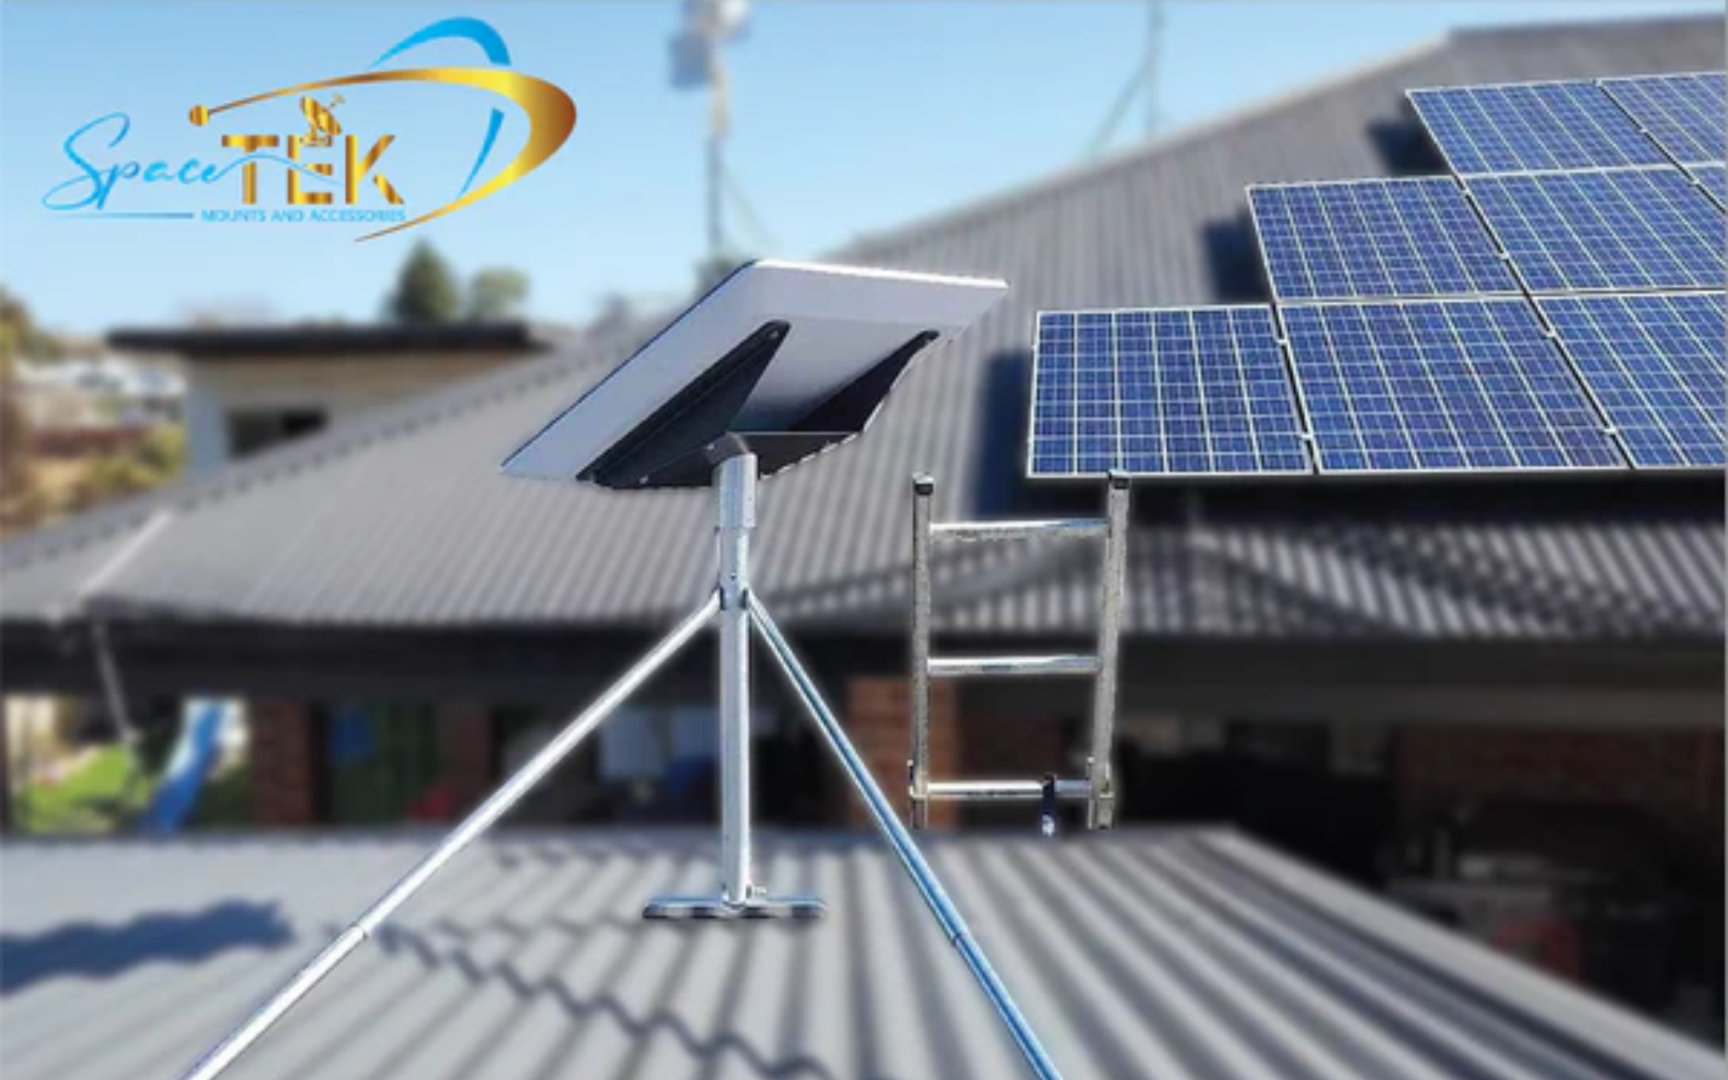
- Pole Mounts: Often the best option for elevating the dish above obstructions like trees or buildings. A pole mount needs to be securely anchored, often requiring a cement pad (e.g., a hole roughly 2 ft deep by 1.5 ft wide for pouring concrete). This keeps the dish high enough off the ground to avoid snow accumulation and improve visibility.
We recommend exploring our Gen 2 collection and Gen 3 / V4 collection to find the perfect solution for your specific dish and property. For expert advice on selecting the right option, refer to How to Choose the Right Starlink Mount for Your Roof Type in Australia.
Solutions for Starlink Mini & Mobile Lifestyles
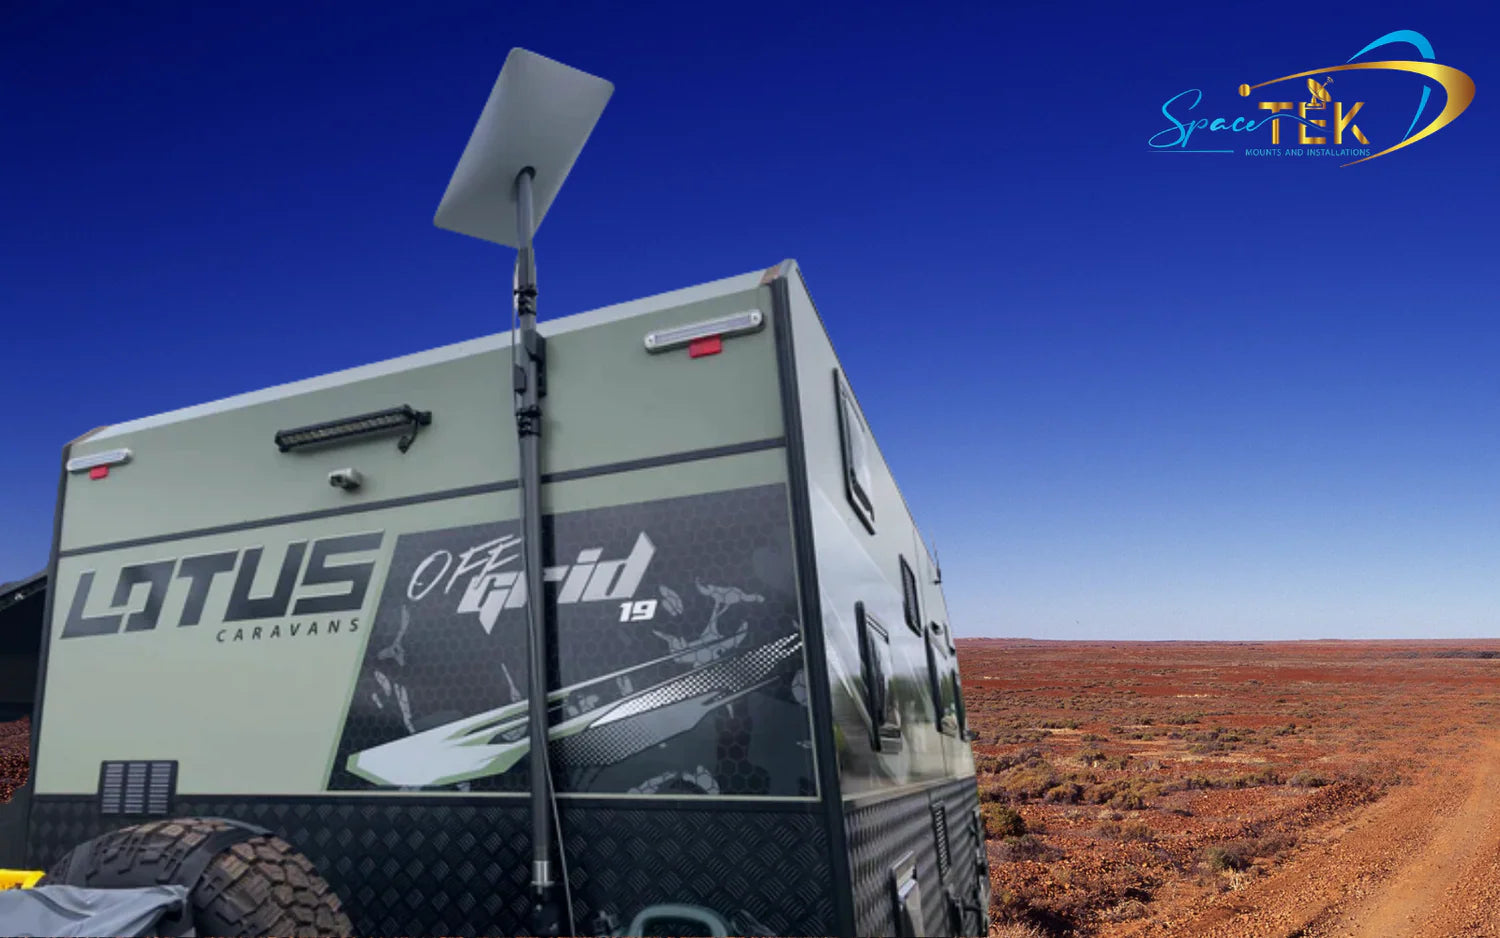
The advent of Starlink Mini and various portability plans has revolutionised internet access for those on the move. Whether you're exploring the Australian outback in your 4WD or caravanning along the coast, mobile Starlink requires specialised mounting.
Can Starlink be mounted on RVs or vehicles? Absolutely! Elon Musk himself stated that Starlink would be fully mobile, usable on RVs or trucks in motion. This has opened up a world of connectivity for adventurers and remote workers alike.
Considerations for mobile installations:
- Secure Mounting: Vibrations, sudden stops, and varied terrain demand exceptionally secure mounts. We offer solutions like our Gen 3 / V4 Standard Mobility Mount and Gen 3 Basic In-Motion Mount, designed to keep your dish stable and connected while travelling.
- Portability: Many mobile users prefer mounts that allow for quick setup and takedown. Suction cup mounts, for instance, offer flexibility for temporary setups on flat surfaces.
- Power Solutions: Mobile setups often rely on 12V or 24V DC power. Our StarPower 12V Starlink DC Power Supply eliminates the need for bulky inverters, making off-grid power management seamless.
- Roof Rack Mounts: For a more permanent vehicle solution, our Starlink Gen 3 Roof Rack Mobility Mount offers heavy-duty, adjustable clamping for various roof rack types.

Our Starlink RV Life Connected: Setting Up Starlink on the Go article provides extensive details, and you can browse our dedicated collections for Starlink Mini and RV and Portability solutions. We understand the freedom of the open road and the necessity of staying connected.
Conclusion: Build a Reliable Connection from the Ground Up
We've debunked several critical Starlink mounting myths today, highlighting why a haphazard approach to installation can severely impact your internet experience. From the necessity of a clear sky view and proper weather resistance to the pitfalls of DIY hardware and the importance of professional-grade mounting, the message is clear: your Starlink's performance is only as good as its installation.
Investing in a quality mount isn't just about securing your dish; it's about protecting your investment, ensuring consistent high-speed internet, and avoiding expensive repairs down the track. At SpaceTek Australia, we pride ourselves on providing the most secure, rust-resistant, and user-friendly Starlink mounts in Australia, built specifically for our harsh local conditions. Our solutions are designed to work seamlessly with Starlink's self-installer kits, elevating your connectivity to new heights.
Don't let common starlink mounting myths compromise your internet. For expert advice custom to your specific needs, get in touch with our team today. We're here to help you achieve a flawless Starlink setup, ensuring you stay connected wherever your Australian adventures take you.
Leave a comment
This site is protected by hCaptcha and the hCaptcha Privacy Policy and Terms of Service apply.