
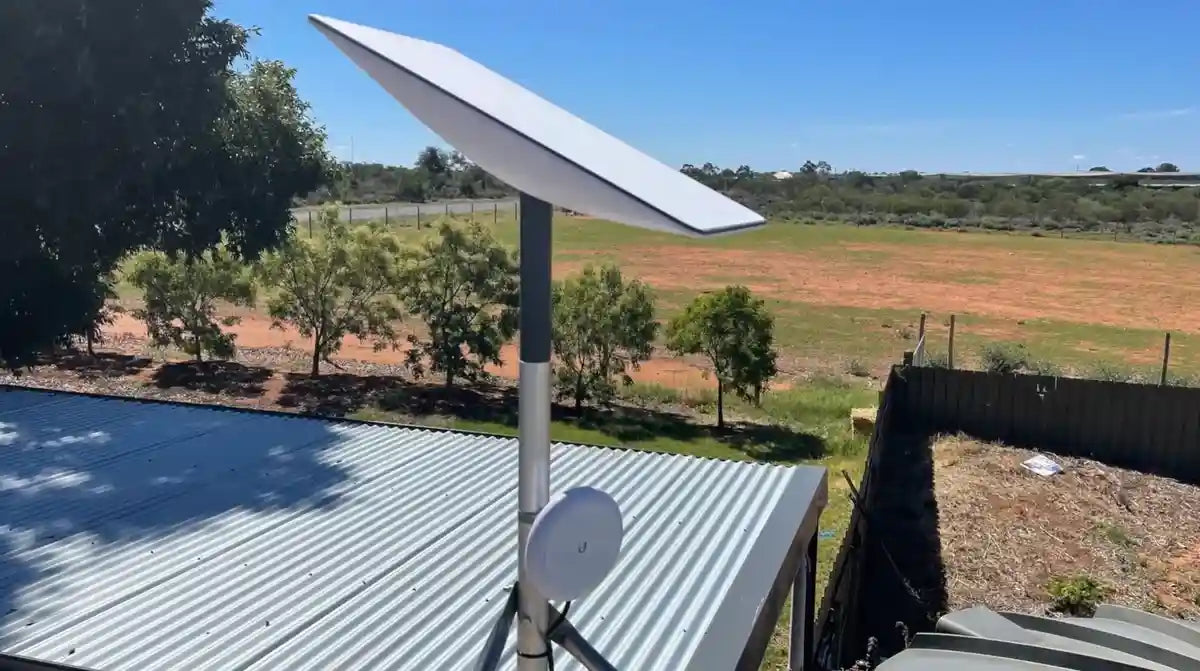
How can you protect your Starlink mount from wind?

Starlink mount wind protection starts with a mount and installation method suitable for the exact terminal, supporting structure and site exposure. A “heavy-duty” label alone does not establish that a complete installation is suitable for your property.
Updated for October 2026, this guide explains what to check with the supplier and installer before choosing a mount, and what you can assess safely after bad weather. It does not assign a generic wind-speed rating to Starlink roof mounts.
Keep the sky view, cable route, weatherproofing and future access in the same planning conversation. For an exposed or elevated installation, obtain appropriate professional advice rather than adapting a generic roof-fixing recipe.
Why does the complete installation matter?
The terminal, adapter, mast, stays, fixings and building form one installation. A compatible adapter confirms only part of that arrangement; it does not establish whether the supporting roof or wall is suitable.
Compare documentation for the actual product rather than assuming that all standard mounts are weak or all reinforced mounts are storm-proof. Check the specified Starlink models, intended mounting surfaces and installation restrictions.
For example, SpaceTek describes its heavy-duty Standard Gen 3 / V4 tin-roof kit for exposed metal-roof installations. It still requires structurally suitable roofing and correct installation. The supplier's generic fastener pack must be checked for the particular installation; the product is not a freestanding or portable mount.
Ask for supporting documentation if a numerical wind rating is important to your site. Do not treat a terminal's own specification, an illustration or a general “heavy-duty” description as certification of the entire building attachment.
How should you choose the location?
Compare the available sky view with the practical demands of installing and maintaining the equipment. The Starlink app's obstruction check helps assess sky visibility; it does not evaluate the structure or certify wind resistance.
Use safely accessible positions for initial checks. If the proposed location needs roof access, arrange an appropriate assessment rather than climbing solely to perform a phone scan.
Discuss these questions with the installer:
- Does the specific mount suit this roof, wall or pole arrangement?
- Is the supporting structure in suitable condition?
- What does the manufacturer require for fixing and weatherproofing?
- Is the proposed height within the documented configuration?
- Can the equipment and cable route be inspected and maintained safely?
A roof ridge, sheltered wall or ground pole is not automatically the best answer. Each has different sky-view and installation constraints. Avoid choosing the tallest or most sheltered spot without considering the complete setup.
Should you add bracing or change the mast?
Use the mount as documented for the installation. Do not add generic struts, extend a pole or substitute fasteners on the assumption that extra hardware must improve wind resistance.
SpaceTek's tin-roof guide describes a particular permanent system with a mast, adapter, base and stays. It also identifies roof penetrations and sealing as part of the installation and recommends professional installation for exposed or elevated sites.
That example does not provide a universal method for tile roofs, masonry, vehicle panels or ground poles. Obtain the matching guide for the chosen product and ask the supplier or an appropriate installer about any change to its configuration.
Materials also vary by component: a kit may combine aluminium components with steel stays or fasteners. Judge the specific assembly and installation requirements rather than relying on a blanket material claim.
What about cables and portable equipment?
Cable routing is part of the installation, not an afterthought. Follow the kit and mount instructions for connector seating, strain relief, bend limits and entry-point protection. Avoid pinching the cable or leaving it rubbing against a sharp edge.
The correct clips, supports and weatherproofing depend on the cable, surface and installation. Do not use a generic conduit or sealing prescription without checking the relevant instructions.
For a temporary campsite or parked vehicle setup, check the restrictions of the actual stand or mount. A permanent roof kit is not interchangeable with a portable base. Monitor weather forecasts and arrange any necessary packing away while conditions and access are safe; do not attempt to retrieve equipment from a roof during severe weather.
Vehicle use while moving is a separate application with hardware, mount and service-plan requirements. This guide does not establish that a temporary setup is suitable for in-motion use.
What can you check after bad weather?
Wait until it is safe to assess the installation. Begin with a non-invasive visual check from the ground or another protected position. Follow the manufacturer's maintenance guidance rather than relying on a universal calendar interval.
Look for a noticeable change in position, visible damage, a displaced cable or signs that the roof or fixing area needs attention. Do not touch damaged equipment or climb onto a roof to tighten parts as a first response.
If something appears loose, damaged or inaccessible, arrange an appropriate inspection. Any repair should follow the product and building requirements, including weatherproofing where the installation affects the roof.
Check the app separately for service information. An obstruction or connectivity message can help describe a problem, but it does not prove that wind damaged the mount.
Frequently asked questions
Does a heavy-duty mount guarantee uninterrupted internet in storms?
No. Mount suitability and internet availability are different questions. Correct mounting does not remove obstructions, service outages or every weather-related limitation.
How do I know whether more bracing is needed?
Ask the supplier or an appropriate installer to assess the documented configuration and site. Do not add stays based only on a general online diagram or a nearby installation.
Can I apply a wind rating from another Starlink product?
No. Verify which terminal, mounting assembly and installation conditions a specification covers. If you need a site-specific assessment, seek appropriate professional advice.
What if the app reports a problem after strong winds?
Record the message and any visible change you can observe safely. Use the kit-specific troubleshooting guidance and arrange physical inspection if there are signs of damage. Do not assume every dropout requires a mounting change.
Choose documented compatibility and installation support
A useful wind-protection plan matches the Starlink model, mount, supporting structure and site exposure. Start with the relevant Starlink kit guides and the mount manufacturer's installation documentation.
For help selecting a SpaceTek product, contact the team with your model and installation context. Confirm suitability before permanent work begins, and arrange professional help when exposure, structure or access makes the installation uncertain.


Leave a comment
This site is protected by hCaptcha and the hCaptcha Privacy Policy and Terms of Service apply.