Planning for a Perfect Connection
Wondering how to install Starlink on a tile roof? You're in the right place. For Aussies in rural and remote areas, Starlink is a game-changer, but a proper installation is key to getting the best performance. Here's the quick guide:
- Use the Starlink app to find a location with a clear sky view.
- Choose your mount - a penetrating mount for stability or a ridgeline mount for a no-drill option.
- Gather the right tools, like diamond-tipped drill bits and weatherproof sealants.
- Install safely, using flashing and sealing to prevent water damage.
- Test and adjust for optimal signal strength.
A correctly mounted dish ensures a consistent signal, protects your gear from harsh weather, and prevents costly roof damage. While portable options exist, roof mounting is the gold standard for permanent setups, offering the clearest sky view and most reliable performance. According to Starlink's official support documentation, proper mounting height and obstruction clearance are critical factors for achieving optimal internet speeds.
At SpaceTek Australia, we specialise in mounting solutions that make the difference between a flawless installation and future headaches. Let's walk through what you need for a successful tile roof installation.
Understanding Your Starlink Dish: Models and Mounting Needs
Before you start, it's important to know which Starlink dish you have, as each model has different mounting needs.
- Starlink Standard: The common rectangular dish for residential homes, offering a great balance of performance and practicality for roof mounting.
- Starlink Mini: A compact version, perfect for smaller homes or where a full-sized dish might seem too large.
- Gen 3 Series: The latest models, including standard and mini variants, with improved efficiency and specific mounting requirements. Our SpaceTek Gen 3 mounts are engineered for these.
- Gen 2 Dishes: Older rectangular models that are still excellent performers.
Crucially, each Starlink dish has a unique mounting stem. You can't use a standard TV antenna mount. You need purpose-built hardware designed specifically for your Starlink model.
This is where quality mounting systems are essential. SpaceTek mounts are designed to integrate seamlessly with all current Starlink models, ensuring a secure, stable connection that can handle Australian weather. Choosing the right mount from the start protects your investment and guarantees optimal performance.
Choosing Your Installation Type: Roof, RV, or Portable?
While this guide focuses on tile roofs, it's good to know your options to confirm you're on the right path.
- Fixed Roof Installation: The gold standard for homes. It provides the clearest line of sight, protects cables, and offers rock-solid stability. Tile roofs require special attention to support and waterproofing, but are perfectly manageable with the right hardware.
- RV Installations: Ideal for the nomadic lifestyle. Our Starlink RV and Portability mounts are built to handle the movement and vibration of life on the road.
- Portable Setups: Offer flexibility for camping, temporary work sites, or testing signal strength before a permanent install.
Regardless of your choice, avoiding obstructions is critical. Trees, buildings, and even parts of your own roof can block satellite signals. The Starlink app is your best tool for this, using your phone's camera to scan the sky and identify the perfect spot with clear access. For tile roofs, also consider roof accessibility, tile condition, and structural support.
Pre-Installation: Choosing Your Location and Mount
Planning is crucial when installing on a tile roof, given the fragility of tiles and the risk of water ingress.
Finding the Optimal Spot with the Starlink App
Your first step is to use the official Starlink app. Its "Check for Obstructions" feature uses your phone's camera to show you exactly where trees or buildings might block the signal. Walk around your property and aim your phone at the sky where you plan to mount the dish. The app will highlight problem areas, helping you find a spot with a clear view, especially towards the south in the Southern Hemisphere. The dish must be mounted within 40 degrees of vertical to work correctly.
Understanding the Risks of Drilling into Tiles
Drilling into tiles for a penetrating mount must be done carefully to avoid costly damage.
- Cracked Tiles: Terracotta and concrete tiles can be brittle. Using the wrong drill bit or too much pressure can easily cause cracks.
- Water Leaks: Any hole in your roof is a potential leak. Poor sealing can lead to thousands of dollars in damage to your ceiling, insulation, and timber structure.
- Structural Integrity: Mounts must be secured to underlying rafters or battens, not just the tiles, to withstand strong winds.
These risks are manageable with the right tools and techniques, such as using diamond-tipped drill bits, high-quality silicone sealants, and proper flashing kits.
Choosing the Best Mount for a Tile Roof
Not all mounts are suitable for tile roofs. Here are your main options:
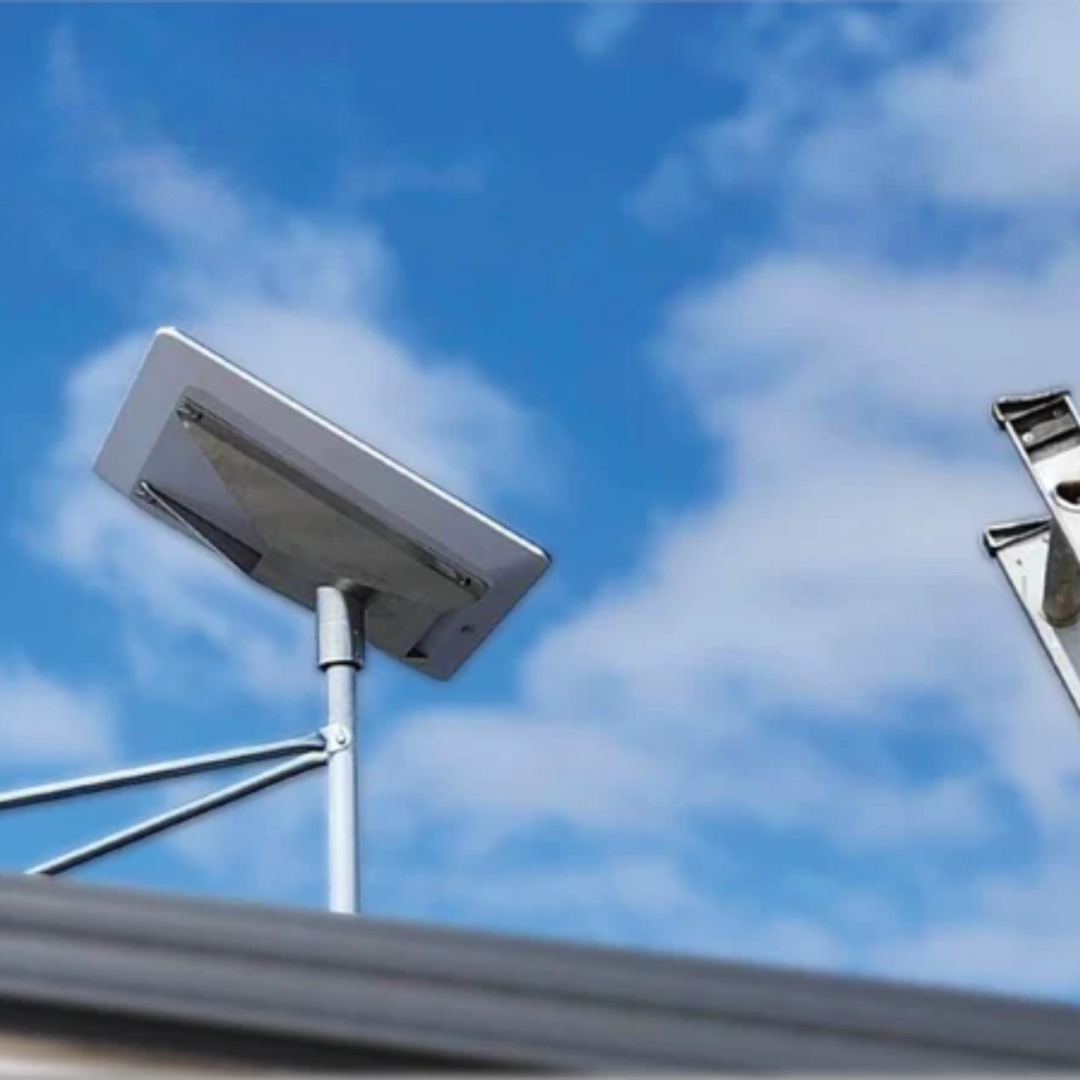
- Penetrating Mounts: These are drilled through the tiles and secured to the roof structure, offering maximum stability. They are the best choice for steep roofs or areas with extreme weather.
- Non-Penetrating Mounts: These sit on the roof without any drilling. The SpaceTek Ridgeline Mount, for example, uses ballast weights to stay secure. This is ideal for renters or anyone wanting to avoid roof penetration.
At SpaceTek, our mounts are engineered for Australian conditions. Whether you choose a penetrating or non-penetrating option, our hardware is designed for durability and straightforward installation. For a full comparison, see our guide to Starlink roof mounts and what you need to know before you buy.
Fixed Roof Installation: Beyond Just Tiles
While this guide focuses on tiles, other fixed installations are common in Australia. Tin roofs are often easier to work with, while wall mounts under eaves can be a great alternative to avoid roof access altogether. Ridge cap mounts offer a high vantage point without drilling through tiles. Each roof type requires specific hardware, but the principles of stability and waterproofing remain the same. Our guide on Starlink Roof Mounts covers all options.
Method 1: Installing Starlink on a Tile Roof with a Penetrating Mount
For maximum stability in high-wind areas or on steep roofs, a penetrating mount is the best choice. This method secures the mount directly to your roof's structure.
Tools and Materials:
- Safety gear (harness, non-slip shoes, gloves)
- Cordless drill and a diamond-tipped tile drill bit
- Stud finder, high-quality silicone sealant, and a flashing kit
- Lag bolts and a socket wrench
The Installation Process:
- Safety First: Always use a fall arrest system when working at height.
- Locate Rafters: Use a stud finder to find the timber beams under the tiles. The mount must anchor to these.
- Drill Pilot Holes: Carefully lift the tile if possible. Use the diamond-tipped bit at a slow speed to drill through the tile. Then, drill a pilot hole into the rafter below.
- Waterproof: This is the most critical step. Apply a generous amount of silicone sealant in and around the holes. Place the flashing over the holes, ensuring it integrates with the surrounding tiles to shed water correctly. Add more sealant under and around the flashing.
- Secure the Mount: Place your SpaceTek mount over the sealed holes and drive lag bolts into the rafters. Tighten until snug, but don't overtighten.
- Route the Cable: Run the cable neatly using clips, avoiding sharp bends. If drilling through a wall, seal the entry point thoroughly.
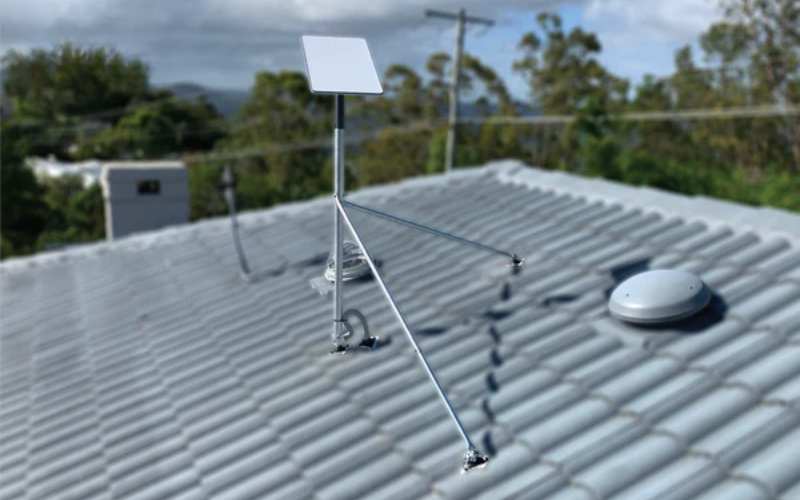
Method 2: Installing Starlink on a Tile Roof with a No-Drill Mount
If you want to avoid drilling, our SpaceTek Ridgeline Mount is an excellent solution. It uses ballast weights for stability, preserving your roof's integrity.
The No-Drill Installation Process:
- Safety First: Even without drilling, roof work requires proper safety gear.
- Position the Mount: Place the mount on your roof's ridge, ensuring the trays on each side sit flush and stable.
- Add Ballast Weights: Place heavy pavers (typically four, totalling around 22kg) into the trays to hold the mount firmly in place.
- Align the Arm: Position the Starlink dish mast in the mount's centre arm, keeping it within 5 degrees of vertical. Tighten the knob to secure it.
- Route the Cable: Run the cable down the roof, securing it with clips to prevent damage.
This no-drill design is also easy to relocate, offering great versatility.
Dish Adjustment: Aligning for Optimal Signal
Once installed and powered on, the Starlink dish will automatically align itself, which can take several minutes. Use the Starlink app to monitor its status and confirm it has a clear view of the satellites. Run the "Check for Obstructions" tool one last time to ensure the final position is clear. As long as the mast is near-vertical, the dish's internal motors will handle the fine-tuning for the best signal.
Starlink on the Move: RV and Portable Setups
Starlink's portability is one of its greatest strengths, and SpaceTek offers solutions for those on the move.
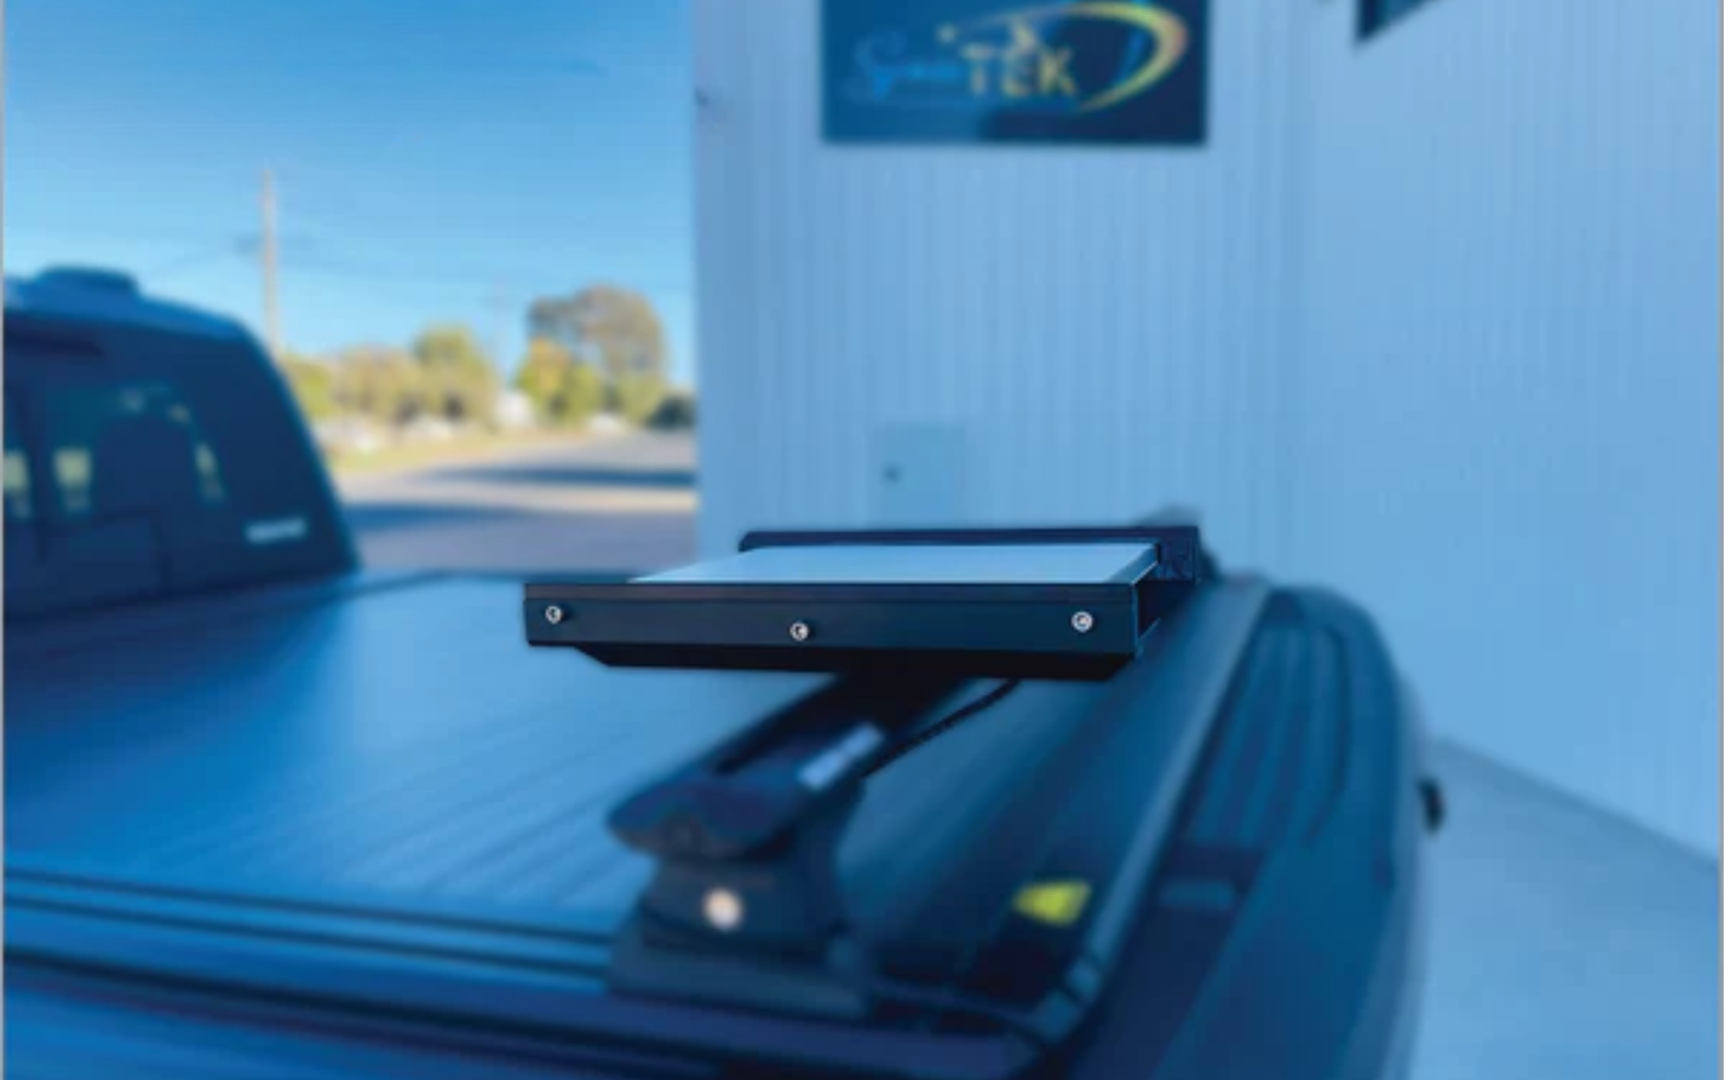
RV Installation
For travellers, we offer mounts that match your style. Our SpaceTek Gen 3 Roof Rack Mobility Mounts are built from rust-resistant stainless steel to handle Australian roads, allowing for in-motion connectivity. For stationary setups when you've parked, our suction cup mounts provide a quick, secure grip on smooth surfaces like your windscreen or RV wall.
Portable Setups
For camping or temporary work sites, a portable setup is ideal. Our mast adapters allow you to use a standard tripod to lift your dish above ground-level obstacles, improving your signal. Setting up takes just a few minutes, giving you a reliable internet connection wherever your adventures take you, with no permanent modifications required.
Tailoring Your Installation: A SpaceTek Mount for Every Need
Choosing the right mount ensures years of reliable performance. At SpaceTek, we've designed a comprehensive range to match every Australian installation scenario, from tile and tin roofs to RVs and portable setups.
Your Starlink model and roof type determine the best solution. Gen 3 dishes require our latest mounts, while the compact Starlink Mini is perfect for portable use. Here’s a quick guide to matching a SpaceTek solution to your needs:
| Installation Type | Best For | Recommended SpaceTek Solution |
|---|---|---|
| Tile Roof - Permanent | Homeowners wanting maximum stability | Ridgeline Mount (no-drill) or Penetrating Mount with flashing |
| Tin Roof - Permanent | Rural properties, sheds, workshops | Corrugated roof clamps or flashed penetrating mounts |
| RV/Caravan - Mobile | Grey nomads, mobile workers | Gen 3 Roof Rack Mobility Mount or suction cup solutions |
| Portable - Temporary | Campers, temporary sites, renters | Mast adapters with tripods or portable base kits |
| Wall/Eave Mount | Limited roof access, shallow overhangs | Wall mount adapters with weatherproof sealing |
Every SpaceTek mount is built from premium materials like marine-grade aluminium and stainless steel, engineered to handle everything from tropical cyclones to alpine snow. Our mounts work seamlessly with Starlink's plug-and-play approach, adding professional-grade stability for optimal performance.
Alternatives, Long-Term Care, and Final Thoughts
Successfully installing your Starlink is just the beginning. Ensuring it performs reliably for years is the real goal.
When Tile Roof Installation Isn't Right
If a tile roof mount isn't suitable, you have other great options. Wall mounting is an excellent alternative if roof access is difficult, and can be securely attached to fascia boards or external walls. Ground pole mounting is perfect if you have yard space and want to keep the dish separate from your house structure. Our guide on Roof vs. Pole Mounts can help you decide.
Protecting Your Investment: Long-Term Maintenance
Proper maintenance protects your investment. Here are a few tips:
- Annual Inspections: Check for cracked sealant, loose fasteners, or tile damage.
- Sealant Refresh: Australian UV is harsh. Expect to refresh silicone sealing every 2-3 years.
- Fastener Check: Re-tighten lag bolts every 1-2 years to counteract loosening from vibration and thermal expansion.
- Dish Cleaning: Remove dust and debris quarterly to maintain signal quality.
Safety Throughout Your Starlink Journey
Always prioritise safety when working on a roof. Use stable ladders, wear proper footwear, and consider professional installation if you're uncomfortable with heights. The peace of mind often justifies the cost.
At SpaceTek Australia, our mounts are built to last in Australian conditions. Proper installation and maintenance will transform your Starlink into a permanent, reliable connectivity upgrade.
Conclusion
Getting your how to install starlink on tile roof setup right is the key to a fantastic internet experience. Whether you choose a penetrating mount for ultimate stability or our no-drill Ridgeline Mount, a proper installation ensures consistent speeds and protects your home from damage.
At SpaceTek Australia, we design our high-quality aluminium and carbon fibre mounts specifically for the harsh Australian environment. They resist rust, handle extreme weather, and integrate perfectly with the Starlink hardware, keeping Aussies connected from the suburbs to the outback.
While tile roofs are a common choice, wall mounts, pole mounts, and our mobile RV solutions offer flexibility for any situation. The key is choosing the right solution for your property.
For expert advice custom to your home and circumstances, contact SpaceTek directly. Our team understands Australian conditions and is here to help you achieve the perfect Starlink installation.
Leave a comment
This site is protected by hCaptcha and the hCaptcha Privacy Policy and Terms of Service apply.