Why Proper Planning Makes All the Difference
Effective Starlink setup tips can transform your internet experience from one of frustrating dropouts to reliable, high-speed connectivity. For any location in Australia, a successful installation depends on three critical factors: securing an unobstructed view of the sky, selecting the correct mounting solution, and implementing proper cable management.
Quick Starlink Setup Essentials:
- Clear Sky Access: Ensure a 100-degree cone of unobstructed sky view.
- Stable Mounting: Use weatherproof, rust-resistant mounting systems.
- Proper Cabling: Route cables safely with appropriate weatherproofing.
- Location Testing: Test placement before permanent installation.
- App Configuration: Use the Starlink app for obstruction checking and setup.
- Performance Monitoring: Allow 12 hours for system optimisation.
A successful Starlink installation involves more than unpacking the dish and connecting it to power. Poor placement can cause frequent dropouts, while inadequate mounting solutions may fail under Australia's harsh weather. Reliable connectivity often depends on using the right accessories and following proven installation practices.
SpaceTek Australia was founded on over 25 years of experience in satellite communications and remote connectivity. Our expertise comes from designing and testing mounting systems across diverse Australian environments, from coastal properties battling salt corrosion to rural stations enduring extreme temperature variations.

Getting Started: Pre-Installation Checks and Planning
Proper planning is the key to a successful Starlink installation. Before touching any hardware, investing time in pre-installation checks helps avoid common issues like signal dropouts and poor performance. This preparation phase is critical for achieving reliable, high-speed internet, whether you are setting up Starlink in Australia on a remote property or in a suburb.
The Golden Rule: Securing a Clear View of the Sky
Your Starlink dish requires an unobstructed view of the satellites. Obstructions are the primary cause of performance problems. The system needs a 100-degree cone of clear sky, which is a view above 20 degrees of elevation in all directions. Common obstructions include trees, buildings, and power lines.
The Starlink app includes an obstruction checker tool. Use your smartphone's camera to scan the sky from a proposed installation site to identify potential interference. Testing multiple locations is a crucial step. SpaceTek's custom mounts are designed to lift your dish above local obstructions, securing the necessary clear view. For more information on avoiding interference, the Australian Communications and Media Authority provides helpful resources. Our tips for clear sky installation also offer specific advice.
Your Essential Pre-Setup Checklist
Proper preparation ensures a smooth installation. Have these items ready:
- SpaceTek Starlink Mount Kit: Our custom-engineered mounts provide the stability and durability required for Australian conditions.
- Smartphone with Starlink App: Download the app and log in to your account. It is essential for every step of the process.
- Reliable Power Source: Identify an accessible AC power outlet near your chosen location.
- Location Testing: Perform a temporary setup to test performance before committing to a permanent installation. The initial connection can take up to 20 minutes.
- Performance Optimisation: Allow the system up to 12 hours to collect data and optimise its performance after the initial setup.
Choosing the Right Location for Your Dish
Optimal dish placement varies between rural properties and urban settings. Remote locations often have open skies but may face challenges from tall trees or distant ridges. In these cases, gaining elevation with a pole or roof mount is vital.
Urban installations must contend with nearby buildings and limited space. Wall mounts or low-profile roof mounts are often suitable, but careful obstruction checking is paramount. In any setting, height is the key to overcoming obstructions. SpaceTek mounts provide the necessary elevation while ensuring structural integrity and stability against wind exposure. Our guide on choosing the best location for your Starlink dish provides more detailed advice.
A Guide to Mounting and Essential Starlink Setup Tips
With planning complete, the next phase is the physical installation. This process involves assembling and securing the mount, connecting the hardware, and activating the system. SpaceTek's custom-engineered solutions simplify this process, enabling a secure, professional-grade installation.
Step-by-Step: From Box to Broadband
Follow these steps for a methodical installation:
- Unbox and Assemble: Familiarise yourself with the components of your SpaceTek Starlink Mount Kit and assemble it according to the included instructions.
- Position and Secure: Place the mount in your pre-tested location. Secure it firmly to the surface using appropriate hardware, such as lag bolts for timber or masonry anchors for brick.
- Connect Dish and Cables: Seat the Starlink dish into the mount's adapter. Connect the cable to the system's indoor unit, ensuring there is no strain on the connection points.
- Power On and Activate: Connect the system to a power source to begin the automated startup sequence. The dish will begin to align itself.
- Configure and Monitor: Use the Starlink app to set up your Wi-Fi network. The system will then require up to 12 hours to map obstructions and optimise performance.
Our detailed resource covers every aspect of how to set up Starlink in Australia.
Essential Starlink Setup Tips for a Secure Installation
The choice of mount is fundamental to your system's long-term reliability. SpaceTek offers a range of solutions for different Australian environments:
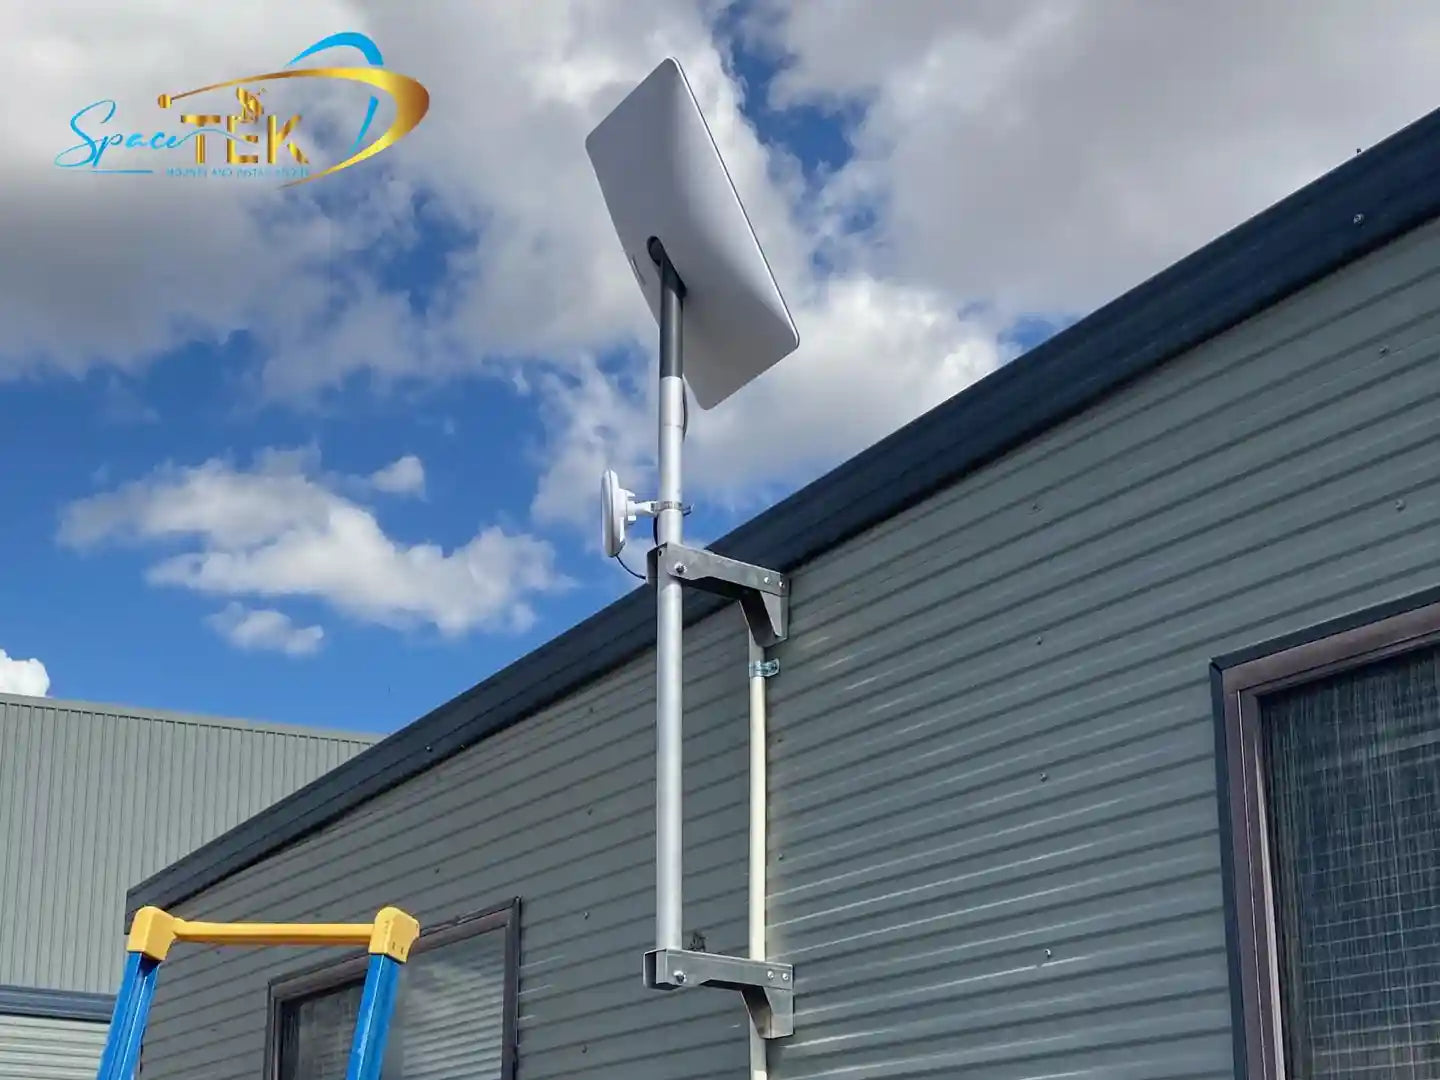
- Roof Mounts: Ideal for gaining maximum elevation to clear obstructions, especially in suburban areas.
- Pole Mounts: Offer flexibility for properties where a building-mounted solution is not feasible, providing significant height and stability.
- Wall Mounts: A suitable option for urban settings with space constraints, offering a discreet yet robust mounting solution.
All SpaceTek mounts are designed for permanent installation, using premium materials resistant to rust, corrosion, and UV degradation to withstand Australia's harsh climate. For help choosing, see our guides on roof vs. pole mounts and our SpaceTek Starlink mounting kits.
Practical Starlink Setup Tips for Cable Routing
Proper cable management is crucial for a professional and durable installation. The Starlink cable is the system's lifeline and requires careful handling.
Plan your cable's entry point into the building, which requires a hole of at least 19.05mm. Seal the entry point thoroughly with a high-quality outdoor sealant to prevent water and pest ingress. Avoid damaging the cable by preventing sharp bends, crushing, or excessive tension. Secure the cable with UV-resistant clips to prevent movement from wind. For more on cable management solutions, explore our guide to SpaceTek Starlink accessories.
Starlink in Australia: Solutions for Remote and Urban Communities
The introduction of Starlink in Australia has significantly improved internet access across the continent, from remote regions to urban fringes. It provides a vital service where traditional infrastructure is lacking.
Bridging the Digital Divide in Remote Australia
For many, Starlink for Remote Australia is a lifeline, closing the digital gap caused by slow or non-existent terrestrial internet services. It enables access to education, telehealth, and economic opportunities that were previously out of reach.
However, the Australian environment poses significant challenges to satellite equipment. Extreme heat, dust, and high winds can damage improperly mounted hardware. SpaceTek custom mounts are engineered specifically to withstand these conditions, ensuring a stable connection.
Custom Solutions for All Environments
Starlink for Remote Communities, such as cattle stations and mining camps, requires robust mounting solutions that can handle severe weather and require minimal maintenance. Our mounts are made from rust-resistant materials to combat corrosion, particularly in coastal areas.
Urban installations also benefit from this durable engineering. While the challenges in cities relate more to aesthetics and space, the need for a secure mount that can withstand storms and high winds remains. SpaceTek's wall and roof mounts are designed to be visually unobtrusive while providing the same level of stability as our remote solutions. Our team can help you select the right mount for your needs when you contact SpaceTek Australia.
Maximise Your Starlink Performance
After installation, ongoing monitoring and optimisation are key to getting the best performance from your Starlink system. A secure SpaceTek mount provides the stable foundation needed for consistent connectivity.
Understanding Your Performance Metrics
The Starlink app provides essential performance data, including download/upload speeds, latency, and obstruction mapping. For a more detailed view, steer to dishy.starlink.com in a web browser. After installation, allow up to 12 hours for the system to generate a complete obstruction map. If this map shows any red areas, you may need to relocate the dish or use a taller mount to clear the obstacles.
System Updates and Wi-Fi Coverage
Starlink automatically deploys firmware updates to improve performance. Ensure your system remains powered on to receive these updates. While the Starlink system provides Wi-Fi, larger properties may require a mesh Wi-Fi network to ensure strong signal strength throughout. Our guide on boosting Starlink Wi-Fi offers strategies for extending your network.
Power Solutions for Remote Installations
For off-grid locations, Starlink for Remote Australia can be powered efficiently using a DC power supply, which is ideal for solar or battery systems. This method reduces power conversion losses. Our guide on powering Starlink directly from DC provides detailed instructions.
For personalised advice on optimising your setup, contact SpaceTek Australia. You can also browse our comprehensive guide to compatible Starlink mounts and adapters to find the right accessories for your system.
Stay Connected, No Matter Where You Are
Following correct Starlink setup tips is essential for achieving reliable, high-speed internet across Australia's diverse landscapes. A successful installation is built on a foundation of careful planning, from securing an unobstructed sky view to proper cable management.
The most critical factor for long-term performance is a secure mounting solution designed for Australian conditions. SpaceTek's custom-engineered mounting kits provide the stability and durability your Starlink system requires. Our rust-resistant materials withstand coastal salt spray, while our robust designs handle the high winds common on rural properties.
Whether you are connecting a remote cattle station or improving internet access in a suburban home, our mounting solutions provide the reliable foundation needed for optimal performance. This ensures that the vital connectivity Starlink for remote communities provides remains stable, regardless of environmental challenges.
SpaceTek Australia is committed to helping all users maximise their Starlink performance. For personalised advice on selecting the right mounting solution for your specific situation, please contact SpaceTek Australia.
For further technical and regulatory information, the Australian Communications and Media Authority – Satellite Services provides useful guidance.


Leave a comment
This site is protected by hCaptcha and the hCaptcha Privacy Policy and Terms of Service apply.