
Why a Starlink Roof Bracket Matters for Your Connection
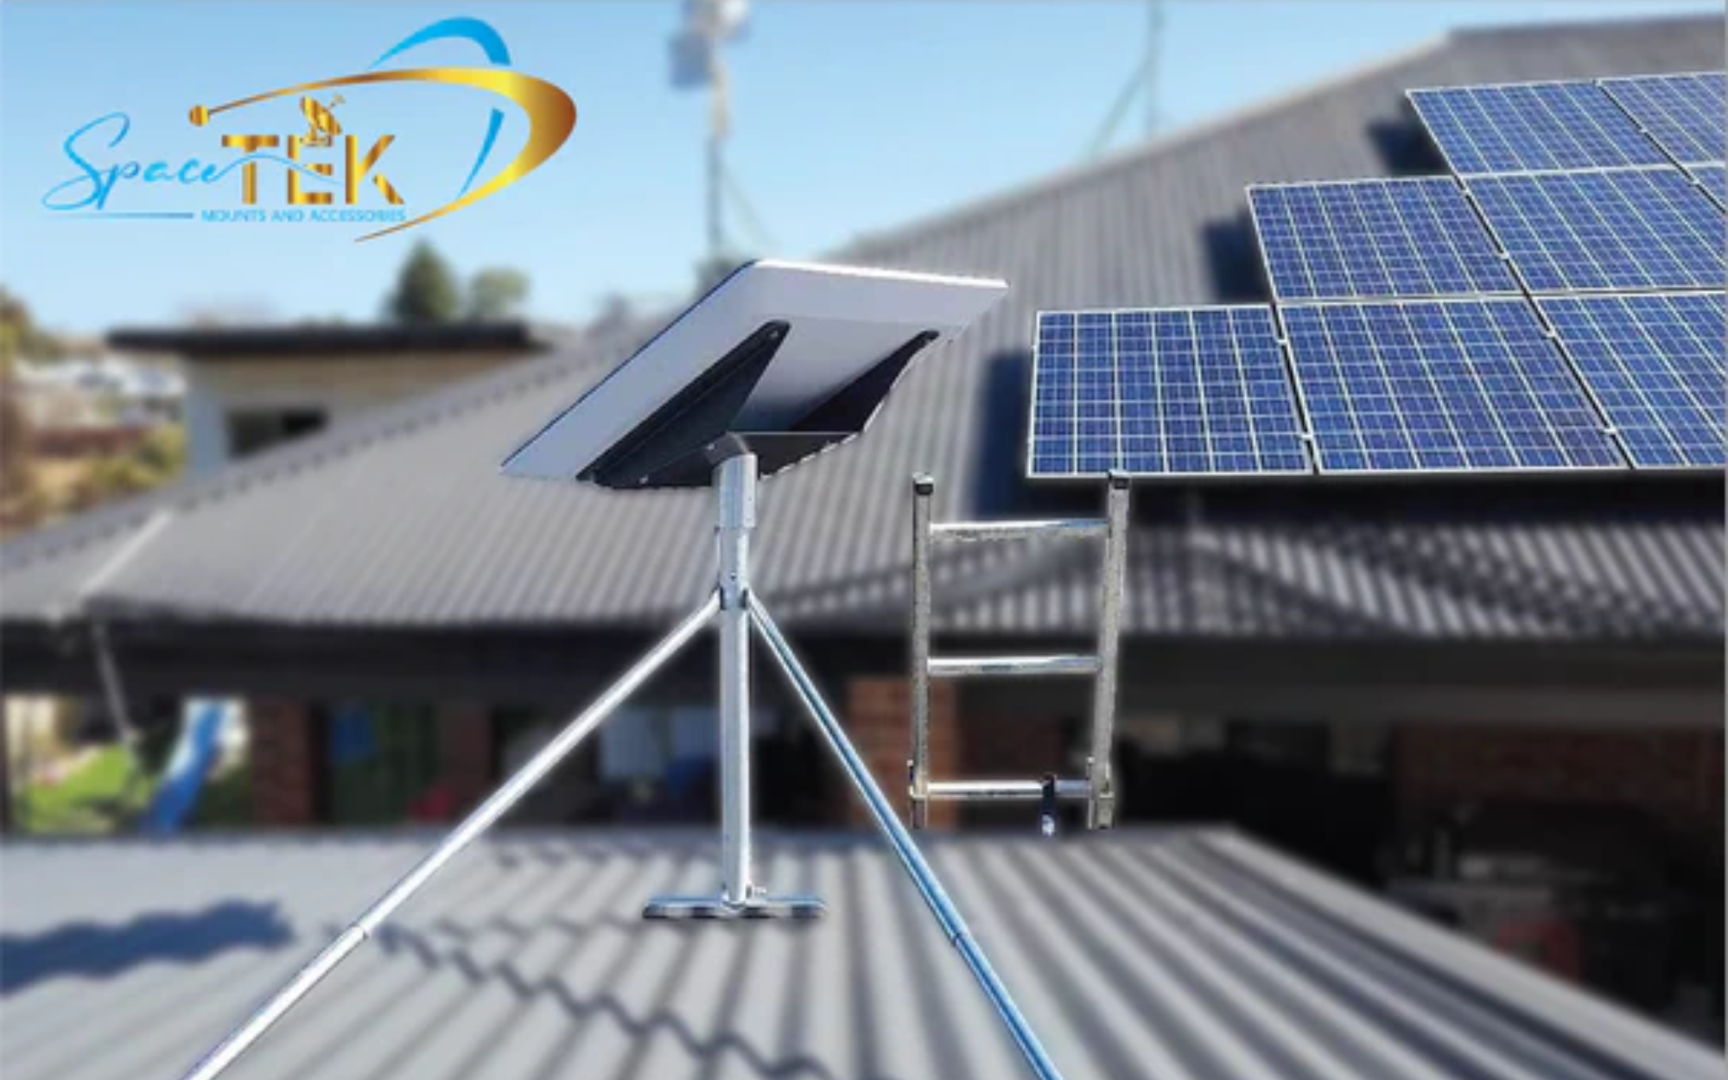
A Starlink roof bracket is essential for securing your dish and elevating it above obstructions for the best possible signal. For a permanent and reliable installation, a dedicated roof mount is crucial for long-term performance.
Key Benefits:
- Better Signal: Lifts your dish above trees and buildings to prevent dropouts.
- Stability: Engineered to withstand harsh Australian wind and rain.
- Permanent Solution: A secure, long-term installation for optimal performance.
A dedicated roof bracket solves connection vulnerabilities by lifting your dish high above obstructions like trees, buildings, or even your own roofline, and keeping it secure through any weather.
I'm Aaron Wroblewski, founder of SpaceTek Australia. With 25 years of experience in satellite systems, I started SpaceTek to provide Starlink roof brackets designed specifically for Australian conditions after seeing too many inferior mounts fail in our climate.
For background on how Starlink actually connects to the satellite network, you can learn more about satellite Internet and why line-of-sight matters so much.
If you are weighing up whether to invest in a dedicated roof mount, our guide Why Invest in a Starlink Roof Mount Kit breaks down the pros, cons, and typical use cases in detail.
Starlink roof bracket further reading:
Your Guide to Selecting the Perfect Starlink Roof Bracket
To open up Starlink’s full potential, your dish needs a clear, unobstructed view of the sky. A dedicated starlink roof bracket is the key to achieving this, offering significant advantages for a permanent installation.
Why a Dedicated Mount is a Game-Changer
- Signal Optimisation: A roof mount lifts your dish above trees and buildings, ensuring a clear line of sight to satellites for faster, more reliable internet.
- Weather Stability: Our mounts are designed for Australian conditions, securely anchoring your dish against high winds and heavy rain.
- Long-Term Security: A permanent installation protects your Starlink equipment from damage, theft, and accidental knocks.
- Obstruction-Free View: Elevating your dish is the best way to get the "no obstructions" status in the Starlink app, which is required for peak performance.
Decoding the Different Types of Roof Mounts
With various roof types and Starlink dish generations (Gen 2, Gen 3, and Mini), choosing the right mount is crucial. We design solutions for all Australian conditions.
- Mounts for Different Roofs: We offer non-penetrating mounts for flat roofs to avoid drilling, ridge mounts for the peak of a gable roof, and pivot mounts for angled surfaces. We also have specialised solutions for tile and metal roofs.
- Mounts for Different Generations: Whether you have the standard Gen 2 dish, the newer Gen 3 model, or the compact Starlink Mini, select a compatible mount. We provide custom mounts for all versions, ensuring a perfect fit. For more on the latest model, see our guide: Mounting Starlink Gen 3 in Australia Made Easy.
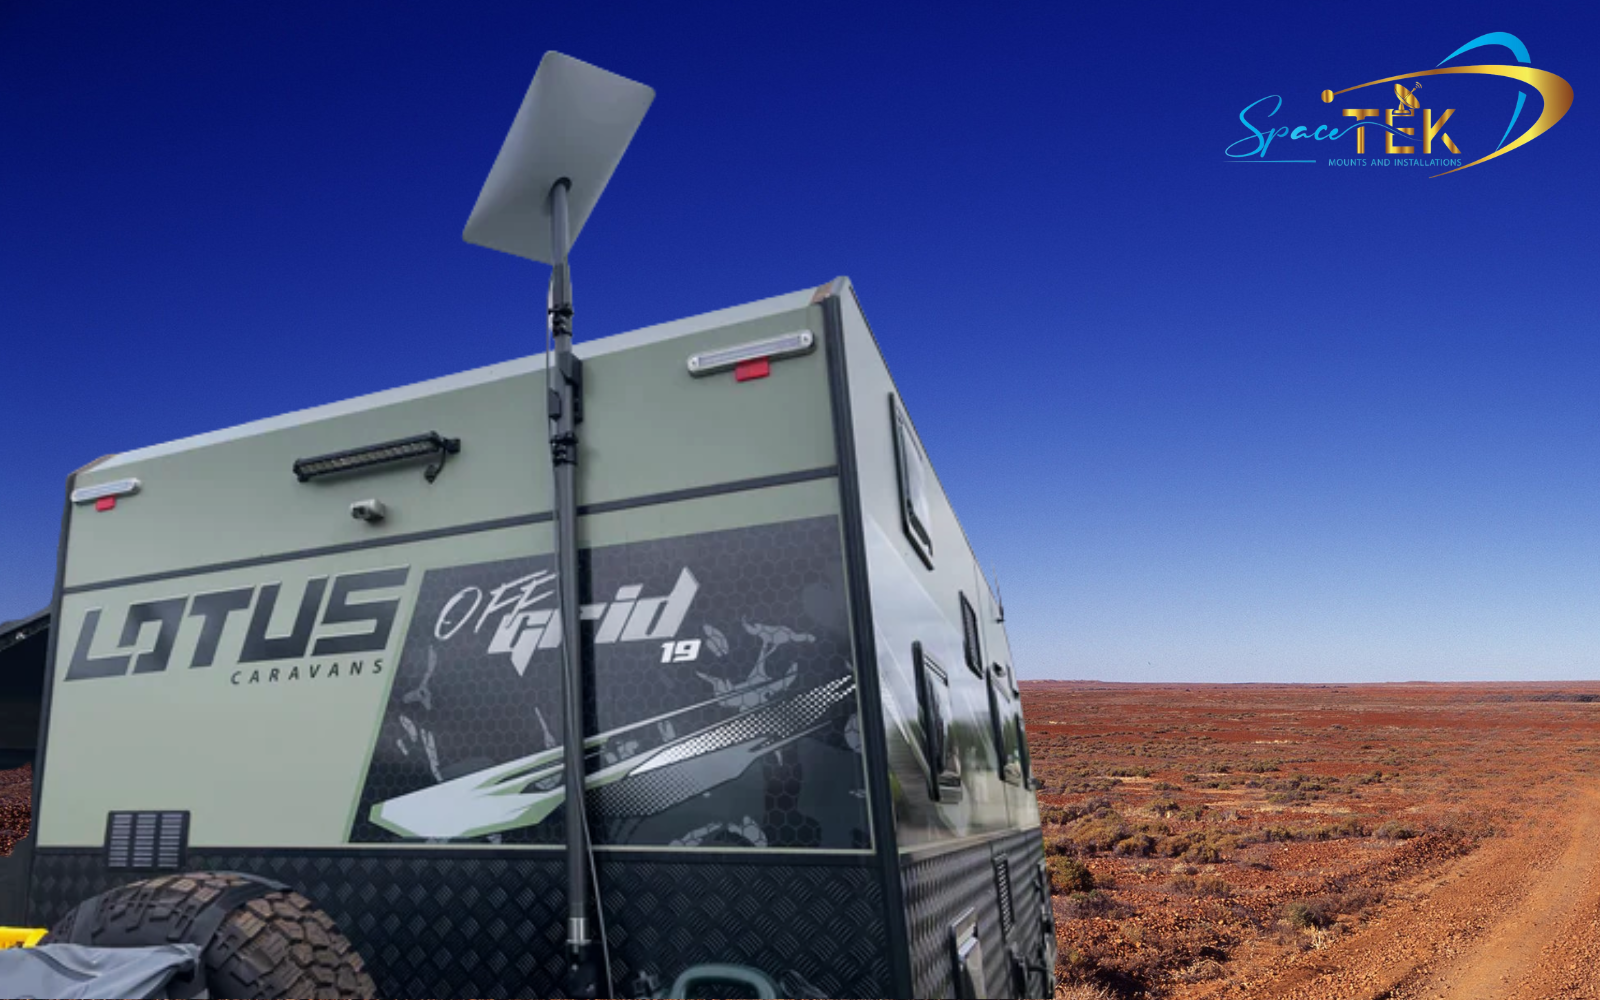
- Mounts for Portability: For those on the move in RVs or caravans, we have specialised roof rack and mobility mounts designed to withstand the rigours of travel while providing a secure, waterproof installation.
- Adapters for Existing Poles: If you have a sturdy, existing metal pole (like an old antenna mast), a pipe adapter can be a simple and effective solution.
For a deeper dive into the roof versus pole mount debate, check out our guide: Roof vs. Pole Mounts: Which One's Best for Your Starlink Setup.
Must-Have Features for Your Starlink Roof Bracket
- Premium Materials: Look for hot-dip galvanised steel or high-grade aluminium for superior corrosion resistance against the harsh Australian sun and salt spray.
- Durability: The mount must be robustly constructed to support the dish without flexing, especially in high winds.
- Compatibility: Ensure the mount is designed for your specific Starlink dish version (Gen 2, Gen 3, or Mini).
- Weatherproofing: Any mount that penetrates the roof must include quality sealing components like rubber pads or mastic tape to prevent leaks.
Finding the Sweet Spot: Installation Basics
Before installation, use the Starlink app's obstruction checker to find the location with the clearest sky view. Safety is paramount when working on a roof; if you're not comfortable, contact a professional.
The basic process involves assembling the mount, securing it to the roof (sealing any holes properly), routing the cable, and clicking the dish into place. For detailed instructions on installing our mounts, refer to the guides included with your SpaceTek product.

The Practicalities: Costs, Challenges, and Long-Term Care
Installing a Starlink roof bracket involves practical considerations about your roof type, budget, and ongoing care.
Navigating Roof Types and Installation Challenges
Different Australian roofs require specific mounting solutions to ensure stability and prevent leaks.
- Pitched and Flat Roofs: Pivot and ridge mounts work well for pitched roofs, while non-penetrating mounts are ideal for flat roofs to avoid drilling.
- Tile and Metal Roofs: These common Australian roof types can be challenging. Specialised mounts are needed to attach securely without damaging tiles or compromising the waterproofing of a metal roof. Our SpaceTek mounts are engineered for this purpose.
- Preventing Leaks and Damage: Always attach mounts to structural elements like rafters and use high-quality sealants for any penetrations. This maintains your roof's integrity and prevents water damage.
For detailed guidance, read our article: How to Choose the Right Starlink Mount for Your Roof Type in Australia.
The Bottom Line: Care and Your Connection
- Signal Improvement: A properly installed roof mount is the single best thing you can do to improve signal reception, leading to fewer dropouts and more consistent speeds.
- Minimal Maintenance: Quality mounts made from galvanised or stainless steel require little upkeep. A visual inspection after severe weather is a good practice.
- DIY vs. Professional: While many mounts are DIY-friendly, consider hiring a professional if you're uncomfortable with heights or roof work to ensure a safe and secure installation.
For custom advice on the best mount for your home, get in touch with our team.
Conclusion: Secure, Reliable, and Built for Australia
Choosing the right Starlink roof bracket is a crucial investment in your internet connection and your home's integrity. A dedicated mount provides the elevation and stability needed for optimal performance in Australia's challenging weather, safeguarding your Starlink system.
At SpaceTek Australia, we deliver secure, rust-resistant, and user-friendly mounting solutions designed and tested for local conditions. Ensure a stable, long-term connection by choosing a permanent solution engineered for durability.
For expert advice and support customised to your needs, contact us today.
Leave a comment
This site is protected by hCaptcha and the hCaptcha Privacy Policy and Terms of Service apply.