
Why Your Starlink Gen 3 Mount Kit Choice Matters More Than You Think
To secure your Gen 3 dish to a fixed or mobile surface and prevent wind movement, misalignment, or signal dropout, you need a dedicated Starlink Gen 3 mount kit, a specialised hardware system designed to anchor your dish to corrugated iron roofs, caravan drawbars, or marine vessels. Without the right mount, your dish is vulnerable to the elements, making a proper installation essential for reliable high-speed internet.
Here are the most common Starlink Gen 3 mount types to help you choose quickly:
- Roof mount: ideal for permanent residential installs on metal or tile roofs
- Wall mount: suits structures where roof access is limited; supports up to 100mm overhang
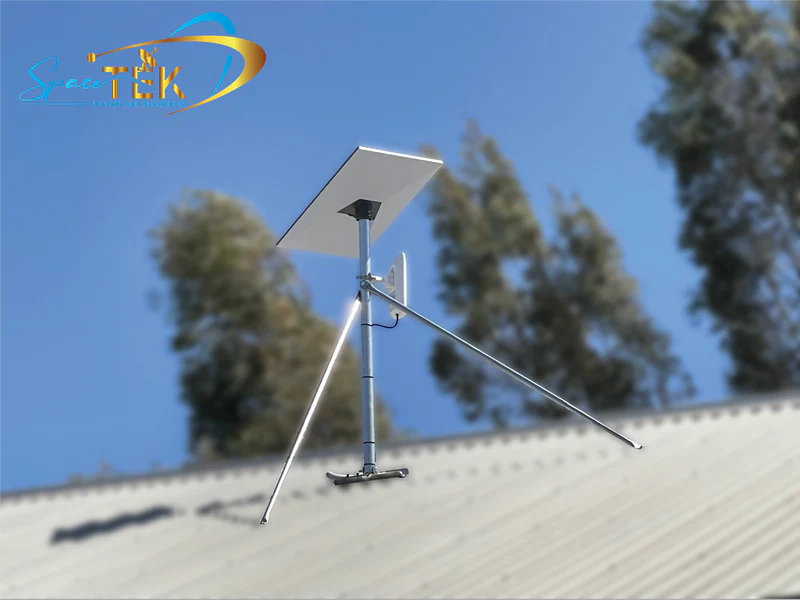
- Pole or mast mount: best for open paddocks or elevated installs; requires a metal pole between 31mm and 63.5mm diameter
- Pivot mount: designed for angled or sloped roofs; adjusts dish tilt for optimal signal
- Ridgeline mount: no-drill option using ballast weights; rated to 80 kph wind
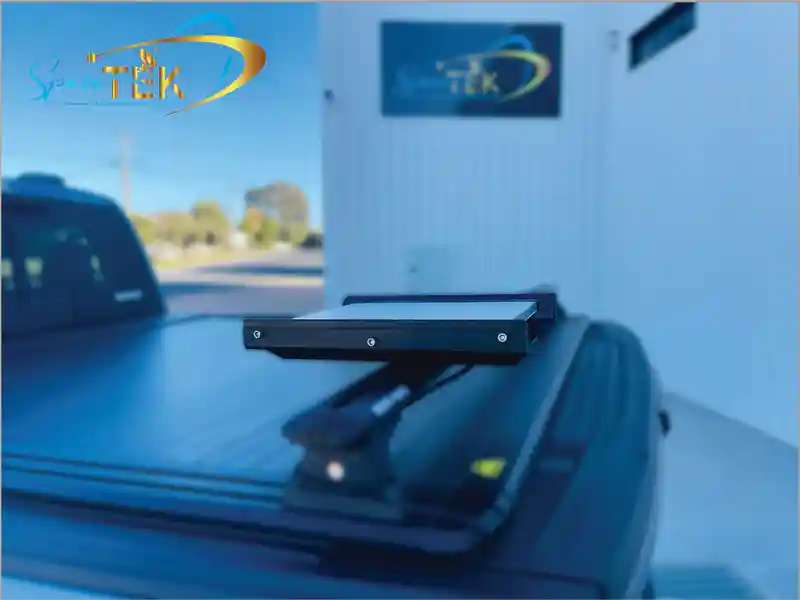
- Mobile/flat mount: for caravans, RVs, and marine use; attaches via magnets, suction cups, or VHB adhesive
- Pipe adapter mount: connects the Gen 3 dish to an existing pole; metal poles only, not PVC
The Gen 3 dish measures 59.5 cm x 38.2 cm and weighs approximately 3.9 kg, and its flat, low-profile design means it needs a mount purpose-built for its dimensions. Older Gen 2 mounts generally won't cut it.
For Remote Resident Rob out in rural Australia, getting this choice right the first time saves a lot of frustration. A poorly mounted dish in a storm can mean days without connectivity, and out bush, that's not just an inconvenience.
SpaceTek Australia specialises in Australian-designed Starlink dish mounts built from precision-folded aluminium and powder-coated steel, not flimsy plastic, engineered specifically for harsh Aussie conditions from coastal winds to outback heat.
What is a Starlink Gen 3 Mount Kit and Why Do You Need One?
When you unbox your new Starlink Standard V4 hardware, you will notice that it comes with a simple, integrated kickstand. While this kickstand is fantastic for temporary setups on a flat lawn or a picnic table, it is not a long-term solution for permanent residential or mobile installations.
A dedicated Starlink Gen 3 mount kit is essential because it transitions your dish from a temporary ground-level device to a permanently secured, elevated system. Elevating your dish is the single most effective way to clear local obstructions like trees, fences, and neighbouring structures. Because the Gen 3 dish relies on a wide, clear view of the sky to communicate with the constellation of over 6,000 satellites in orbit, even a minor obstruction can cause frustrating dropouts.
Furthermore, permanent outdoor installations must withstand extreme weather conditions. The Gen 3 dish weighs nearly 4 kg and has a flat surface area that acts like a sail in high winds. A quality mount ensures that your hardware remains rock-solid during heavy storms, preventing physical damage and maintaining a stable connection. For a comprehensive look at what accessories you need to complete your setup, read The Ultimate Guide to Starlink Gen 3 Compatible Accessories: Get Yours Now at SpaceTek Australia.
Upgrading from Gen 2 to Gen 3
If you are upgrading from the older Gen 2 hardware, you need to be aware of several physical and mechanical differences. The Gen 2 dish featured an actuated motor that automatically rotated and tilted the dish to find the signal. The Gen 3 dish, however, is completely manual. It relies on its wide-angle field of view and requires you to manually align the dish during the initial setup using the Starlink app.
According to the official Starlink specifications, the Gen 3 dish is physically larger and heavier than its predecessor. Because the Gen 2 dish utilized a round, motorized mast that clicked into its mount, those older mounts are not directly compatible with the kickstand-style base of the Gen 3 dish. To reuse an existing mast or mount, you will need a specialized pipe adapter designed to securely grip the bottom of the Gen 3 dish and clamp onto your old pole.
Choosing the Right Starlink Gen 3 Mount Kit for Your Setup
Every installation environment presents unique challenges. Choosing the right mount depends heavily on where you live, how your home is constructed, or how you travel.
- Corrugated and Trimdeck Metal Roofs: Very common across Australia. These require heavy-duty mounts that can be anchored directly into the timber rafters or steel purlins beneath the metal sheeting.
- Tile Roofs: Require specialised tile roof mounts that slide under the tiles to bolt directly to the rafters, ensuring a waterproof seal.
- Caravans and RVs: Demand ultra-low-profile flat mounts, heavy-duty magnets, or suction cups that can handle highway speeds and constant vibration.
- Coastal and High-Wind Areas: Require marine-grade, rust-resistant materials like powder-coated aluminium to survive the salty air and intense storms.
If you are planning a residential roof installation, check out our detailed resource: Raise the Roof: A Guide to Starlink Gen 3 Roof Mount Kits.
Key Features of a Premium Starlink Gen 3 Mount Kit
When browsing for a mount, it is easy to get enticed by cheap generic options online. However, outdoor satellite hardware is constantly exposed to harsh UV rays, rain, and wind. A premium mount should feature:
- High-Quality Materials: Look for precision-folded aluminium or powder-coated galvanised steel. Avoid cheap 3D-printed plastic mounts, which degrade rapidly under the harsh Australian sun.
- Dual-Axis Adjustability: This allows you to adjust both the tilt and the rotation of the dish, making it easy to align your hardware perfectly even if your roof or wall is sloped.
- Secure Locking Mechanisms: Gear-locking designs or heavy-duty bolts prevent the mount from slipping or changing angles over time due to wind vibration.
Official vs. Third-Party Starlink Gen 3 Mount Kit Options
SpaceX offers its own range of official mounts, which are generally well-designed but can be difficult to source quickly in Australia and may not always suit local building practices.
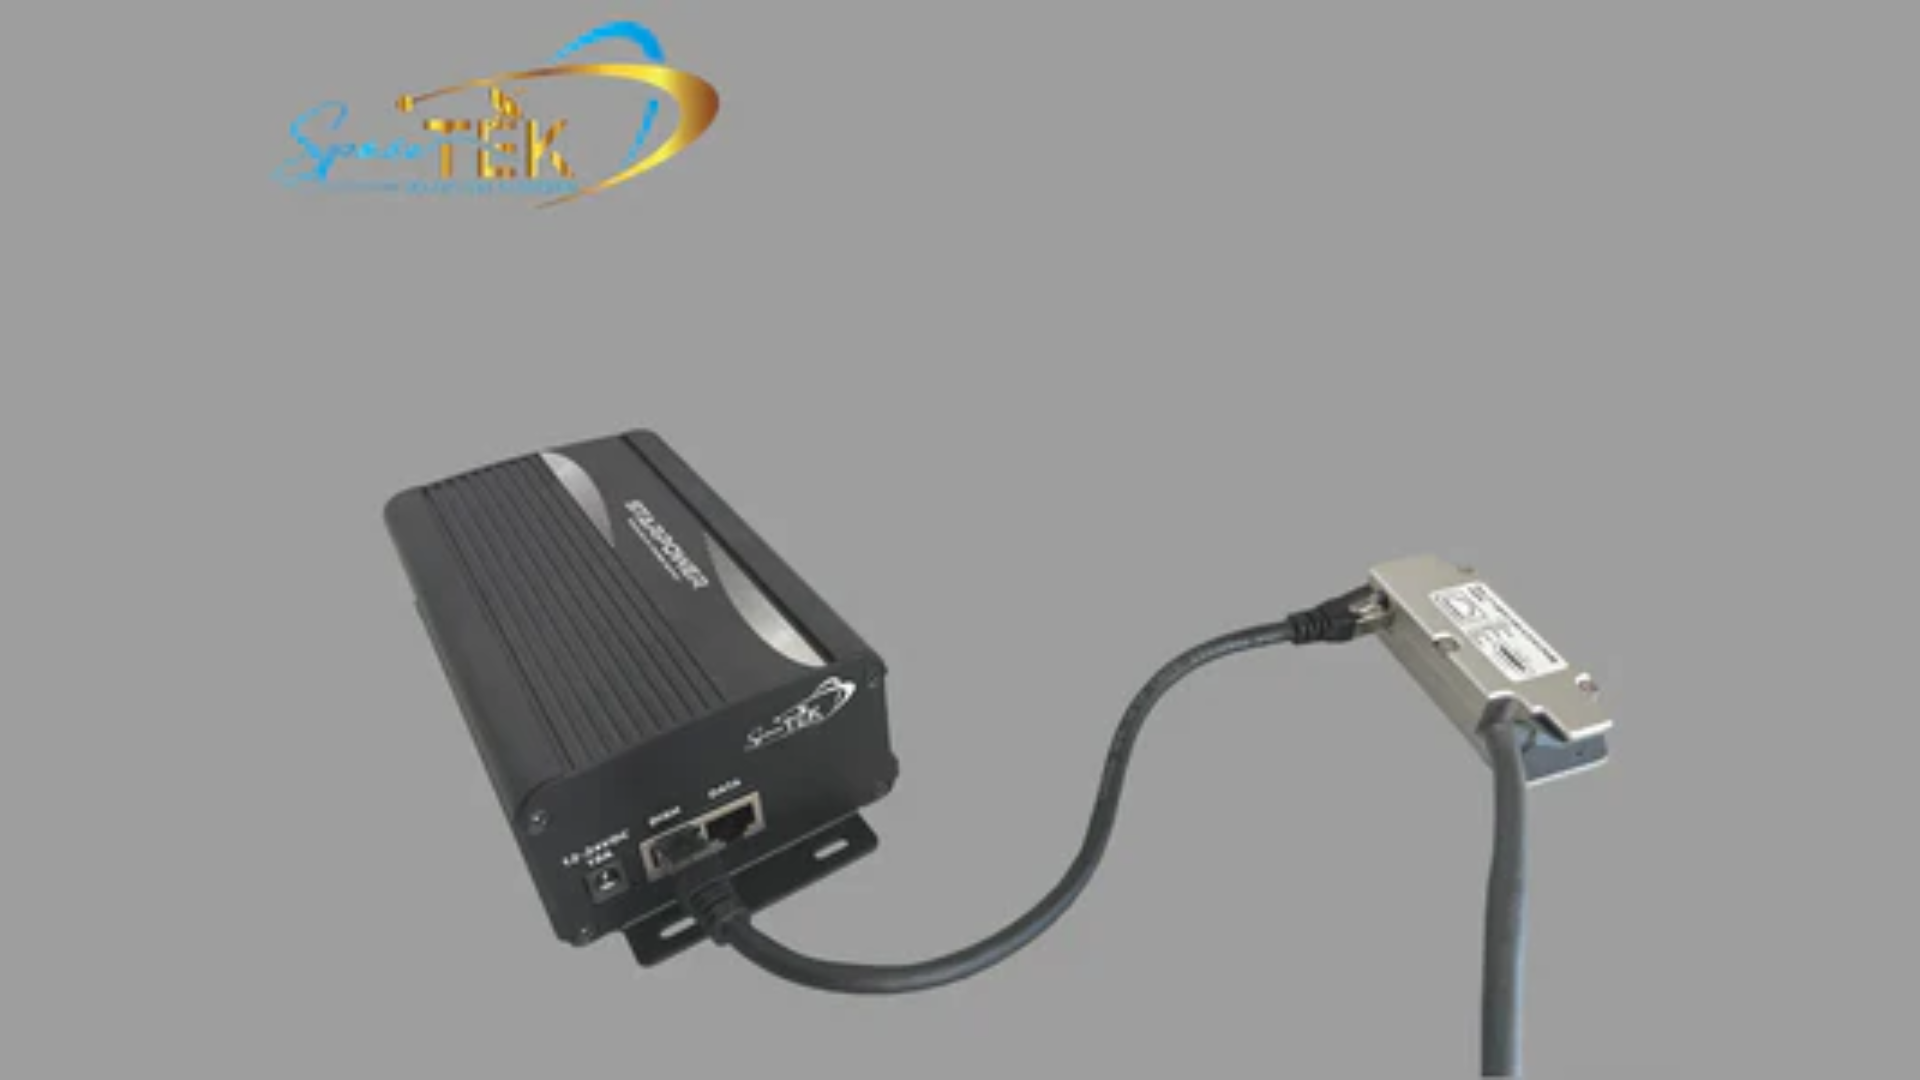
Our third-party SpaceTek Australia mounts are engineered specifically for Australian homes and mobile rigs. We use heavy-gauge, marine-grade aluminium and structural powder coating to ensure our mounts outlast standard steel alternatives. Additionally, our mobile mounts are designed to integrate seamlessly with custom off-grid setups, such as our StarPower V2 and V3 DC power supplies. These systems allow you to run your Starlink directly from a 12V or 24V caravan battery system, offering significant DC-to-DC efficiency advantages over traditional AC inverters that waste power during conversion. To learn more about setting up your system for off-grid travel, read our Starlink Gen 3 12V Complete Guide.
Key Installation Locations and Mount Types

Roof and Wall Mounts for Residential Use
For standard homes, roof and wall mounts are the most popular choices. A wall mount is perfect for homes with a clean gable end or fascia board. It allows you to mount the dish high on the side of the house, bypassing the need to walk on the roof. Our wall mounts provide plenty of clearance to overhang gutters and eaves up to 100mm.
If you prefer a roof installation, using a pivot mount on your roof's ridge or slope is highly effective. These mounts feature a slotted baseplate that conforms to various roof profiles and can be screwed directly into the structural timber underneath. For more details on wall-specific installations, refer to our guide on the Starlink Gen 3 Wall Mount.
Pole Mounts and Pipe Adapters
If your property is surrounded by tall trees, a pole mount is your best bet to get the dish high enough to establish a clear line of sight. Pole mounting kits generally feature a long mast, ranging from 1m to 1.8m, supported by telescopic stay bars for added stability in high winds.
When using a pole mount, a high-quality pipe adapter is essential. The adapter clicks securely into the bottom of the Gen 3 dish and clamps onto the metal pole. Ensure your pole diameter is between 31mm and 63.5mm. Never use PVC or plastic pipes for this type of installation, as they will flex and eventually crack under the weight and wind load of the dish. For a step-by-step breakdown, see our Starlink Gen 3 Pole Mount Kit Guide.
Mobile and Off-Grid Caravan Mounts
For the modern nomad, mounting a Starlink dish to a caravan or 4WD roof rack opens up incredible remote work opportunities. When mounting on a vehicle, you have a few choices:
- Flat Mounts: These house the Gen 3 dish horizontally in a low-profile frame, keeping it safe from low-hanging branches and reducing wind drag while driving.
- Magnetic Mounts: Utilise powerful rubber-coated earth magnets to secure the dish to steel roofs without drilling.
- Suction Cup Mounts: Ideal for temporary placement on glass or smooth fiberglass surfaces when stationary.
When running Starlink in mobile or off-grid environments, power efficiency is critical. Standard Starlink setups require an AC wall outlet, meaning you have to run an inverter in your caravan. Inverters are notoriously inefficient and can drain your battery bank quickly.
By upgrading to a SpaceTek StarPower V2 or V3 DC power supply, you can power your Starlink directly from your 12V or 24V battery system. This setup provides excellent DC-to-DC efficiency advantages over AC inverters, reducing overall power consumption and allowing you to bypass the standard Starlink router to use your own energy-efficient travel router. Remember to always follow local regulations, such as the Australian Communications and Media Authority Guidelines, when installing and operating communication equipment on the move.
How to Install Your Gen 3 Dish Mount Safely
Installing your own Starlink Gen 3 mount kit is a straightforward weekend project if you have the right tools and follow a few safety best practices.
Recommended Tools
- Cordless drill with a 6mm drill bit (for timber) or appropriate masonry bits
- 9/16 inch (or metric equivalent) hex socket or spanner
- High-quality silicone sealant (roofing grade)
- Cable ties and outdoor-rated cable clips
- Safety harness and ladder if working on a roof
Step-by-Step Installation Guide
- Find the Perfect Spot: Use the Starlink app's obstruction tool to scan the sky from your proposed mounting location. Ensure there are zero obstructions in the green zone.
- Secure the Base: Align your mount base on the roof or wall. If mounting on a metal roof, ensure you are drilling into a structural rafter or purlin, not just the thin sheet metal. Apply a generous amount of silicone sealant under the baseplate and into the screw holes to prevent water leaks.
- Assemble the Mount: Attach the extension pole or pivot arm to the base. Tighten the bolts, but leave them loose enough to allow for final adjustments.
- Click in the Dish: Insert your Gen 3 dish into the pipe adapter or mount head until you hear a solid click. Route the cable through the pole or adapter before clicking it into place to protect the connector.
- Align the Dish: Open the Starlink app and follow the manual alignment tool instructions. Rotate and tilt the dish until the app confirms optimal alignment, then lock all the mount bolts down tightly.
- Route and Protect the Cable: Run the cable down the mast and along your roofline. Use cable clips every 30-40cm to prevent the cable from flapping in the wind. Always create a "drip loop" (a small downward loop in the cable) just before it enters your home or caravan. This prevents rainwater from running down the cable directly into the entry hole. Seal the wall entry point with silicone or a waterproof cable entry gland.
Frequently Asked Questions About Gen 3 Dish Mounts
Can I use my existing Gen 2 mount for the Gen 3 dish?
No, not directly. The Gen 2 dish has a round mast with built-in locking buttons, while the Gen 3 dish uses a wider, flat kickstand design. To reuse your Gen 2 pole or mount, you will need to purchase a specific Gen 3 pipe adapter that bridges the physical differences between the two generations.
Is drilling required for roof installations?
Not always. If you want a zero-penetration install, you can use a ridgeline mount which relies on heavy ballast weights to stay secure. For caravans and metal-skinned vehicles, heavy-duty magnetic mounts or suction cups are highly effective non-drilling options.
How do I protect my Starlink cable during installation?
Keep the cable clear of sharp metal edges, such as the ends of roof sheeting. Use UV-resistant cable ties to secure it, and always implement a drip loop before the cable enters your home or vehicle. If routing through walls, use a plastic conduit or protective grommet to prevent the cable from rubbing against timber or masonry.
Building a Reliable Starlink Gen 3 Mount Setup
Choosing the right Starlink Gen 3 mount kit is the foundation of a reliable, high-speed satellite internet setup. Whether you are mounting to a suburban tile roof, a rural mast, or an off-grid caravan, selecting a high-quality, Australian-designed mount ensures your hardware remains safe, stable, and performing at its peak.
Before you start your installation, make sure you have:
- Scanned for obstructions using the Starlink app
- Chosen a rust-resistant aluminium or powder-coated steel mount
- Planned a safe, weatherproof cable routing path with a drip loop
- Considered a 12V DC power conversion to save battery power on the road
Ready to get your Starlink set up properly? Explore our range of custom-engineered Australian mounts and off-grid power solutions designed to keep you connected wherever your adventures take you.

Leave a comment
This site is protected by hCaptcha and the hCaptcha Privacy Policy and Terms of Service apply.