Why Extending Your Starlink Wi-Fi Range Matters
Your Starlink kit includes a capable router designed to cover approximately 300 square metres under ideal conditions. However, for many Australian properties, particularly sprawling rural blocks and homes built with robust materials, these ideal conditions are rarely met.
The internet connection from the Starlink dish is fast, but distributing it via WiFi involves the same physical challenges that affect all wireless signals. WiFi signal strength diminishes over distance and through physical barriers, and Australian conditions can be particularly demanding.
This is a significant consideration for Starlink for Remote Australia users who require reliable connectivity across an entire property, from the main residence to outbuildings. Understanding these limitations is the first step to effectively extend Starlink range. For detailed optimisation techniques, our guide on Boosting Starlink Wi-Fi: Simple Steps For Better Connectivity provides comprehensive strategies.
Common Factors That Weaken Your Signal
Several factors degrade WiFi signal strength. The most direct is distance from the router; the further a device is from the signal source, the weaker the connection becomes. This effect is amplified by physical obstructions.
Internal walls, especially the double-brick construction common in Australia, present significant barriers. Each wall the signal penetrates reduces its strength. Floors, particularly reinforced concrete slabs, create similar challenges.
Dense furniture and large appliances can also absorb or reflect signals, creating unexpected dead zones. Furthermore, for rural properties, trees and dense foliage can absorb and scatter WiFi signals, limiting their reach to outdoor areas and outbuildings.

The Challenge of Australian Building Materials
Australian construction methods create unique obstacles for WiFi. Metal sheds and steel-frame homes are highly problematic, as metal can block WiFi signals by creating a Faraday cage effect, trapping or reflecting the signal.
This signal reflection and signal absorption are critical when trying to connect workshops or machinery sheds. The corrugated iron roofing and steel cladding that protect these structures also block internet signals. Concrete slabs, often reinforced with steel, are dense barriers that WiFi struggles to penetrate.
Finally, signal interference from other electronic devices, such as generators or welding equipment, can degrade connection quality. Any solution to extend Starlink range must also incorporate robust weatherproof solutions to withstand extreme heat, UV exposure, and storms. The impact of signal quality on performance is further explored in our analysis, Starlink SNR Explained: How Signal To Noise Ratio Affects Your Speed, Power Use, Reliability.
Foundational Step: Maximising Your Source Signal
Before attempting to extend Starlink range, it is crucial to first maximise your source signal. The performance of your entire network depends on the strength and stability of the initial connection received by the Starlink dish.
Your Starlink dish requires an unobstructed view of the sky to maintain consistent communication with the satellite constellation. Even minor obstructions like tree branches can cause dropouts that affect every connected device. This is particularly challenging across Australia's diverse landscapes, where dense bushland and rolling terrain can create unexpected signal obstacles.
Signal stability is as important as signal strength. A dish that moves in the wind will struggle to maintain its precise alignment with the fast-moving satellites. Australia's harsh weather demands mounting solutions that can withstand these conditions without compromising the connection.
At SpaceTek Australia, we engineer our mounting systems specifically for these challenges. Our custom-designed mounts are built to handle everything from cyclone-force winds to intense UV exposure. For comprehensive guidance on optimising your setup, explore our guide: Boost Your Starlink Internet: Best Setup Performance Hacks.
Why a Secure Mount is Critical
An unstable dish directly threatens internet reliability. Even millimetre-scale movements can cause the dish to lose its lock on satellites, resulting in slower speeds and frequent disconnections.
Maximising signal quality requires absolute stability. Our mounting solutions are engineered to eliminate the micro-movements that standard mounts cannot handle, ensuring your dish maintains its optimal alignment. Weather resistance is not optional in Australia; our mounts use marine-grade materials and advanced coatings to resist corrosion, UV degradation, and thermal expansion.
Long-term reliability depends on selecting the right mount from the outset. Our engineered systems provide wind load resistance that exceeds industry standards, ensuring your connection remains stable through Australia's most challenging weather. For properties where professional installation is preferred, our certified installers understand the technical requirements of our solutions. Learn more in Secure Your Signal: Starlink Mounting Solutions Explained.
Achieving the Best Dish Position
Finding the optimal location for your Starlink dish involves giving it the clearest possible view of the sky while ensuring it is securely mounted.
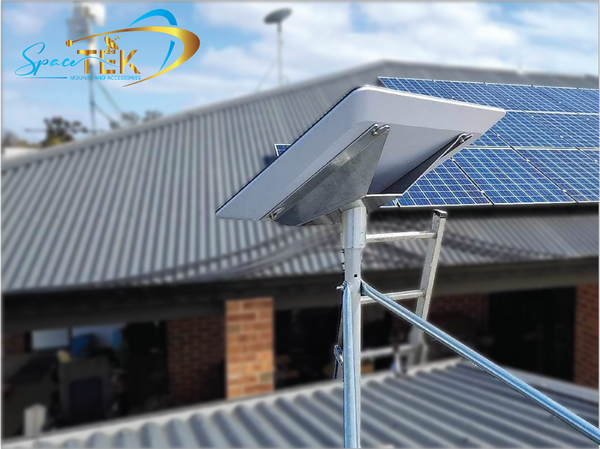
Roof mounting often provides the best performance by elevating the dish above ground-level obstructions, leading to more consistent speeds. Pole mounting is an excellent alternative when roof installation is unsuitable, lifting the dish to an optimal height with the required stability.
Avoiding obstructions is critical. The Starlink app's obstruction checker helps identify potential issues, but it is also important to consider seasonal changes, such as foliage growth. Using the Starlink app effectively provides real-time feedback to fine-tune the dish position for optimal performance. A strong source signal is the foundation for any successful attempt to extend Starlink range.
For detailed installation guidance, our resource Boost Your Connection: The Ultimate Guide To Installing Starlink On Your Roof covers the entire process.
SpaceTek Solutions for Maximum Coverage
Below are the principal hardware options manufactured by SpaceTek to extend Starlink range while coping with Australia’s harsh climate.
Solution 1: Liftd Roof Mounts
Raising the dish just one or two metres can clear surrounding metal roofs, solar panels and water tanks. SpaceTek roof mounts are fabricated from marine-grade aluminium with stainless fasteners, delivering long-term corrosion resistance in coastal and outback environments alike.
Installation steps
- Identify the highest point on the roof with a clear 100° view of the sky.
- Use the Starlink app’s obstruction tool to confirm minimal blockage.
- Secure the SpaceTek mount to structural timber or purlins using supplied hardware.
- Attach the dish and verify stability in windy conditions.
Solution 2: Pole-Extension Kits for Line-of-Sight Performance
Where trees or outbuildings sit directly in the satellite path, a pole-extension kit positions the dish above these obstacles. SpaceTek poles are galvanised inside and out, preventing rust and reducing maintenance.
Quick guide
- Conduct a line-of-sight check from proposed pole location to the open sky.
- Concrete the base plate or clamp to a load-bearing post.
- Run SpaceTek UV-stabilised cable down the pole and into the premises via a weather-sealed gland.
Solution 3: Weather-Proof Cable Management & Junction Boxes
Signal quality can be lost through poor cabling. SpaceTek’s pre-terminated, shielded cables and IP-rated junction boxes protect against moisture, rodents and extreme UV.
Key benefits
- Maintains full throughput for high-bandwidth applications such as 4K streaming and remote CCTV.
- Reduces fault-finding time by keeping every join accessible and dry.
These hardware solutions form the backbone of a reliable network. Once in place, homeowners may add additional access points or other networking devices as required, knowing the primary satellite link is already optimised.
Choosing the Right SpaceTek Hardware for Your Property
Selecting the correct accessory depends on three factors: property layout, environmental exposure and future expansion plans.
- Single-storey suburban home – a heavy-duty roof mount usually provides enough elevation for trouble-free coverage throughout the house.
- Large rural dwelling with nearby sheds – combine a roof mount with a pole-extension kit to clear gum trees and corrugated-iron roofs, forming a stronger base signal for any indoor access points you may add later.
- Remote community buildings and outstations – pair liftd mounts with weather-proof cable management to ensure the service remains operational during heatwaves and summer storms.
If you are unsure which configuration suits your site, contact our technical team via the SpaceTek enquiry form for custom advice. Our nationwide installer network can also assist with on-site assessments and professional fitting.
Frequently Asked Questions about Extending Starlink Range
How do I get reliable Wi-Fi inside a metal shed?
Mount the dish on a SpaceTek pole outside the shed, then run a shielded, weather-proof cable through a sealed gland into the structure. The satellite link remains outside the Faraday-cage effect of the walls, while the internal access point distributes Wi-Fi where you need it.
What is the simplest way to improve coverage before buying extra networking gear?
Ensure the dish is secured on a rigid, liftd SpaceTek mount with no obstructions. A stronger upstream signal often removes indoor dead zones without additional extenders.
Do I need special cable connections with SpaceTek hardware?
SpaceTek mounts and cable kits work with standard Starlink setups. Our weather-sealed cable management systems maintain full signal integrity from the dish to your router. Our team can advise on the best cable routing and termination options for your specific installation.
For further assistance, visit our contact page and speak with a specialist.
Reliable Internet Starts with the Right Accessories
The success of any project to extend Starlink range depends on a stable source signal from the dish. While methods like mesh WiFi, wired extensions, and wireless bridges can distribute your connection, their performance is fundamentally limited by the quality of the initial signal.
An optimal installation is about more than just basic setup; it requires preparing for Australia's unique environmental challenges. Harsh conditions, including intense UV radiation, extreme temperatures, and high winds, can degrade standard mounting hardware, leading to signal instability and dropouts.
For users of Starlink for Remote Australia and Starlink for Remote Communities, where connectivity is essential for business, education, and services, reliability is paramount. This starts with a professional-grade mounting solution that secures the dish and protects the connection from the elements.
The importance of a stable source signal cannot be overstated. Any degradation at the source will be amplified throughout your extended network, undermining the effectiveness of your range extension equipment.
At SpaceTek Australia, we develop mounting solutions engineered to address the specific challenges faced by Australian Starlink users. Our products are designed to optimise performance and ensure longevity in demanding conditions. To find a professional in your area, visit our installer network page. For assistance or to learn more about our solutions, please contact us. To see our custom-engineered products, browse our full range of products.


Leave a comment
This site is protected by hCaptcha and the hCaptcha Privacy Policy and Terms of Service apply.