Why Starlink Connection Issues Are So Common in Remote Australia
Step 1: Is the Starlink Network Down?
Before beginning any complex troubleshooting, it is crucial to determine if your Starlink connection issues are caused by a widespread service outage or a localised problem with your equipment. This initial check can save considerable time and effort if the issue is beyond your control.
Network outages affecting Starlink's satellite constellation or ground stations can impact thousands of users across Australia simultaneously. These disruptions typically resolve on their own, making local troubleshooting futile until the service is restored.
However, Starlink does not always provide immediate, official status updates during an outage. This can leave users in remote communities uncertain whether they are facing an equipment failure or a broader service disruption.
How to Check for a Service Outage
Several methods can help you quickly ascertain if your connection problems are part of a wider network event.
- Community-Driven Status Trackers: Websites like Downdetector provide real-time user reports. While the main status may indicate no issues, the user comments section often reveals ongoing problems in specific regions.
- Specialised Status Pages: The unofficial Starlink Status page offers a more focused view of Starlink-specific reports, including historical data that can help identify recurring problem patterns in your area.
- Social Media Monitoring: Searching for terms like "Starlink outage Australia" or "Starlink down" on platforms such as X (formerly Twitter) can provide immediate confirmation from other users experiencing similar problems.
If these resources confirm a widespread outage, the most effective strategy is to wait. Starlink's network operations team typically resolves these issues within a few hours. During this time, your system may display an "Offline – Searching" message as it attempts to reconnect to the network.
Step 2: Analysing Environmental and Placement Factors
After confirming that the wider Starlink network is operational, turn your attention to local conditions. In most cases, recurring Starlink connection issues originate from physical obstacles or sub-optimal dish placement.
Your dish must maintain an unobstructed view of the sky. Anything that sits within that signal cone—trees, buildings, or even power lines—will degrade performance. This requirement is especially challenging across Australia's diverse terrain, from densely forested regions to coastal suburbs.
How to Identify and Remove Signal Obstructions
- Use the Starlink App • Open the app and select the obstruction checker. This tool uses your phone's camera to create a visibility map and highlight potential blockages.
- Conduct a Visual Inspection • Walk a full circle around the installation. Look for branches, roof lines, water tanks, or nearby structures intruding into the signal path.
- Clear Debris • Remove leaves, dust, bird nests, or any other material from the dish face. Even a light covering of debris can impede the signal.
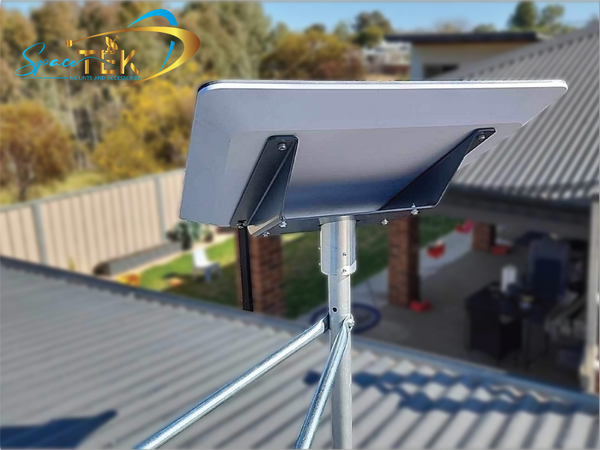
- Relocate or Lift the Dish • If obstruction is unavoidable, move the dish to higher ground or install it on a robust mast. SpaceTek's corrosion-resistant mounting systems are engineered to hold precise alignment in high winds while lifting the antenna above common obstacles.
Weather-Related Factors
Australia's climate can be punishing. Although the satellite link itself is resilient, severe conditions still influence performance:
- Heavy Rain (Rain Fade): Intense downpours absorb and scatter radio frequency energy. Expect temporary slow-downs or momentary drop-outs during thunderstorms.
- High Winds: Gusts do not block the signal directly; however, they can shift a poorly secured dish. SpaceTek's rigid, Australian-made mounts prevent movement and maintain alignment.
- Heat and Dust: Prolonged exposure to extreme heat may cause thermal throttling of electronic components. Dust storms can also obscure the sky. Regular cleaning and ensuring adequate airflow around the dish housing mitigate these risks.
By eliminating obstructions and securing the antenna on a purpose-built SpaceTek mount, many users in remote Australia restore full service without further intervention.
Step 3: Essential Hardware and Software Troubleshooting
If environmental checks reveal no issues, proceed to a systematic review of hardware and software. In many instances, fundamental steps—completed in the correct order—resolve seemingly complex Starlink connection issues.
1. Perform a Controlled Power Cycle
- Disconnect the system from mains power.
- Wait at least 60 seconds to allow components to discharge fully.
- Reconnect power and allow up to 15 minutes for a complete reboot.
A power cycle clears transient faults and forces the terminal to request a fresh network assignment.
2. Inspect and Reseat Cables
- With power still off, examine the entire cable run for cuts, kinks, or weather-related wear.
- Confirm connectors at both ends are clean and free from corrosion.
- Reseat each connector firmly until it locks in place.
- Restore power and re-check performance.
If the cable shows physical damage, replacement is the only reliable remedy.
3. Verify Software Currency
The terminal automatically downloads firmware updates during off-peak hours. Keep the system powered so these updates install without delay. Current software mitigates known bugs that can mimic hardware faults.
Should basic checks fail to resolve the issue—and you have verified that obstructions and mounting stability are not at fault—continue to Step 4 to diagnose speed-specific problems.
Step 4: Diagnosing and Improving Slow Speeds
Slow internet performance is one of the most frustrating Starlink connection issues. When high-speed satellite internet feels sluggish, it is important to determine whether the cause is the Starlink service itself or your local network setup.
How to Accurately Test Your Starlink Speed
The Starlink app includes a built-in speed test that provides the most accurate measurement of your service's performance. This tool measures the speed from the internet to your Starlink system, bypassing any potential bottlenecks in your local home network.
To run the test:
- Open the Starlink app and steer to the "Speed Test" section.
- Initiate the test and wait for the results.
- The primary result shows the download and upload speeds being delivered to your Starlink terminal. This figure is the true indicator of your service quality.
Common Causes of Slow Starlink Connection Issues
Several factors can lead to disappointing speeds. Identifying the root cause is key to resolving the problem.
- Network Congestion: Like any internet service, Starlink can experience higher demand during peak usage periods, typically between 5:00 PM and 10:00 PM. During these hours, increased user density in your service area, or "cell," can lead to temporary slowdowns. This can particularly affect Starlink for remote communities where adoption has been high.
- Minor Obstructions: Even small, intermittent obstructions like swaying tree branches can cause frequent micro-interruptions in the signal. While not a total blockage, these drops degrade overall throughput and result in slower perceived speeds.
- Local Network Limitations: Sometimes, the bottleneck is within your own home. A large number of devices simultaneously streaming or downloading can strain your local network's capacity. Similarly, poor WiFi signal strength due to distance from the router or physical barriers like walls can result in slow speeds on specific devices, even when the Starlink service itself is fast.
- Data Deprioritisation: Users on certain plans or those who consume very large amounts of data may experience slower speeds during times of network congestion as the system prioritises traffic to ensure fair access for all users.
Step 5: When to Contact Starlink Support
If you have systematically worked through all the previous troubleshooting steps and your Starlink connection issues persist, it is time to contact Starlink's customer support team. Some problems, such as internal hardware failures or critical cable damage, require professional intervention.
Starlink's support team can access detailed diagnostic data from your system and authorise hardware replacements when necessary. The company operates primarily through an online ticketing system rather than phone support.
How to Submit a Support Ticket
Creating a clear and detailed support ticket is the most effective way to get a timely resolution.
- Initiate via the Starlink App: Whenever possible, submit your ticket through the app. This method automatically attaches crucial diagnostic data from your system, giving technicians immediate insight into the problem.
- Be Specific: Clearly describe the issue you are experiencing. Instead of "internet is not working," provide details like, "System has been stuck on 'Offline - Searching' for 24 hours."
- Document Your Troubleshooting: List every step you have already taken, such as power cycling, checking for obstructions, and inspecting cables. This prevents support from suggesting redundant steps.
- Provide Evidence: Attach clear photographs of your installation, especially any suspected cable damage. Screenshots of error messages from the app are also extremely helpful.
- Be Patient: After submitting your ticket, monitor both your email and the Starlink app for a response. If hardware replacement is required, ensure your shipping address in your account is current to avoid delays, which is especially important for users in remote Australia.
Frequently Asked Questions about Starlink Connection Issues
Why does my Starlink disconnect for a few seconds?
Brief drop-outs can occur when the terminal hands off its link from one satellite to the next. Occasional transfers are normal. Frequent interruptions, however, usually point to either:
- Intermittent Obstructions – A single branch moving in the wind is enough to sever the path momentarily.
- Dish Instability – Any movement caused by high winds will break alignment. A rigid SpaceTek mount eliminates this issue.
Review the "Outages" log in the Starlink app to spot patterns.
How does network congestion in Australia affect my Starlink?
Every Starlink coverage cell has a finite capacity. When many users in the same cell go online simultaneously—commonly 5:00 pm to 10:00 pm—bandwidth is shared, and individual speeds fall. This effect is particularly evident in remote communities where adoption has been rapid. Planning large downloads for off-peak hours helps maintain consistent performance.
Reliable Internet Starts with the Right Accessories
Resolving Starlink connection issues involves a systematic process of elimination, from checking for network-wide outages to inspecting your own hardware. The steps in this guide empower you to fix most common problems, a crucial skill for anyone relying on satellite internet in remote Australian locations.
However, preventing problems is always more effective than curing them. Many persistent issues, especially those related to signal obstruction and weather, are a direct result of the initial installation. The foundation of reliable Starlink performance is a secure, stable mount.
A dish that moves in high winds or a mount that settles over time will inevitably lead to intermittent dropouts and degraded performance. SpaceTek Australia designs and manufactures custom mounting solutions engineered specifically for harsh Australian conditions. Our mounts provide exceptional stability and corrosion resistance, ensuring your dish remains perfectly aligned through high winds, extreme temperatures, and coastal air.
Investing in a high-quality mounting system is an investment in long-term reliability. For those using Starlink for remote Australia, where a stable connection is essential, the peace of mind from a professional installation is invaluable.
For custom mounting solutions designed for Australian conditions, contact SpaceTek to discuss your specific requirements.
Explore our range of high-quality Starlink mounts engineered to ensure your satellite internet delivers the reliable performance you need.


Leave a comment
This site is protected by hCaptcha and the hCaptcha Privacy Policy and Terms of Service apply.