What Is the Starlink Mini Power Supply — and Why Does It Matter?

The Starlink Mini power supply is the critical link between your 12V vehicle system and reliable satellite internet in the field. Get it wrong, and you'll deal with dropouts, instability, and frustration — especially when you're hours from the nearest town.
Here's what you need to know upfront:
- Average power consumption: 25–40W
- Input voltage range: 12–48V DC (via the DC power cable)
- USB-C PD requirement: 100W minimum, 20V/5A — not all USB-C ports qualify
- Official AC power supply input: 100–240V, 1.6A, 50–60Hz
- IP rating: IP67 with DC power cable and Starlink plug installed
- Operating temperature: -30°C to 50°C (-22°F to 122°F)
- Key challenge: Standard 12V systems fluctuate and drop voltage along cable runs — causing the Mini to underperform or cut out entirely
For most Australians running the Mini off a caravan, 4WD, or off-grid battery system, the answer isn't just "plug it in." You need a regulated DC-to-DC power solution that steps your 12V source up to a stable voltage the dish can actually work with.
That's exactly what this guide covers — from official specs through to the best purpose-built power setups for real-world Australian conditions.
Why Proper DC Power Matters for Starlink Mini
A Starlink Mini power supply must provide a stable voltage to ensure the dish functions during high-demand tasks like satellite searching or snow melting. While the dish is rated for a wide 12–48V range, relying on a raw 12V lead-acid or lithium battery system is where most setups go wrong.
In a typical 12V vehicle environment, voltage is rarely a flat 12V. It fluctuates based on battery charge, alternator output, and the load from other appliances. When the voltage drops below a certain threshold—often due to long cable runs or thin wiring—the Starlink Mini can suffer from reboot loops or sudden connection dropouts. This instability is particularly noticeable during the initial boot-up phase or when the dish is actively tracking satellites, as these actions cause temporary spikes in power draw.
Using a regulated power source ensures that the dish receives a consistent stream of energy regardless of what your vehicle's battery is doing. By stepping up the voltage to a stable 35V or 48V, we can eliminate the risks associated with "voltage drop" and keep your internet rock-solid even in the middle of the Simpson Desert. For a deeper dive into these requirements, check out our guide on how to understand Starlink DC power requirements in 3 simple steps and see the official Starlink Mini specifications for the baseline technical data.
The Smarter Way to Power and Mount Starlink Mini
The most efficient way to run your gear is to use a direct DC-to-DC regulated power supply. By bypassing the need for an AC inverter, you avoid the "inverter tax"—the 10% to 20% energy loss that occurs when converting battery power to 240V and then back down to DC via the standard Starlink wall plug.
At SpaceTek Australia, we've engineered solutions that handle the three biggest enemies of mobile satellite internet: vibration, heat, and unstable power. Our DC-to-DC converters are designed to take a messy 12V or 24V input and output a clean, high-wattage signal.
When it comes to mounting, the Starlink Mini is incredibly light (just over 1kg), but that doesn't mean it should be held on with zip ties. Proper mounting is about more than just staying attached; it’s about cable management and protecting the Starlink Mini power supply port from moisture and strain. Using precision-machined aluminium mounts ensures that your dish stays put at highway speeds while maintaining the IP67 weather rating. For more on choosing the right hardware, read about the Starlink DC-DC power supply demystified and our advice on Starlink Mini power and mount compatibility.
Bundle Deals Built for Real-World Use
If you don’t want to piece everything together—start here. We’ve taken the guesswork out of the equation by creating bundles that include everything you need for a professional-grade installation. These kits ensure that your power supply, cables, and mounts all play nicely together, saving you time and preventing the frustration of incompatible parts.
Our bundles are designed for those who value reliability over DIY hacks. Whether you're a weekend warrior or a professional field crew, these systems provide a "plug-and-play" experience that is built to survive the corrugations of the outback. You can learn more about these integrated systems in our guide to Starlink on the go 12-56V DC power supplies.
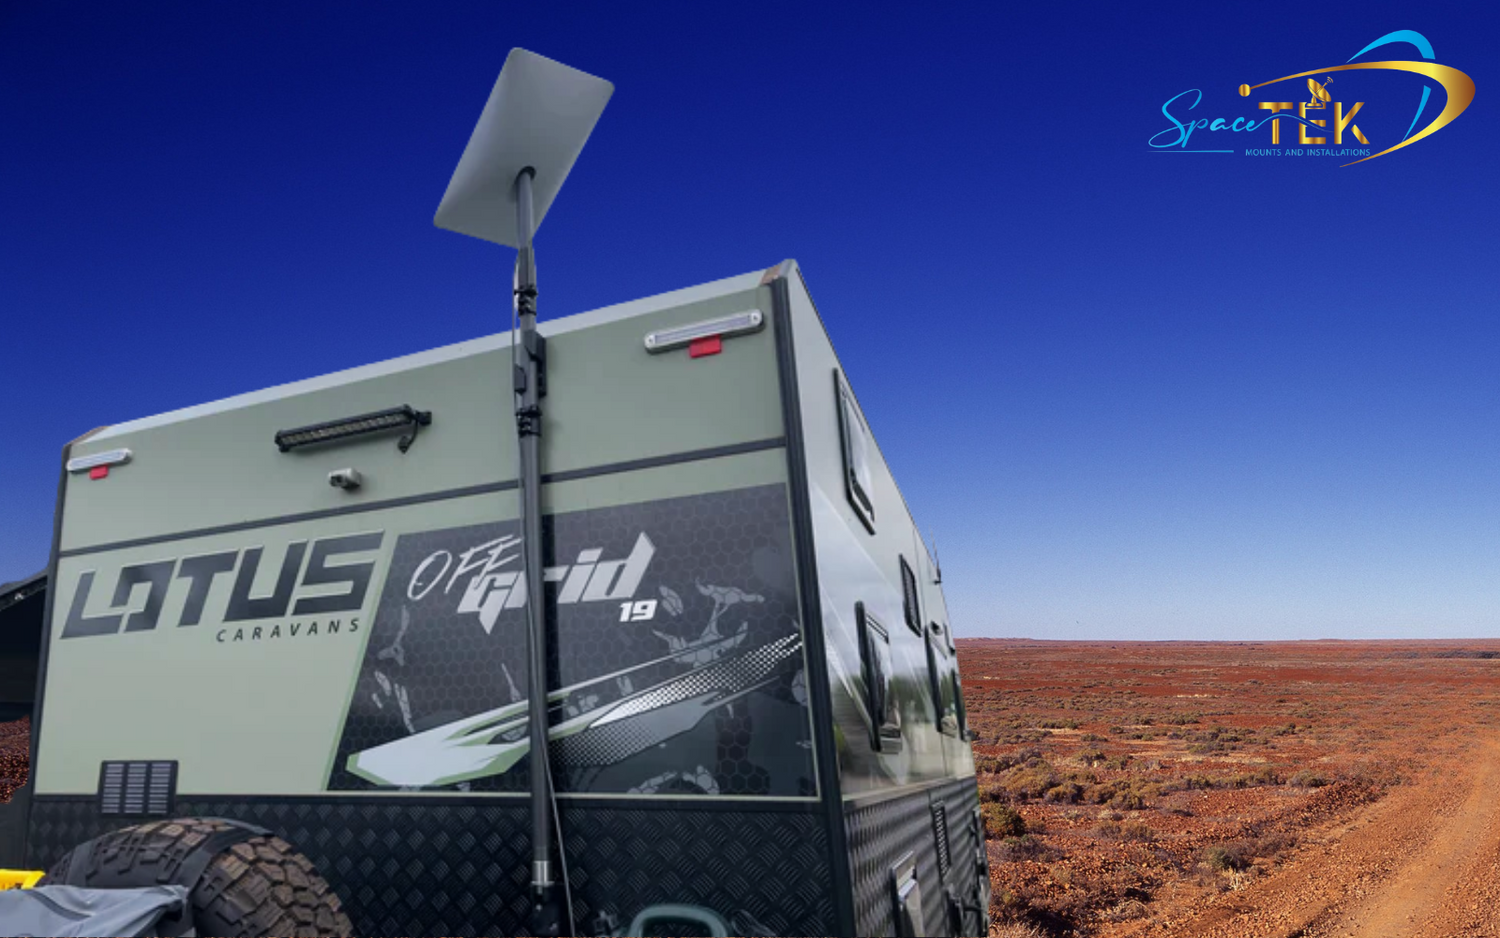
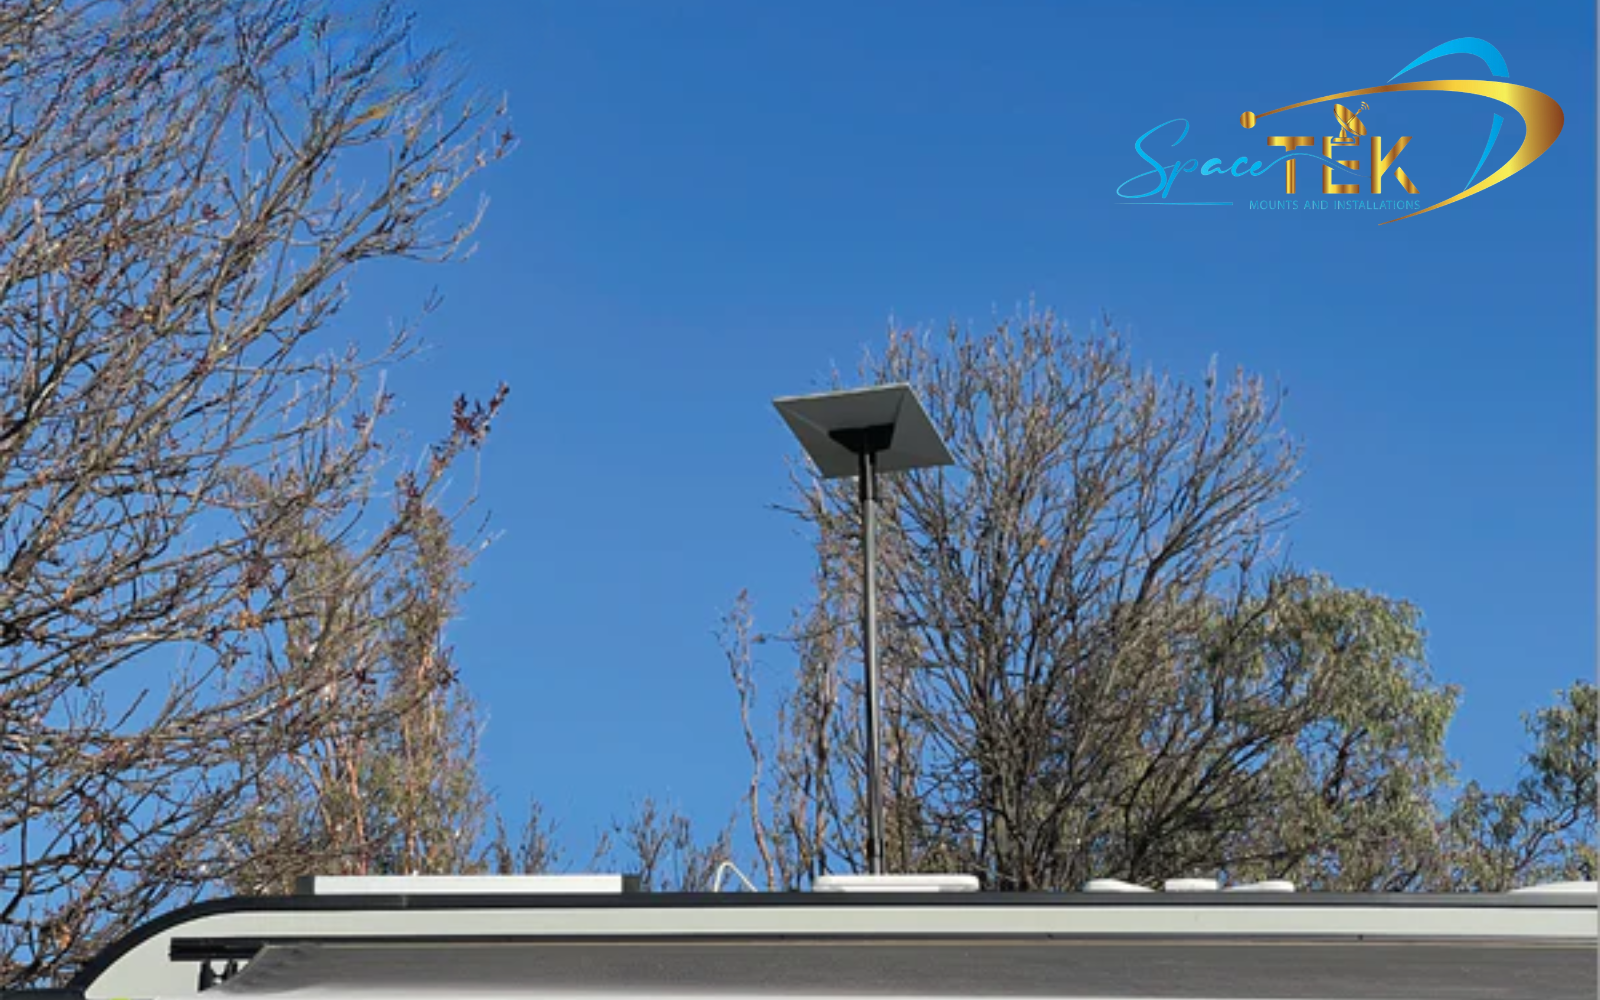
Starlink Mini Road Bundle (Vehicle + In-Motion Setup)
The Road Bundle is the ultimate choice for 4WDs, touring vehicles, and field crews who need internet while on the move. This setup features a low-profile, aerodynamic mount that reduces wind noise and drag, paired with a regulated 12V to 35V power system.
- In-Motion Ready: Designed to keep the Mini secure at high speeds.
- Magnetic or Fixed: Choose between high-strength magnets for flexibility or a permanent bolt-down install.
- Regulated Power: Includes a DC-DC booster to prevent dropouts during engine starts or low-battery scenarios.

View the Starlink Mini Road Bundle
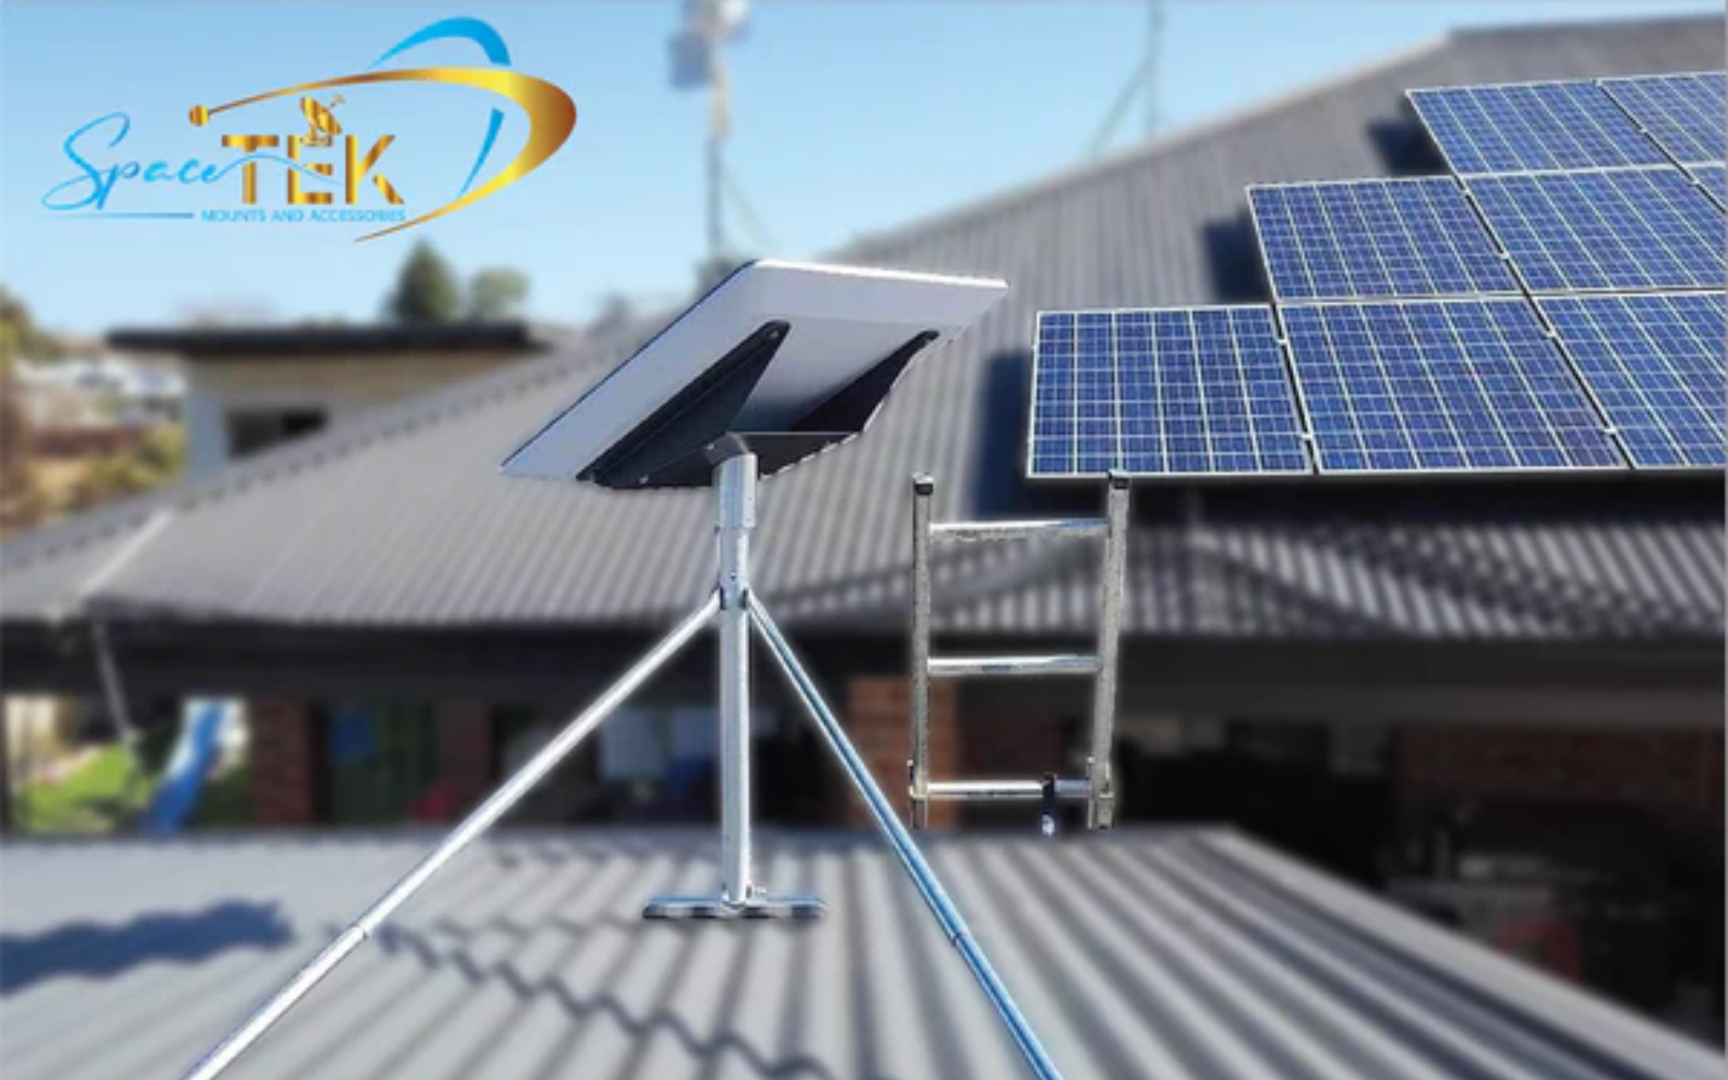
Caravan Builder Value Bundle (Permanent Install Setup)
For those building out a caravan or van, the Caravan Builder Value Bundle offers a clean, permanent integration. This kit focuses on a "do it once, do it properly" philosophy, featuring an IP68-rated recessed socket that provides a professional finish to your exterior wall.
- Seamless Integration: All cables are routed internally for a clutter-free look.
- Weatherproof Finish: The recessed socket ensures your caravan remains sealed against the elements.
- OEM Quality: Ideal for professional builders or high-end DIY projects.

Explore the Starlink Mini Caravan Builder Value Bundle
Browse all House & Caravan Mounts
Essential Starlink Mini Power Supply Accessories
Already have your dish but need to fine-tune the setup? This is where you can make small upgrades that lead to massive gains in reliability. When running DC power over any distance, the gauge of your wire becomes critical. Using thin, generic cables will lead to voltage drop, which is the number one cause of "Starlink Mini disconnected" errors.
We recommend using heavy-duty 14 AWG or 16 AWG wiring for all DC runs. This ensures that the energy from your battery actually reaches the dish without being lost as heat along the way. For more technical details, see everything you need to know about the Starlink standard DC-DC power supply.
Starlink Mini Router 9V USB-C PD Power Supply
If you are using the standalone Mini Router, you can ditch the bulky 240V inverter. Our USB-C PD adapter allows you to run the router directly from a compatible 12V vehicle adapter or a high-capacity power bank.
- Stable Output: Delivers a consistent 9V / 3A via Power Delivery.
- Portability: Perfect for camping or temporary field setups.
- Note: This requires a USB-C port that supports the Power Delivery (PD) protocol.

Get the Starlink Mini Router USB-C Adapter
Heavy-Duty Starlink Mini Power Supply Cables
Standard cables are often too long or too thin for efficient 12V use. Our heavy-duty cables use 14 AWG wire and feature the specialized weatherproof barrel connector required to maintain the dish's IP67 rating.
- Voltage Drop Solution: Thicker copper cores mean more power reaches the dish.
- Weatherproof Boot: Protects the connection point from dust and rain.
- Custom Lengths: Available in 5M and 10M options to reduce excess cable clutter.

Choosing the Right Setup for Your Use Case
Selecting the right Starlink Mini power supply setup depends entirely on how you travel.
- Driving and Touring: If you’re constantly on the move in a 4WD, the Road Bundle is your best bet. It handles the vibrations of corrugated roads and ensures the dish stays powered even when the alternator is under heavy load.
- Caravan Builds: For a permanent home on wheels, the Caravan Builder Bundle provides the cleanest look and most reliable long-term connection.
- Upgrading Existing Gear: If you already have a mounting solution, focus on the DC-DC Power Supply and Heavy-Duty Cables to ensure your electrical backbone is up to the task.
For a comparison of all mobile options, check out the easiest way to power your Starlink Roam with DC options.
Installation Notes
Installing your Starlink Mini power supply should be done with a "measure twice, cut once" mindset. Here are the practical steps to ensure a professional result:
- Secure the Mount: Ensure you are mounting to a structural part of the vehicle or caravan. Vibration can loosen generic mounts over time.
- Verify Voltage: Before plugging in your dish, use a multimeter at the end of your cable run to ensure you are getting at least 12V (or your regulated 35V/48V) under load.
- Cable Routing: Avoid sharp bends and use grommets when passing cables through metal panels to prevent chafing.
- Seating the Plug: The Starlink Mini barrel connector must be pushed firmly into the port until it clicks. This ensures the weatherproof seal is engaged.
For official support on power connections, you can visit the Starlink Support Mini Power page.
FAQs – Starlink Mini Power, Bundles & Setup
Do I need a DC-DC booster for the Mini?
While the Mini can run on 12V, a DC-DC booster is highly recommended. It steps the voltage up to a stable 35V or 48V, which prevents reboots caused by voltage drops when your battery gets low or your fridge kicks in.
Can I run the Mini from a standard cigarette lighter plug?
You can, but it is often the weakest link. Many cigarette sockets are prone to vibrating loose and have thin internal wiring. For a reliable setup, a hardwired connection or a high-quality Anderson plug is much better.
Why do some USB-C ports fail to power the dish?
The Starlink Mini requires a USB-C PD (Power Delivery) source capable of at least 100W (20V/5A). Most standard dashboard USB ports only output 5W to 15W, which isn't enough to boot the dish.
Should I buy a bundle or individual parts?
If you are starting from scratch, the bundles offer the best value and guaranteed compatibility. Individual parts are best for those who already have a partial setup or very specific custom requirements. Learn more about conquering Starlink power challenges.
Get Your Starlink Mini Setup Sorted (Before You Head Off-Grid)
At the end of the day, your Starlink performance depends on your setup, not just the device itself. A poor Starlink Mini power supply configuration will leave you frustrated with constant dropouts right when you need the internet most.
SpaceTek Australia gear is purpose-built for the harsh Australian environment. We don't do "generic"—we do engineered. Whether you're crossing the Nullarbor or setting up a remote worksite, our kits ensure your connection remains rock-solid.
Leave a comment
This site is protected by hCaptcha and the hCaptcha Privacy Policy and Terms of Service apply.