Why Starlink DC Power Matters for Remote Australia
Starlink DC power eliminates the need for AC inverters when running your satellite internet system off-grid, saving up to 43% on energy consumption. Here's what you need to know:
Key Benefits:
- Power Savings: DC-DC conversion saves 29-43% compared to AC inverters
- Voltage Range: Most systems accept 9-36V DC input (12V/24V compatible)
- Efficiency: Eliminates double conversion losses (DC→AC→DC)
- Compatibility: Works with Gen 1, 2, and 3 Standard terminals
Power Requirements by Model:
- Gen 1: 56V output, 75-100W average draw
- Gen 2: 48V output, 52.5W DC vs 57W AC
- Gen 3: 57V output, stable power delivery
- Snow melt mode: Additional 120W draw
Living off-grid in remote Australia means every watt counts. Traditional AC setups waste precious battery power through inverter losses—typically 10W just to run the inverter, plus conversion inefficiencies that can increase your total power draw by 31%.
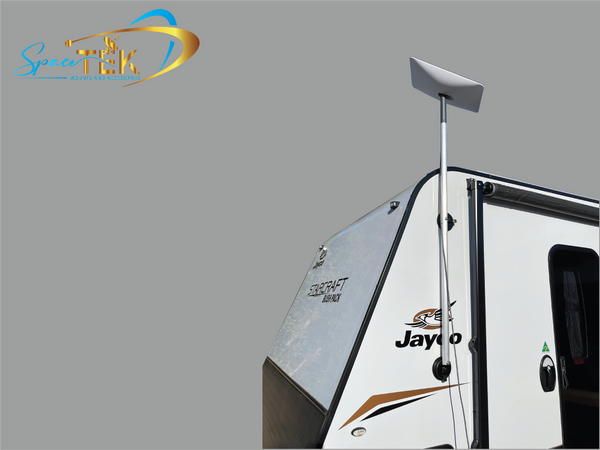
Whether you're in a caravan touring the outback, running a remote station, or simply seeking reliable internet in areas where the grid doesn't reach, understanding your Starlink's DC power requirements is crucial for maintaining connectivity without draining your battery bank.
I'm Aaron Wroblewski, founder of SpaceTek Australia, and I've spent over 25 years helping Australians stay connected in remote locations through satellite internet and DC power solutions. My experience with Starlink DC power systems has shown me that proper power management is often the difference between reliable connectivity and constant frustration in off-grid setups.
Step 1 – Identify Your Dish & Its Power Specs
Getting your Starlink DC power setup right starts with knowing exactly what you're working with. I've seen too many remote setups fail because someone assumed all Starlink dishes were the same—they're definitely not. Each generation has its own power personality, and understanding yours is crucial for reliable off-grid internet in remote Australia.
Check Power-Draw Numbers
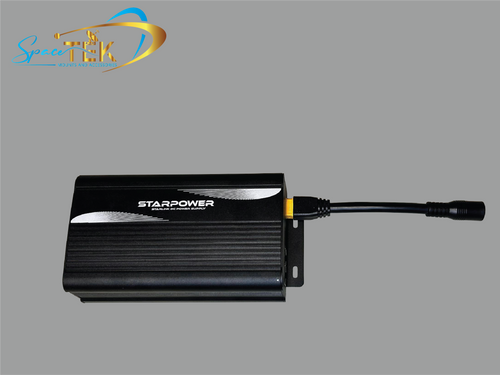
Your Starlink dish is like a teenager—its appetite changes throughout the day. Understanding these power swings helps you size your battery bank properly and choose the right DC supply from our StarPower range.
During idle periods, your dish sips just 20W of power—barely more than a bright LED bulb. But when you're streaming Netflix or on a video call, expect 75-100W of steady consumption. The real surprise comes with snow melt mode, which can push total consumption up to 180W.
Now, you might think snow melt is irrelevant in Australia, but this heating function also kicks in during cold desert nights or when condensation builds up on the dish. More importantly, it shows why your DC supply needs headroom—our StarPower V2 and StarPower V3 units are designed to handle these peak loads without breaking a sweat.
Starlink DC Power Requirements by Model
Here's where things get technical, but stick with me—this knowledge will save you headaches and potentially expensive mistakes. Each Starlink generation operates at different voltages, which determines which StarPower unit you need.
Generation 1 dishes (the round ones) need 56V DC and typically draw 57W on AC power. Switch to our StarPower V2, and you'll drop that to just 41W—a solid 29% power saving. That's significant when you're running on batteries in the middle of nowhere.
Generation 2 terminals require 48V DC and are even more impressive for efficiency gains. Using AC power, they consume 52.5W, but our StarPower V2 drops this to just 31W—a whopping 43% saving. The catch? Gen 2 cables need modification to work with third-party DC supplies, but we'll walk you through that.
Generation 3 dishes are the sweet spot for Starlink DC power enthusiasts. They need 57V DC output but accept 12-48V DC input with the right converter. Our StarPower V3 is specifically engineered for Gen 3 terminals, providing stable 57V output from your 12V or 24V battery system.
The Starlink Mini is the simplest—it's designed to run directly on 12V DC, making it perfect for smaller mobile setups.
Map Battery-Bank Capacity
Sizing your battery bank for Starlink DC power in remote Australia requires thinking beyond just the dish's consumption. You're dealing with temperature extremes, dust, vibration from corrugated roads, and the harsh reality that help is often hundreds of kilometres away.
The StarPower V2 is designed for both 12V and 24V battery systems, thanks to its wide 11–36V input range. This means you can power your Starlink whether you’re using a standard caravan setup or a more efficient 24V off-grid system. For most users, plan for around 400–600 watt-hours (Wh) of daily battery capacity to keep your Starlink running reliably.
In practical terms for remote Australia, this means a minimum 200Ah battery bank at 12V (that's 2.4kWh), paired with at least 400W of solar panels. But here's the thing—Australian conditions are tough on batteries. Temperature swings, dust infiltration, and constant vibration all reduce battery performance.
I recommend oversizing your system by 20-30% to account for these harsh conditions. It might seem like overkill when you're planning in your comfortable suburban garage, but when you're three days into the Simpson Desert and your internet connection is your lifeline, you'll thank yourself for the extra capacity.
Step 2 – Compare Starlink DC Power Options
When it comes to Starlink DC power solutions, the market is flooded with options that promise the world but often deliver disappointment. After years of field testing across remote Australia and countless customer installations, I've learned that not all DC power supplies are created equal—and the wrong choice can leave you stranded without internet when you need it most.
Why DC-DC Beats AC Inverters
The efficiency gains from direct Starlink DC power aren't just impressive on paper—they're game-changing in the real world of remote Australian installations. When every watt counts and your battery bank is your lifeline to connectivity, understanding these differences can mean the difference between staying connected all day or watching your power dwindle by afternoon.
Traditional AC setups force your power through a wasteful journey: 12V DC from your battery gets converted to 240V AC by an inverter, then back down to 56V DC by the Starlink power supply. That's two conversions, each stealing precious energy from your system. Our direct DC approach eliminates this waste entirely with a single, efficient conversion from your battery voltage straight to what your dish needs.
The numbers tell the story clearly. Our field testing across remote Australian locations consistently shows power savings of 29-43% with direct DC power. A Gen 1 dish that draws 57W through an AC inverter only needs 41W with our StarPower V2—that's a massive 29% reduction. Gen 2 dishes are even more impressive, dropping from 52.5W to just 31W for a remarkable 43% saving.
But here's what really hurts AC setups: inverter overhead. Even when your Starlink is sitting idle, that inverter is consuming 10-11W just to stay ready. Over a 10-hour day, you're looking at 160-320Wh saved with DC power—enough energy to run LED lighting for hours or keep your mobile devices charged.
Choosing the Right Supply for Your Dish
At SpaceTek Australia, we've developed our StarPower range specifically for Australian conditions after seeing too many customers struggle with unreliable imported solutions. Our two main offerings each solve different challenges based on your specific Starlink generation and installation needs.
Our StarPower V2 handles Gen 1, 2, and 3 Standard terminals with impressive versatility. This robust unit accepts input voltages from 11-36V DC, making it perfect for both 12V caravan systems and 24V setups. What makes the V2 special is its ability to bypass the Starlink router entirely, connecting directly to your own router's WAN input. This approach eliminates another potential failure point whilst allowing you to use networking equipment that's actually designed for harsh Australian conditions.
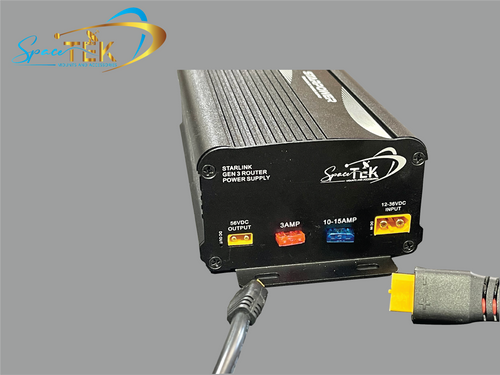
The V2 comes with your choice of connectors: Anderson plugs for traditional 12V/24V systems, XT60 connectors for those familiar with drone and RC equipment, or 2.5mm DC jacks for permanent installations. At 160 x 100 x 60mm including mounting tabs, it fits neatly into most installations without taking up precious space.
For Gen 3 terminals specifically, our StarPower V3 delivers a rock-solid 57V output that works through your existing Starlink router. This makes installation simpler for users who want to maintain the standard Starlink setup whilst gaining all the efficiency benefits of DC power. The V3 supports both 12V and 24V input systems and includes improved heat dissipation design for reliable operation in Australian heat.
Starlink DC Power Safety & Warranty Notes
Here's where I need to be absolutely clear: proper installation isn't optional. We've seen too many customers damage expensive equipment by following questionable advice from online forums or attempting DIY wiring based on incomplete information.
Critical wiring requirements include using 12 AWG minimum cable for all power connections, installing proper fusing (10A on 12V systems, 5A on 24V systems), and ensuring every connection is clean and tight. For data connections, always use shielded Cat6 cable and stick to T-568B termination standards for consistency.
The warranty implications are serious. Our StarPower systems are specifically designed to work without modifying your Starlink equipment, but some installations—particularly Gen 2 systems—may require cable modifications. For Gen 2 terminals, you'll typically need to cut the main cable to your preferred length and terminate it with a proper Cat6 plug. We recommend T-568B termination for consistency with Starlink standards, though T-568A will work if that's what your other equipment uses.
If you're uncomfortable with cable termination, our Starlink SPX to RJ45 adapter provides a simpler connection without cutting cables. It's a small additional cost that can save you from expensive mistakes.
DO NOT attempt wiring based on Reddit suggestions or other DIY hacks—we've repaired too many systems where well-meaning advice has blown internal fuses, damaged cables, or even destroyed terminals. The cost of professional-grade equipment and proper installation is always less than replacing damaged Starlink hardware.
Step 3 – Install & Optimise Your DC Setup
Getting your Starlink DC power system properly installed is where all the planning pays off. After years of helping Australians set up reliable satellite internet in remote locations, we've learned that a methodical approach saves time, prevents damage, and ensures your system runs smoothly from day one.
Quick-Install Checklist
Before you start connecting anything, take time to plan your installation properly. Our StarPower V2 and StarPower V3 units are designed for straightforward installation, but the difference between a good setup and a great one lies in the preparation.
Choose your mounting location carefully—the StarPower V3 needs indoor or weatherproof protection since its housing isn't moisture-resistant, while the StarPower V2 offers more flexibility. Both units benefit from good ventilation to manage heat during Australia's hot summers.
Mount your converter securely using the provided mounting tabs. The dimensions of 160 x 100 x 60mm (including tabs) make both units compact enough for most installations, but ensure you can access the unit later for maintenance.
Power connections are critical—use 30 amp wiring from your battery source for optimal performance, with 15 amps as the absolute minimum. Install the appropriate fuse (10A for 12V systems, 5A for 24V systems) using fast-blow fuses for protection.
For data connections, crimp your shielded RJ45 connector using the T-568B standard for consistency with Starlink's wiring. Quality matters here—cheap connectors cause more problems than any other component in our experience.
Always verify your output voltage with a multimeter before connecting your dish. The StarPower V2 should output the correct voltage for your dish generation (56V for Gen 1, 48V for Gen 2), while the StarPower V3 provides stable 57V for Gen 3 terminals.
Testing & Monitoring Consumption
Once everything's connected, thorough testing prevents future headaches. Start by measuring your startup current—this initial surge tells you whether your wiring can handle the load without voltage sag.
Monitor converter temperature during the first hour of operation. Both StarPower units are designed for Australian conditions, but inadequate ventilation can cause thermal issues, especially during summer installations.
Run a speed test and compare it to your previous AC-powered performance. You should see similar or better speeds—if performance drops significantly, check for EMI interference or connection issues.
For ongoing monitoring, consider installing a Victron SmartShunt or similar battery monitor. These devices track your daily consumption patterns and help optimise your solar charging requirements. Many of our customers find they can reduce their solar array size once they see the actual power savings from DC operation.
Troubleshooting Starlink DC Power Issues
Even with careful installation, issues can arise. The most common problem we see is EMI interference causing network instability. If your speeds suddenly drop to 1Mbps or connections become unstable, try forcing your router's WAN port to 100Mbps full-duplex mode—this often resolves interference issues immediately.
Voltage sag during high power draw periods usually indicates undersized wiring or poor connections. The symptoms are obvious—your system resets when the dish draws maximum power during startup or snow melt mode. Upgrading to 12 AWG wiring and checking all connections typically solves this problem.
Converter overheating becomes more common during Australian summers, especially in poorly ventilated installations. If your system shuts down during hot weather, improve airflow around the unit or relocate it to a cooler position. The StarPower V3's improved heat dissipation design helps, but proper installation remains crucial.
DO NOT attempt DIY wiring based on Reddit suggestions or forum posts—we've seen too many damaged terminals and blown fuses from incorrect wiring. The StarPower V2 and StarPower V3 are designed to work safely with standard installation practices, maintaining your equipment warranties while delivering reliable performance.
Frequently Asked Questions about Starlink DC Power
How much power will I save by ditching my inverter?
The power savings from switching to Starlink DC power are substantial and measurable. After testing hundreds of installations across remote Australia, we've consistently found that our StarPower systems deliver impressive efficiency gains.
With the StarPower V2, you'll see different savings depending on your Starlink generation. Gen 1 dishes drop from 57W on AC to just 41W on DC—that's a solid 29% reduction. The real winner is Gen 2, which plummets from 52.5W down to 31W, giving you a massive 43% power saving.
But here's what many people miss: your inverter is constantly drawing power even when your Starlink is idle. That's an additional 10-11W running 24/7, whether you're using the internet or not. Our StarPower systems eliminate this phantom load entirely.
For a typical remote Australian setup running 10 hours daily, you're looking at saving 160-320Wh per day. Over a year, that's enough energy to run a 12V fridge for several additional hours daily or power LED lighting throughout your camp. When you're living off-grid and every watt counts, these savings make a real difference to your daily routine.
The StarPower V3 delivers similar efficiency gains for Gen 3 terminals, providing that stable 57V output your dish needs without the conversion losses of traditional AC setups.
Can I run Starlink safely on a 12V caravan system?
Absolutely! Both our StarPower V2 and V3 are specifically engineered for 12V caravan systems. We've had thousands of happy customers touring Australia with these units powering their Starlink from standard caravan batteries.
The StarPower V2 handles input voltages from 11-36V DC, making it perfect for 12V systems that might see voltage fluctuations during charging or heavy loads. It's designed to work reliably even when your battery voltage drops to 11V or rises to 14.4V during solar charging.
For safe caravan operation, you'll need a minimum 200Ah battery bank—preferably lithium for better performance in Australian heat. Use 30A rated wiring from your battery to the StarPower unit, and don't forget the 10A fast-blow fuse for protection. Mount the unit in a ventilated compartment where it can dissipate heat properly.
The StarPower V3 is equally capable on 12V systems, delivering that precise 57V output your Gen 3 terminal needs. Just remember it needs indoor or weatherproof installation since the housing isn't moisture-resistant.
Many modern caravans now come pre-wired for DC power systems, and we're seeing more manufacturers recognising the efficiency benefits of Starlink DC power for extended off-grid travel. The days of running noisy inverters just for internet are rapidly disappearing.
Does using a third-party DC supply void my warranty?
This is probably our most common question, and I understand the concern. The good news is that our StarPower systems are designed to work without modifying your Starlink equipment.
For warranty-safe installation, the StarPower V2 connects directly to your router's WAN input, bypassing the Starlink router entirely. This means no cutting of Starlink cables and no modifications to their equipment. You can easily revert to the original setup if needed for warranty service.
The StarPower V3 works through your existing Starlink router, so there's no equipment modification required. It simply replaces the AC power adapter with efficient DC power.
Gen 2 installations can be trickier since they sometimes require cable modification. That's why we developed our SPX to RJ45 adapters—they let you connect without cutting the main Starlink cable. If cable cutting is unavoidable, we provide detailed instructions for proper T-568B termination that maintains signal integrity.
Here's what we absolutely don't recommend: following random Reddit posts or DIY forum suggestions for wiring. We've seen too many cases where incorrect wiring has blown internal fuses, damaged cables, or even destroyed terminals. The cost of our professional-grade StarPower systems is far less than replacing a damaged Starlink.
All StarPower units come with our 12-month warranty covering manufacturing defects and performance issues. We also provide ongoing technical support to ensure your installation runs smoothly. When you choose SpaceTek Australia, you're not just buying a power supply—you're getting the expertise and support that comes from over 25 years of keeping Australians connected in remote locations.
Reliable Internet Starts with the Right Accessories
Converting to Starlink DC power isn't just about saving a few watts—it's about creating a robust, dependable system that keeps you connected when it matters most. Whether you're exploring the vast Australian outback in your caravan, managing a remote cattle station, or bringing vital internet connectivity to isolated communities, having the right power solution can make the difference between staying connected and losing touch with the world.
At SpaceTek Australia, we've been helping Australians stay connected in remote locations for over 25 years. Our StarPower range isn't just another DC converter—it's the result of decades of experience understanding what works in the harsh Australian environment and what doesn't.
The StarPower V2 Advantage
Our StarPower V2 12V/24V DC Power Supply is engineered specifically for Gen 1, 2, and 3 Standard terminals. With its wide input voltage range of 11-36V DC (configurable up to 45-56V), it's perfect for everything from 12V caravan systems to 24V truck installations. The unit connects directly to your router's WAN input, bypassing the Starlink router entirely and giving you the flexibility to use your own networking equipment.
What sets the V2 apart is its multiple connector options—choose from Anderson plugs for robust caravan installations, XT60 connectors for drone-style setups, or 2.5mm DC jacks for permanent installations. The unregulated DC pass-through via Phoenix connector can even power your router directly, simplifying your entire setup.
StarPower V3 for Gen 3 Excellence
For Gen 3 terminal owners, our StarPower V3 12V/24V DC Power Supply delivers stable 57V output through your included Starlink router. This unit is specifically designed for the latest generation terminals, offering improved heat dissipation and reliable performance in demanding conditions.
The V3 works seamlessly with both 12V and 24V systems, making it ideal for RVs, boats, and off-grid installations where AC power simply isn't practical. While it requires indoor or weatherproof installation, its compact 160 x 100 x 60mm dimensions make it easy to mount anywhere in your setup.
Australian Engineering for Australian Conditions
Both StarPower units eliminate the inefficiencies of AC inverters, which waste energy converting DC to AC and back to DC again. Our direct DC-to-DC approach saves 29-43% on power consumption while providing cleaner, more stable power to your Starlink terminal. When you're running off batteries in remote Australia, every watt counts.
We've tested these systems across the continent—from the red dirt of the Pilbara to the coastal communities of Tasmania. They're built to handle temperature extremes, vibration from corrugated roads, and the dust that seems to get into everything out here.
Professional Installation Without the Headaches
One thing we can't stress enough: don't attempt DIY wiring based on Reddit forums or YouTube videos. We've seen too many expensive Starlink terminals damaged by incorrect wiring. Our systems are designed to work safely with your equipment, maintaining warranties while delivering professional-grade performance.
For Gen 2 installations, we provide detailed instructions for cable modification or offer our SPX to RJ45 adapters to avoid cutting cables entirely. Every StarPower unit comes with comprehensive installation guides and access to our Australian technical support team.
Ready to Make the Switch?
The transition to Starlink DC power represents more than just an upgrade—it's an investment in reliability, efficiency, and peace of mind. When you're hundreds of kilometres from the nearest town, you need equipment that simply works.
Browse our complete StarPower range today and find why thousands of Australians trust SpaceTek for their remote connectivity needs. With local support, Australian engineering, and products designed specifically for our conditions, we're here to keep you connected wherever your trips take you.
Don't let inefficient power systems limit your connectivity. Experience the difference that proper Australian engineering makes in remote conditions—order your StarPower system today.

Leave a comment
This site is protected by hCaptcha and the hCaptcha Privacy Policy and Terms of Service apply.