Connect to the Future: Getting Started with Starlink
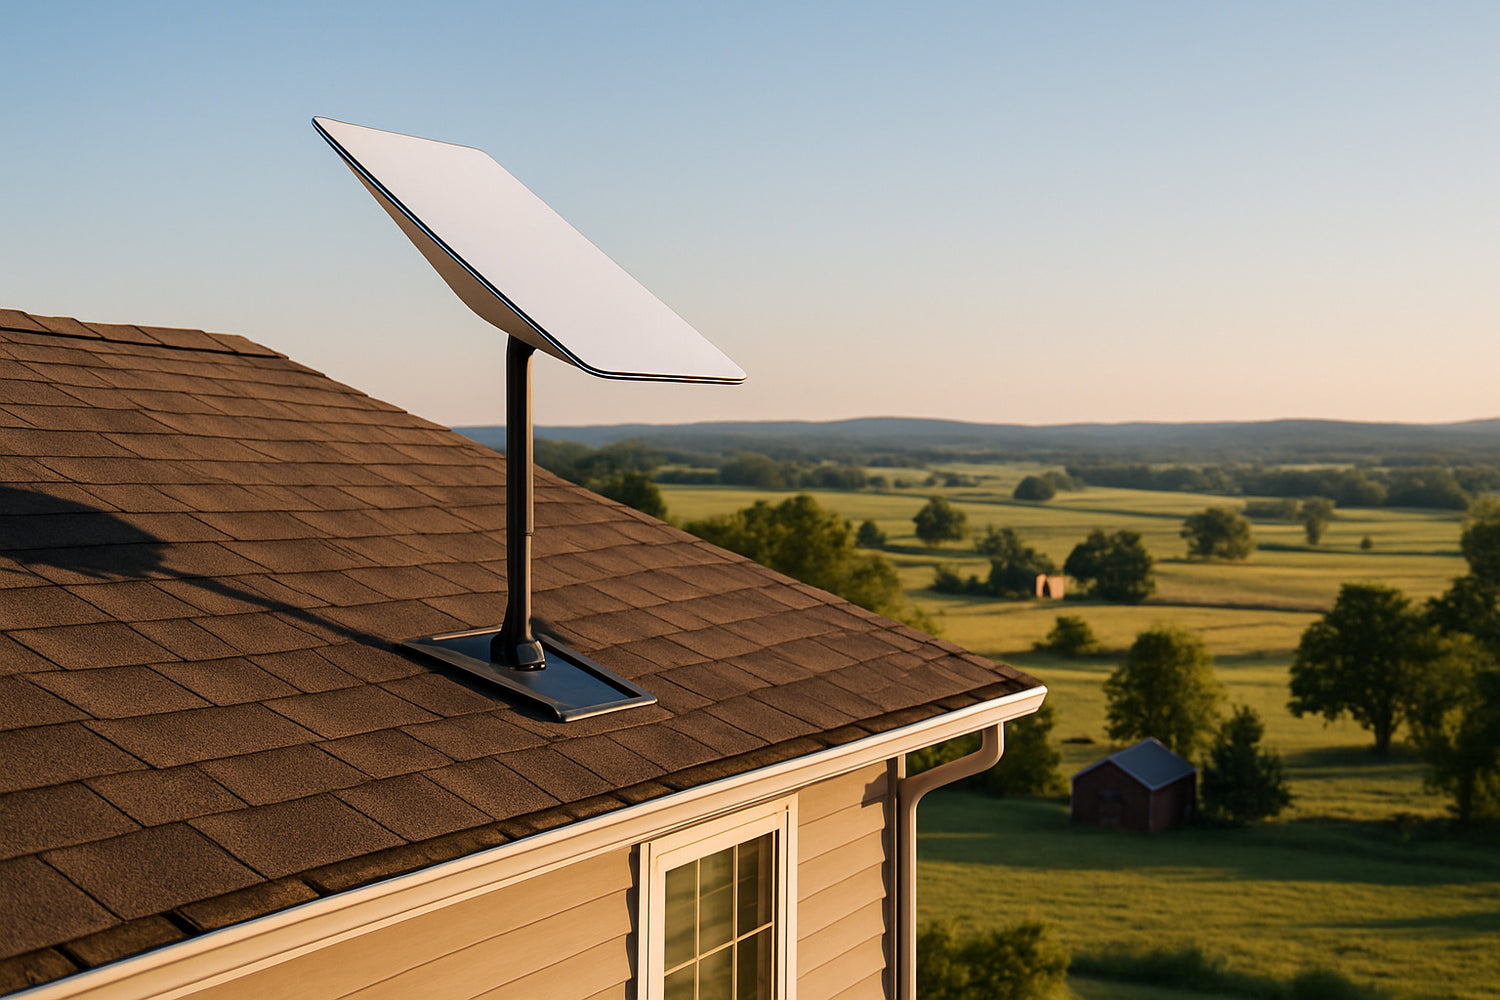
Starlink roof mount installation is a critical step in bringing high-speed satellite internet to your home, especially in remote Australian locations where traditional broadband options fall short. With the right approach, you can achieve a professional-quality installation that ensures reliable connectivity for years to come.
#
Quick Guide: Starlink Roof Mount Installation Steps
- Choose the right mount type based on your roof material (Pivot, Flashing, Ridgeline, or Volcano Mount)
- Select an optimal location using the Starlink app's obstruction tool (needs clear 110° horizontal view)
- Gather necessary tools: drill with 6mm bit, sealant, safety equipment
- Install the mount securely to a structural beam
- Apply proper weatherproofing to prevent leaks
- Route and secure cables safely through roof or wall
- Connect and test your Starlink system
For many Australians in remote areas, Starlink represents more than just internet access—it’s a lifeline to education, healthcare services, and connection with family. As one customer in the Outback told us, "After six years of struggling with patchy service, we were online with blistering speeds in under five minutes."
Whether you're in the Northern Territory or rural Queensland, proper installation is the key to open uping Starlink's full potential. The good news is that with the right mount and techniques, you can achieve a professional-quality setup that will stand up to Australia's unique weather challenges.
While Starlink dishes come with a standard ground mount, roof mounting provides better clearance from obstructions and improved signal quality, making it worth the extra effort for most permanent installations.
Understanding Your Mount Choices
Choosing the right mount is one of the most important steps in a successful Starlink roof mount installation—especially if you want your setup to withstand Australia’s wild weather and keep your connection rock solid. At SpaceTek Australia, we’ve designed our mounting solutions with Aussie conditions at front of mind, making sure your Starlink stays secure no matter where you are, from the suburbs of Sydney to the heart of the Outback.
Before you grab your tools, let’s walk through the main types of mounts we offer, what sets them apart, and which one best suits your home. Picking the right mount isn’t just about getting the dish on the roof—it’s about ensuring ongoing performance, protection, and, yes, peace of mind.
Main Types of Starlink Roof Mounts
Pivot Mounts are a real crowd-pleaser for sloped roofs. They give you flexibility to adjust your dish for the best possible signal, and create a solid anchor point. If your roof is covered in standard shingles, this mount will likely be your go-to. It does require a bit of drilling, but don’t stress—the kit comes with sealant and mastic tape, so leaks are kept at bay.
If you’re worried about water sneaking in—especially in our wetter regions—the Flashing Mount is a brilliant choice. This mount nestles right into your roof’s water barrier using professional-grade flashing, creating a watertight seal around the fixings. For folks in the tropics or anywhere prone to heavy rain, this is the best way to keep your ceiling dry and your connection humming.
Now, for those who want to avoid drilling at all, the Ridgeline Mount sits right on top of your roof’s peak and uses ballast (that’s weight, not screws) to stay put. It’s a favourite for people with tile roofs or anyone wanting to keep their roof surface pristine. Because it doesn’t penetrate the roof, you can avoid a lot of the usual worries about leaks or warranty issues.
On commercial buildings and homes with flat or very low-pitch roofs, the Volcano Mount delivers the height and angle you need for clear sky access. Flat roofs can collect water, so this mount is built to keep everything liftd and stable—no more signal woes from blocked dishes!
Finally, if you’re renting, have a heritage-listed property, or simply can’t put a hole in your roof, our Non-Penetrating Mounts are the answer. They rely on concrete or metal ballast to weigh them down, so you get elevation without a single screw. You’ll still enjoy strong performance—these mounts can lift your Starlink dish up to 8 feet above the roofline, perfect for dodging trees, sheds, or that stubborn neighbour’s new extension.
Penetrating vs Non-Penetrating: Pros & Cons
Let’s talk about the big question: to drill, or not to drill? Both penetrating and non-penetrating mounts have their place in a solid Starlink roof mount installation.
Penetrating mounts—like the Pivot and Flashing—attach directly to your roof structure. Their biggest win is stability, even in heavy winds (properly installed, they’re steady up to 185 km/h). They also keep the footprint small, so you don’t need to load up your roof with heavy weights. Of course, they do require creating holes in the roof, which, if not sealed thoroughly, can lead to leaks or affect your roof warranty.
Non-penetrating mounts—such as the Ridgeline and ballasted systems—preserve your roof’s integrity. No holes, no stress to your warranty. They’re easier to move if you ever need to reposition your dish or move house. The trade-off? They take up a bit more space and need heavy ballast to stay secure. On steep roofs or in wild cyclone zones, their wind ratings are slightly lower than those of their drilled-in cousins.
Either way, the key is proper installation and weatherproofing. A poorly sealed screw can cause more drama than a leaking tap—so always use the supplied sealant and double-check every joint.
Which Mount Fits Your Roof?
It’s not just about choosing your favourite mount style; it’s about matching the mount to your unique roof. A good Starlink roof mount installation comes down to how well the hardware works with your materials.
If your home has shingle roofing, both Pivot and Flashing Mounts are excellent. Always apply sealant and mastic tape under and around every lag screw, and drill at a gentle downward angle from the inside out to help water run off, not in. Finish with a bead of silicone for good measure.
For corrugated metal roofs, you’ll want non-penetrating clamps if you’ve got a standing seam roof, or use our specialty brackets for roofs with exposed fasteners. Skip using timber or concrete ballast, as these can hold moisture against the metal and cause rust or staining. Stick with non-corrosive supports, and always double-seal any bracket points.
If you’ve got tile or slate, the Ridgeline Mount or a custom Pole Mount are your best bets. These roofing materials are fragile—drilling is risky—so you’ll need a mount that works with the natural slope and water flow. Our ridge cap adapters fit snugly without causing cracks, and our cable tethers keep everything secure in wind.
For flat roofs, opt for the Volcano Mount or a Non-Penetrating Mount with the right ballast. Make sure there’s a pathway for water to drain beneath your mount, and use rubber pads to shield the roof surface from scuffs or wear.
Not sure which mount will suit your home? Chat with our SpaceTek team for friendly advice—no obligation, just practical guidance for Aussies by Aussies.
Ready to get started? For more on how our rust-resistant, high-performance mounts can improve your setup, check out SpaceTek’s full range of Starlink mounting solutions.
Mapping the Perfect Spot on Your Roof
When it comes to Starlink roof mount installation, nothing is more important than picking the perfect spot on your roof. Starlink works best when the dish has a completely clear view of the sky—no trees, no chimneys, no nosy cockatoos blocking the signal! This is especially true for remote homes right across Australia, where every bit of signal strength counts.
Before you even think about breaking out the ladder, take a moment to plan. The Starlink app includes a fantastic obstruction tool, which is your best mate for scoping out the ideal dish placement. Using augmented reality, it shows you which sections of the sky must stay clear to keep your connection steady. For most Starlink users, you’ll need a 110° horizontal clear view, with at least 20° vertical clearance above the horizon. If anything pokes into that invisible dome—whether it’s a gum tree or a neighbour’s windmill—you risk slowdowns or dropouts, especially during peak times or stormy weather.
SpaceTek’s mounts are all about giving you the flexibility to find that sweet spot. Our adjustable, rust-resistant kits make it simple to relocate your dish if needed and keep it positioned just right—even as conditions change.
But even with the right gear, it’s easy to make a few classic Aussie mistakes. Chimney shadows are a common trap: that brickwork can block part of your sky view, causing signal interruptions at certain times of day. Tree line interference is another sneaky culprit—remember, eucalyptus trees seem to double in size every time you look away, so always plan ahead for future growth. Watch out for HVAC units or roof vents as well. These might seem harmless, but they can block or reflect the signal, so always keep your dish at least two metres away from large roof fixtures.
And don't forget about the mounting angle. Starlink dishes work best when mounted within five degrees of vertical. That means no horizontal chimney brackets or creative wall mounts—stick to the roof or a sturdy mast using SpaceTek’s custom solutions. If you’re installing in a cyclone-prone area, avoid the windward side of your roof, as powerful gusts can put extra stress on your system. SpaceTek mounts are cyclone-tested, but smart placement is still key for long-term resilience.
For those living in remote corners of Australia, elevation makes a big difference. The outback might look open, but the reality is that low hills, thick scrub, or even distant treetop horizons can all affect your Starlink performance. Placing your dish higher up—and making sure it’s above all immediate obstructions—can boost your speeds and reliability, especially during unpredictable weather. In some parts of the NT and WA, higher placement also helps your dish shed dust and debris after a big blow.
During scorching summers, mounting your dish in a well-ventilated, liftd position helps reduce signal fade caused by extreme heat. And in cyclone zones, a secure, liftd mount can be the difference between staying connected and scrambling for backup options.
One final tip: always double-check your chosen spot using the obstruction tool on your phone before breaking out the drill. Take a moment to walk around your roof, check for shadows, and imagine how things might change over the next few years. Choosing the right spot really does open up the full Starlink experience—fast, stable, and ready for whatever the Aussie climate throws your way.
If you need more advice, check out the detailed info on mounting hardware or get in touch with our team here at SpaceTek Australia. We specialise in custom mounts and accessories built tough for remote Australia—so you can stay connected, no matter where you call home.
Starlink roof mount installation: Step-by-Step Guide
Ready to take the leap and install your Starlink dish? With the right approach and a bit of care, your Starlink roof mount installation can deliver fast, reliable internet – whether you’re in the heart of Sydney or off-grid in the red centre. Here’s how to do it safely and correctly, using quality SpaceTek mounts built for tough Aussie conditions.
Safety First
Before you even climb that ladder, think about safety. Always wear a safety harness that meets AS/NZS 1891 standards and make sure it’s properly anchored. Never attempt roof work during wet or windy conditions – safety is more important than finishing quickly. It’s best to have a helper on the ground in case you need a hand (or someone to pass up that one tool you forgot). Non-slip boots and insulated tools are your best mates, especially if there are power lines nearby. Take your time: a safe job is a lasting job.
Step 1: Prepare Your Materials and Tools
Get organised before you head up. Lay out your Starlink dish, your selected SpaceTek mount, a drill fitted with a 6mm bit, and all the supplied lag screws. Have your sealant and mastic tape ready, a level for accuracy, and a screwdriver or socket set. You’ll want cable clips or ties (at least twenty for a neat job), weatherproof silicone sealant, and a pencil for marking your drill points. Don’t forget your safety harness and ladder – rated for your roof height – and a stud finder if you have access to the roof cavity.
Step 2: Locate and Mark Mounting Points
Find a structural beam or rafter to anchor your mount – never attach directly to just roof sheeting or tiles. Use a stud finder from inside the roof space if needed. Carefully mark your pilot holes, checking your markings against your earlier obstruction analysis to make sure you’re still getting a clear view of the sky.
Step 3: Drill Pilot Holes
Drill 6mm pilot holes on your marks, aiming at a slight downward angle from inside to outside. This trick helps prevent water from tracking into your home, keeping things dry even in a storm. Steady, even pressure will stop the wood from splitting.
Step 4: Apply Sealant and Install the Mount
Weatherproofing is critical for any Starlink roof mount installation. Roll mastic tape into small balls and push them into the pilot holes. Next, apply a generous bead of silicone sealant around each hole. Position your mount so the arrow points upslope (unless your specific mount instructions say otherwise). Insert the lag screws and tighten them until firmly seated, being careful not to overtighten and strip the timber.
Step 5: Route the Cable
Work out the best route for your cable – through the roof, eave, or wall. If you’re going through the roof, use a weatherproof cable gland to keep water out. Always make a drip loop just before the cable enters your home so water runs off, not in. Secure the cable every 30 to 45 centimetres with clips or ties so the wind won’t catch it.
Step 6: Connect and Test the System
Connect the cable to your Starlink dish. Slide the dish into your SpaceTek mount until it clicks in solidly. Power up your system and use the Starlink app to verify alignment and ensure your signal is strong. Lock off any adjustment screws to keep everything steady, especially important if you’re in a windy area.
Tools & Materials Checklist for Starlink roof mount installation
Here’s a quick checklist to make sure you haven’t missed anything:
- Drill with 6mm bit
- Socket wrench or screwdriver
- Level
- Ladder (roof height rated)
- Safety harness (AS/NZS 1891-compliant)
- Stud finder
- Cable fish tape (for internal routing)
- Multimeter (for grounding checks)
- Starlink dish and mount
- Lag screws
- Silicone sealant
- Mastic tape
- Cable clips or UV-resistant zip ties
- Weatherproof cable entry gland
- Grounding wire (if required)
Recommended extras include a lightning arrestor, surge protector, UV-resistant cable sleeve, and extra ballast if you’re using a non-penetrating mount on a windy roof.
Starlink roof mount installation on existing mast
Already have a satellite or antenna mast? You might be able to reuse it for your new Starlink roof mount installation. Start by checking the mast diameter – it should be between 31–51mm (1.25"–2"). Make sure the mast is rock-solid and can handle the extra weight.
SpaceTek offers dedicated pipe adapter mounts designed for standard masts. Remove any old dish or antenna and give the mast a good clean. Route your Starlink cable through the pipe adapter, then slide the adapter onto the mast. Tighten the clamp set so everything’s secure, then connect the cable to your Starlink dish. Slide the dish home until it clicks.
For extra protection, install a lightning arrestor on the mast below the dish, and ensure the mast is properly grounded. Use the Starlink app’s alignment tool to fine-tune the orientation for best signal – you can rotate the dish in the adapter as needed. Lock it in place, and you’re ready to enjoy high-speed internet.
Every roof is different, but with quality SpaceTek mounts and a bit of patience, your Starlink setup will stand up to Australia’s wildest weather and keep you connected for years to come. For more details, check out SpaceTek’s Roof Mount Installation Guide PDF and browse our mounting hardware blog for expert tips.
Roof-Specific Best Practices & Weather-Proofing
Every Aussie roof is a bit different, and when it comes to Starlink roof mount installation, getting the details right means keeping your roof safe, your warranty intact, and your internet speeds flying—no matter what the weather throws at you. Let’s walk through the best ways to mount your Starlink dish on metal, shingle, and tile or slate roofs, with a focus on SpaceTek Australia’s rugged, rust-resistant hardware.
Metal Roofs – Keep the Warranty Intact
Metal roofs are everywhere across Australia, especially in the bush and outback. But they need the right approach—one careless move and goodbye warranty, hello costly repairs.
The easiest way to keep your roof happy is to use non-penetrating clamps that grip the seams, rather than drilling holes. SpaceTek’s mounts feature strong, purpose-built clamps for Australian metal roof profiles, so you can attach the dish without voiding your warranty or risking leaks.
Of course, what you mount with is as important as how you mount it. Coastal conditions can chew through regular steel in no time, so all SpaceTek kits rely on marine-grade stainless steel or hot-dip galvanised materials to withstand rust, salt, and storms.
Drainage is another biggie. Mounting struts designed for free water flow mean you never end up with water pooling under your hardware. And whatever you do, don’t put concrete or wood ballast directly on your metal roof—those materials trap moisture and react with the metal, leading to corrosion and sometimes even panel failure.
In short: Clamps not screws, marine-grade hardware, and no ballast on bare metal. That’s the SpaceTek way to a strong, warranty-safe install.
More info about metal solutions
Shingle Roofs – Leak-Free Flashing
If you’re working with asphalt shingles, waterproofing is your number one job during your Starlink roof mount installation. Nothing ruins a new internet connection quite like a slow, sneaky leak.
Start with under-shingle flashing—slide it under the upper shingle and over the lower one to keep water moving the way it should. Roofing cement between the flashing and the shingles gives you extra peace of mind.
When it’s time to drill, always go at a slight downward angle from inside to outside. This helps keep water from following the screw path into your roof cavity. Before inserting screws, roll mastic tape into little balls and push them into the pilot holes, then use more tape around the base of the mount. Once everything’s fastened, finish the job with a generous bead of high-quality silicone sealant (J-B Weld RTV is a solid pick) around every penetration. This multi-layered approach is what keeps water out for years—even through wild weather.
Pro tip: Always take your time on the sealing steps. A few extra minutes here means years of dry, worry-free streaming.
Tile & Slate – When to Use Ridgeline or Pole Mounts
Tile and slate roofs can look stunning, but they’re notorious for being tricky with satellite installs. The last thing you want is a broken tile or a leak where none existed before.
Here’s the golden rule: avoid drilling through tiles or slate whenever possible. Instead, use a ridgeline mount—these sit right at the roof peak and spread the dish’s weight across several tiles, so there’s no cracking or uneven pressure. If that’s not an option, look to an extended pole mount that’s specifically designed for fragile surfaces.
In cyclone-prone or high-wind regions, add tethering cables for extra peace of mind. These keep your dish rock-steady without compromising your roof or water channels. Above all, make sure your mounting system doesn’t get in the way of your roof’s natural drainage paths. Blocked or redirected water flow is a fast track to leaks and costly repairs.
Remember: SpaceTek mounts are made for Aussie conditions and designed to keep your roof—and your signal—in top shape.
For every style of roof and every wild weather day, there’s a SpaceTek mounting solution to make your Starlink roof mount installation safe and reliable for the long haul. If you want to dig deeper into mounting hardware, check out our in-depth guide to Starlink mounting hardware for more tips and product info.
Safety, Compliance & Long-Term Maintenance
When it comes to Starlink roof mount installation, it's not just about getting your dish up and running—it’s about making sure everything is safe, secure, and built to last in Australia's tough conditions. At SpaceTek Australia, we know just how much you rely on your connection, so let’s talk about safety, compliance, and how to give your Starlink system a long and healthy life.
Safety During Installation
Installing any gear on your roof means you’ll need to put safety first, every single time. Always wear a safety harness that meets AS/NZS 1891 standards, and make sure it’s clipped to a secure anchor point before you even think about climbing up. Don’t work alone: having someone on the ground can make all the difference if you run into trouble.
Electrical safety is just as important. If you’re handling any electrical components, switch the power off first. Use a surge protector for your Starlink gear to guard against lightning or voltage spikes. For an extra layer of protection, consider installing a whole-house surge protector—especially if you’re in a storm-prone region.
With Australia’s wild weather, wind load calculations matter. Cyclone risk varies across the country, so use local resources like ballastcalc.com to work out how much ballast you need if you’re using a non-penetrating mount. At SpaceTek, our mounts are tested for wind speeds up to 115 km/h when installed correctly, so you can rest easy even when the southerly busters roll through.
Long-Term Maintenance Schedule
Your Starlink setup will brave sun, wind, rain, and maybe the odd cockatoo, so regular checks will keep it running smoothly. Each month, have a quick look to make sure your dish is still pointed correctly, check for any leaves or debris, and ensure cable connections haven’t come loose.
Every quarter, look over your mounting hardware for any hints of rust, inspect the sealant around roof penetrations, and give the dish a gentle clean if it’s looking dusty. In Australia’s outback, a dusty dish can quickly mean a dodgy signal.
Once a year, grab your tools and check that all bolts are tight, reseal any weatherproofing that’s showing its age, and make sure your grounding connections are still rock solid. Don’t forget to look over the cable sheathing for UV damage or cracks—our sunshine can be relentless.
After any wild weather—think cyclones, dust storms, or snow—do a full inspection. Make sure the dish hasn’t shifted, and run a speed test to confirm your internet is still purring along.
Protecting Against Australian Weather Extremes
Australia’s climate throws everything at your gear, from cyclones up north to wild heat in the Red Centre and salty sea breezes along the coast. In cyclone zones, use extra tethering on mounts and upgrade to heavy-duty lag screws. Install a lightning arrestor and make sure your system is properly grounded.
For those living inland where the sun is fierce, invest in UV-resistant cable sleeves and look at getting a dish cover to keep things cool. Good airflow around the dish will help prevent overheating, while in coastal areas, only use marine-grade stainless steel hardware and add extra corrosion protection to every metal part. If you’re in the snow belt, install your dish at a steeper angle so snow sheds off, consider a heated cover, and mount it high enough to avoid all but the deepest drifts.
Tools & Training Resources
Getting your Starlink roof mount installation right sometimes means using a few clever tools. Ballastcalc.com is brilliant for working out how much weight you need for your mount, factoring in your roof height and wind zone. Don’t forget to check with your local council about any building permits or engineering sign-off needed for new rooftop kit.
The Starlink app is your mate for checking obstructions, and SpaceTek Australia has guides custom for our unique Aussie conditions to help you every step of the way.
Upgrading for 2025 & Beyond
Starlink keeps advancing, and your setup should too. Consider a dish cover to protect against snow, dust, and debris—some even have heaters for alpine regions. Place your Starlink router centrally in your home to get the best coverage, and add Wi-Fi extenders if you have a big block. Stay on top of firmware updates to open up new features and keep your performance sharp.
For real peace of mind, invest in proper cable management—UV-resistant sleeves and sturdy clips will keep your cables safe from sun, weather, and accidental damage, giving you a neat, reliable system that’s easy to maintain.
By making safety, compliance, and maintenance part of your Starlink routine, you’re not just protecting your equipment—you’re ensuring fast, reliable internet through all of Australia’s seasons. With SpaceTek’s custom mounts, smart cable solutions, and weather-tough accessories, you’re set for dependable connectivity year after year.
Frequently Asked Questions about Starlink Roof Mounts
Does drilling void my roof warranty?
This is a question we hear all the time, and the answer depends on both your specific roof type and its warranty. If you have a metal roof, drilling often voids the warranty—so it’s best to use non-penetrating clamps, like the ones SpaceTek Australia supplies for standing seam roofs. On shingle roofs, most manufacturers allow for penetrations as long as they’re properly sealed and maintained over time. But with tile or slate roofs, drilling almost always leads to a voided warranty, which is why we recommend ridgeline or tile-specific mounts that don’t require you to drill through fragile surfaces.
To make sure you’re covered:
- Review your warranty documents before getting started with your Starlink roof mount installation.
- Choose non-penetrating mounts wherever possible to avoid future headaches.
- Consider using a professional installer who can certify the work and provide documentation.
- Take photos of your installation process—these can help if you ever need to make a claim.
How much wind can a Starlink mount handle?
Living in Australia means facing wild weather, so it’s wise to think about wind resistance for your Starlink setup. At SpaceTek Australia, our mounts are made specifically for tough Aussie conditions. When properly installed, standard mounts handle wind speeds up to 115 km/h. If you’re in cyclone-prone regions or want extra peace of mind, additional tethering and heavy-duty hardware can boost resilience even further.
Standard Starlink mounts aren’t made for full-blown cyclones or tornadoes straight out of the box. In high-wind areas, use a penetrating mount for top stability, add secondary tethering cables, and make sure you have enough ballast for any non-penetrating setup. During storm season, it’s also smart to inspect your mount more often to catch any issues early.
What’s the safest way to run the cable through the roof?
Getting the cable safely inside your home is just as important as mounting the dish itself. The goal is simple: keep water out and protect your cable from damage. Always use a proper weatherproof cable gland or entry point—this creates a tight, watertight seal and stops leaks before they start. When drilling, go from the inside out at a very slight downward angle. This way, rainwater can’t follow the cable’s path into your ceiling space.
Layer your protection: apply silicone sealant around the entry point, use mastic tape for added waterproofing, and create a drip loop in the cable before it enters the house. This prevents water from pooling and sneaking inside. Secure the cable with UV-resistant clips every 30 to 45 cm, and include a gentle service loop near the entry so the cable doesn’t get pulled too tight or kinked.
If you follow these steps, your Starlink roof mount installation will stay watertight and trouble-free. One of our go-to tips from the field: always finish with a generous bead of silicone sealant around the gland. After years of installs across Australia, we’ve found this method provides long-term peace of mind, even through heavy storms.
If you have more questions about Starlink in Australia, or you’re preparing for Starlink in remote communities or outback setups, don’t hesitate to contact SpaceTek Australia. We’re passionate about helping Australians stay connected—wherever you call home.
Connectivity Without Compromise
A quality Starlink roof mount installation is more than just a technical task—it’s your ticket to fast, reliable internet, no matter how remote your corner of Australia. If you live where mobile towers struggle and the NBN van never shows, you already know what a difference Starlink can make. But to get the most from your investment, you need the right mounting gear—built specifically for our tough weather, unique rooftops, and wide-open spaces. That’s where SpaceTek Australia comes in.
At SpaceTek, we design and build custom Starlink mounts and accessories, purpose-made for Aussie conditions. Our marine-grade, rust-resistant fittings are crafted to handle everything from tropical cyclones in the north, to the dust and heat of the outback, to alpine snow further south. No flimsy shortcuts—just rock-solid security and peace of mind, so your dish stays put and your connection stays strong.
Getting your Starlink roof mount installation right isn’t about luck. It’s about careful planning, using the right hardware, and following best-practice weatherproofing and safety steps. When you choose proper, weatherproof gear from SpaceTek, you’re ensuring your signal remains steady through all four seasons. And with features like adjustable tilt, robust cable management, and real-world wind testing, our mounts are more than just a place to perch your dish—they’re an investment in stability and long-term performance.
For remote Australia, this isn’t just about Netflix or emails. Starlink means access to healthcare from the bush, online education for rural families, or simply staying in touch with loved ones. Wherever you are—the tropical north, the arid heart, or a windswept coastline—a sturdy, well-positioned mount can be the difference between seamless video calls and frustrating dropouts.
Looking to future-proof your setup for 2025 and beyond? Now’s the time to optimise. Whether you’re upgrading to a sturdier mount, elevating your dish above gum trees, adding a snow-proof cover, or tidying up your cabling, SpaceTek’s accessories are designed with real Australian challenges in mind. Want to compare roof vs pole mounts for your property? Check out our detailed comparison to see what’s best for your situation.
Fast and dependable internet starts with the right foundation. With SpaceTek Australia’s purpose-built Starlink accessories, you’re not just connecting to the web—you’re connecting to the future. That’s connectivity without compromise.


Leave a comment
This site is protected by hCaptcha and the hCaptcha Privacy Policy and Terms of Service apply.