When Storms Interrupt Your Starlink Connection
When the skies darken over the Australian outback or coastal regions, your Starlink connection might take a hit. As someone living in remote Australia, you know how precious reliable internet can be – and how frustrating it is when storms roll in and disconnect you from the world.
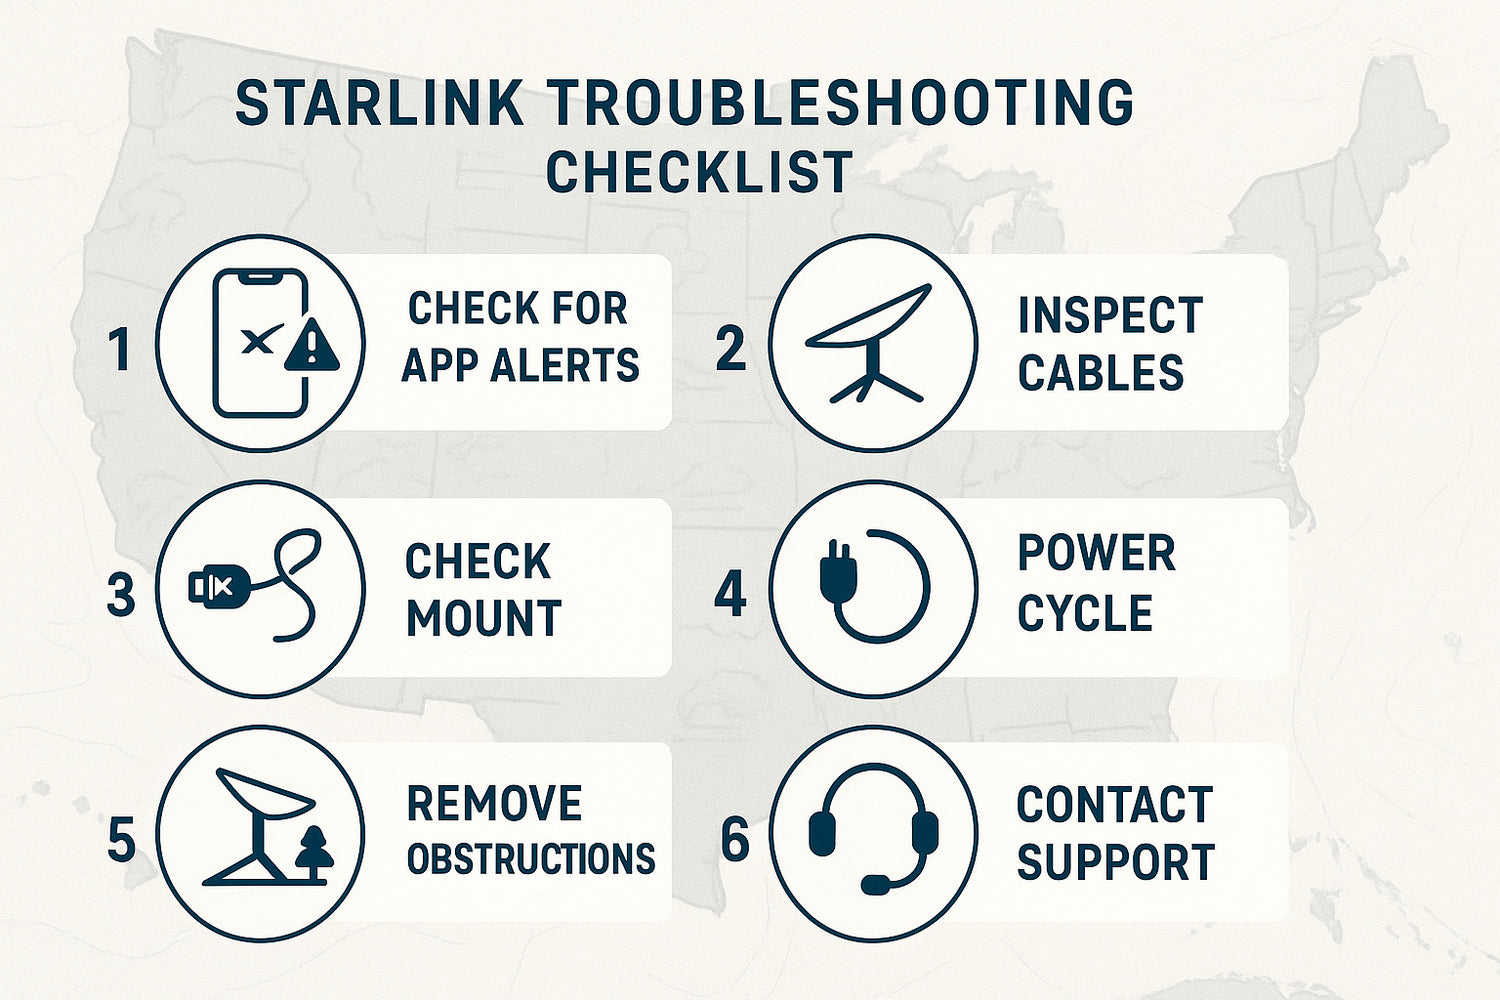
If you're facing Starlink troubleshooting challenges during wild weather, here's a practical 6-step checklist to get you back online quickly:
- Check the Starlink app for alerts or outages
- Inspect cables and connections for damage or looseness
- Ensure dish mount is stable and not swaying in wind
- Power cycle both router and dish (unplug for 60 seconds)
- Remove any third-party hardware to isolate the issue
- Contact Starlink Support if problems persist
Starlink has been nothing short of for those of us in the far reaches of Australia, bringing high-speed internet to places where traditional providers simply couldn't reach. But when those famous Australian storms come barrelling through – whether it's cyclonic winds in the north or fierce southerlies along the coast – even the best satellite systems can struggle.
The most common storm-related issues you'll encounter include the dreaded 'Disconnected' error message, notifications about 'Starlink unplugged or rebooting', and those frustrating intermittent dropouts that seem to happen right when you're in the middle of something important.
These problems typically stem from physical factors like your mount wobbling in high winds, water finding its way into cable connections, or simply the heavy rain creating temporary obstructions between your dish and the satellites.
One tip that's saved many an Aussie Starlink user: "Keep the router and dish always powered." This simple practice allows your system to recover faster after weather events by maintaining its ability to apply firmware updates and re-establish satellite connections more efficiently once the storm passes.
For those of us in remote areas of Australia, where storms can be particularly fierce, investing in a proper mounting solution isn't just nice to have – it's essential. Many users report dramatic reductions in weather-related outages after upgrading from the basic mount to something more robust that prevents dish movement during those wild wind gusts we're famous for.
Check the Starlink App First: Your Storm-Time Starlink Troubleshooting Starting Point
When wild weather hits your patch of Australia and your Starlink connection drops out, don't rush outside in the rain just yet. Your smartphone holds the key to diagnosing what's gone wrong. The Starlink app is your first line of defence during stormy weather – it's packed with diagnostic tools that can tell you whether you're dealing with a simple rain fade issue or something more serious.
Read App Alerts & Weather Impact
The moment your Netflix stream freezes or your Zoom call drops, grab your phone and open the Starlink app. It displays clear alert banners that explain exactly what's happening with your connection:
Disconnected alerts typically mean your router can't chat with your dish – during a storm, this could be due to water getting where it shouldn't or a cable that's copped a beating from the elements.
Unplugged or Rebooting messages often pop up during electrical storms when power fluctuations cause your system to restart itself. If you're in an area prone to lightning, this one's common.
Offline is the app's way of saying something's not right, but it could be for various reasons – from network outages to the heavy rain physically blocking your signal.
Obstructed warnings might appear during particularly intense downpours as water droplets temporarily interfere with your dish's view of the satellites.
It's worth noting that some signal issues during heavy rain are perfectly normal. Satellite internet, including Starlink, experiences what's called "rain fade" when water droplets in the atmosphere absorb and scatter the signal.
The good news for us Aussies is that Starlink's low Earth orbit means this effect is less severe than with traditional satellite services – so you might notice some slowdown during a thunderstorm, but you won't necessarily lose connection entirely.
Run Advanced Speed & Obstruction Tests
When you're experiencing connection dramas, the app's diagnostic tools are absolute gold:
The Advanced Speed Test does more than just tell you how fast your internet is – it provides detailed graphs showing your connection performance over time. Running tests both during and after a storm gives you valuable comparison data. Is your download speed crawling at 5 Mbps during the storm but bounces back to 150 Mbps after? That's classic rain fade. If it stays slow after the skies clear, you might have a hardware issue.
The Obstruction Viewer is brilliant for spotting temporary problems. This 3D visualisation shows exactly where your dish's view might be blocked. During storms, check if water pooling on your dish or nearby debris might be causing issues. The tool creates a map showing where signal interruptions are occurring, which is particularly useful if you need to adjust your dish position after wild weather.
Take screenshots of your test results – they'll be invaluable if you need to contact support later. Having this data ready can speed up the troubleshooting process significantly and help you avoid the frustration of repeating diagnostic steps.
For more detailed information about running these tests and interpreting the results, Starlink provides more info about these services in their support documentation.
The app is your best mate during Starlink troubleshooting – it can often reveal whether you're dealing with a temporary weather-related issue that will resolve itself, or if you need to brave the elements to check your hardware.
Hardware Inspection & Cable Care in Wild Australian Weather
Australia's harsh climate can really test your Starlink equipment. From cyclones lashing the north to fierce thunderstorms in the east and dust storms sweeping across the outback, your Starlink hardware faces challenges that city broadband simply doesn't encounter.
Power Supply & Cable Damage Checklist
After wild weather passes through, it's worth giving your Starlink setup a proper once-over. Start with the power supply - is the light steady? A blinking light is your first clue something's not right with the connection to your dish.
Next, follow the cable from end to end. Look for cuts or nicks in the outer sheath that might let moisture in. Check for hard bends that could damage the internal wiring - these are especially common where cables enter buildings or turn corners. In coastal areas, salt spray corrosion is a real problem, so pay extra attention to connection points if you're near the ocean.
One Aussie user in Far North Queensland finded that a barely visible 1/16-inch gap in a connection was causing frustrating dropouts during the wet season. It's often these tiny issues that cause the biggest headaches!
If you spot any damage, don't put off repairs. A bit of waterproof tape might get you through temporarily, but damaged cables should be replaced as soon as possible.
Secure Connectors & Waterproofing
Water getting into your connections is one of the most common causes of Starlink troubleshooting headaches during stormy weather. Here's how to keep things dry:
Make sure all connectors are properly seated with absolutely no gaps. A properly connected cable should feel secure and be difficult to remove without deliberately trying to disconnect it.
For extra protection in our unpredictable Australian climate, consider adding silicone boots over outdoor connection points. Creating drip loops in your cables (where the cable curves downward before entering a connection) is a simple trick that prevents water from running down directly into sensitive equipment.
Use rust-proof clips to secure cables along their route, maintaining gentle curves rather than sharp bends. Where possible, keep cables liftd to prevent them sitting in pooled water after heavy rain.
These simple precautions can dramatically reduce the risk of moisture-related failures and save you from frustrating troubleshooting sessions when you'd rather be enjoying your internet connection.
For more information about power supply indicators and what they mean, visit What Do the Lights on Your Starlink Power Supply Mean? – it's amazing how much your power brick can tell you when you know what to look for!
Weather Resilience & Mount Stability: Keep Dishy Rock-Solid
When the wind picks up and storms roll across the Australian landscape, one of the most overlooked aspects of Starlink troubleshooting becomes glaringly obvious – mount stability. That innocent-looking dish on your roof needs to be rock-solid when cyclonic winds or fierce southerlies come calling.
Why Wind Gusts Knock You Offline
Your Starlink dish (lovingly nicknamed "Dishy" by most users) isn't just sitting there looking pretty – it's constantly working to maintain precise alignment with satellites zooming overhead. When gusty winds set your dish swaying:
The signal interruption can be immediate and frustrating. Even small movements of just a few millimetres can break that perfect connection between your dish and passing satellites.
After significant movement, your dish often needs to recalibrate, which isn't instantaneous. This recalibration process can leave you staring at buffering screens for several minutes while Dishy finds its bearings again.
In persistent winds, which are common along Australia's coastlines during storm season, the dish enters a state of constant hunting – continuously trying to adjust its position. This creates an unstable connection that drops in and out, sometimes worse than having no connection at all.
Many Aussie Starlink users have finded this the hard way. As one Queensland user shared in a popular Starlink forum: "After replacing my basic mount with a sturdier solution, my storm-related outages dropped by about 90%. The dish needs to be rock-solid to maintain connection in high winds."
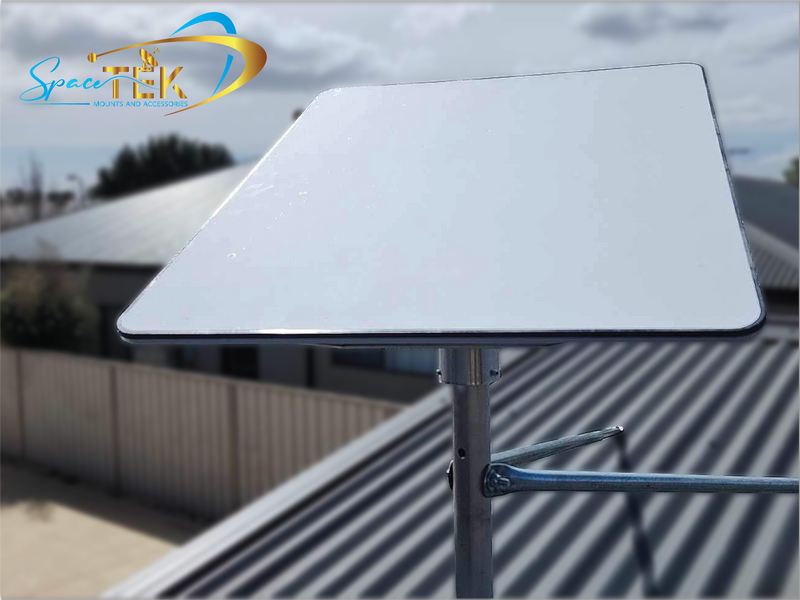
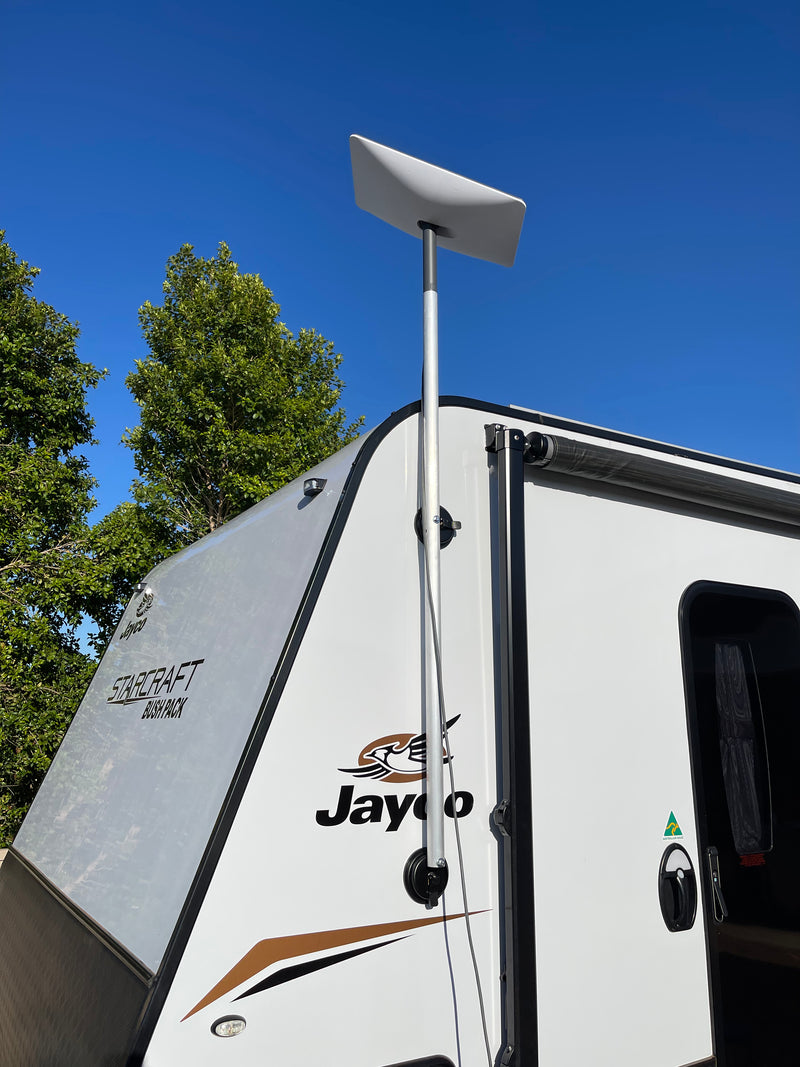
SpaceTek Mounts: Built for Cyclone-Rated Strength
At SpaceTek Australia, we understand that Australian weather conditions demand special consideration. From cyclones in the north to wild southerlies along the coast, our mounting solutions are specifically engineered to keep your Starlink dish stable when Mother Nature throws her worst:
Our cyclone-rated designs aren't just marketing talk – they're engineered to withstand the high wind speeds experienced during tropical cyclones and severe storms that regularly impact northern and coastal communities.
We use only marine-grade stainless steel or aluminium components that resist corrosion, even in coastal environments where salt spray can destroy lesser mounts within months.
Our mounts feature adjustable positioning options that allow you to find the perfect angle for optimal signal reception without compromising on stability – a crucial balance for users in remote areas.
Special vibration dampening features are built into our designs to minimise how much movement transfers from your roof or mounting surface to the dish itself during high winds.
The difference a quality mount makes becomes particularly evident during extreme weather. SpaceTek mounts have proven their reliability in Far North Queensland cyclones, keeping Starlink dishes firmly secured and online during wind gusts exceeding 100 km/h when other internet services fail. Our cyclone-rated mounting systems are specifically engineered for Australia's harshest conditions.
When you're relying on your Starlink connection for critical communications during storms – perhaps the very time you need internet access most – the last thing you want is your dish dancing in the wind. With a properly engineered mount, your Starlink system can weather the storm right alongside you, keeping you connected when traditional services fail.
Network Optimisation, Third-Party Gear & Starlink Troubleshooting Pitfalls
When storms roll across the Australian landscape, your internal network setup can be just as important as your outdoor hardware. A well-optimised network configuration can be the difference between maintaining a workable connection during bad weather and facing complete disconnection.
Bypass Mode vs Mesh: Which One Works Best in a Storm?
During stormy weather, different network configurations offer varying levels of resilience. The standard setup using just the Starlink router is straightforward but might not provide the coverage needed in larger Australian homes or properties.
Bypass mode offers some distinct advantages during wild weather. By connecting your own high-quality router to the Starlink system, you can often maintain more stable local networking even when the satellite connection fluctuates. Many Aussie users report that their third-party routers handle connection instability more gracefully, keeping local devices connected even during brief outages.
Mesh networking truly shines during unstable conditions, especially in larger homes. The Starlink Mini and Gen 2 router support mesh configurations that extend your coverage. For maximum storm resilience, connect your mesh nodes with Ethernet cables rather than relying on wireless backhaul. This wired approach provides a rock-solid internal network that can weather connection hiccups more effectively.
For critical devices like work computers or medical equipment, always use wired connections where possible. Position your router or mesh nodes away from windows and exterior walls to minimise storm interference, and consider a small UPS (uninterruptible power supply) to keep your network alive during brief power fluctuations.
Split 2.4 GHz/5 GHz & Reduce Congestion
Network congestion can make weather-related issues feel much worse. During storms when your bandwidth might already be limited, optimising your wireless network becomes even more crucial.
Band splitting gives you greater control over your home network. By separating your 2.4 GHz and 5 GHz networks, you can strategically assign devices to the most appropriate band. The 2.4 GHz band offers better range and wall penetration but is more susceptible to interference, while 5 GHz provides faster speeds over shorter distances with less interference.
During stormy weather, prioritise essential devices by connecting them to your 5 GHz network. Smart TVs, gaming consoles, and IoT gadgets that don't need maximum speed can remain on the 2.4 GHz band. This prevents less important devices from competing for bandwidth with your critical equipment.
Router placement plays a surprisingly important role in network stability. Position your Starlink router centrally within your home, liftd above floor level, and away from metal objects, appliances, and thick walls. This simple adjustment can significantly improve signal distribution throughout your home.
Be mindful of peak usage times during extended storms. Many Australians experience slower connections in the evening hours when network congestion is highest. If possible, schedule large downloads or updates during off-peak hours to avoid additional strain on your connection when it might already be compromised by weather.
By taking these steps to optimise your internal network, you'll be better prepared to maintain connectivity when the next big storm rolls through, whether you're facing a tropical cyclone up north or a fierce southerly buster along the coast.
Escalation: Outages, Factory Resets & Contacting Support
When storms roll in and your basic Starlink troubleshooting attempts haven't solved the problem, it's time to dig deeper. Sometimes the solution requires more advanced measures or professional assistance – especially after those fierce Australian thunderstorms that can really put your system through its paces.
Perform a Safe Factory Reset for Deep Starlink Troubleshooting
A factory reset can be your saving grace when software issues persist, though it's best kept as your last resort before contacting support. Think of it as the digital equivalent of clearing the slate and starting fresh.
For most current Starlink routers, the process is straightforward. Look for the small reset button (usually recessed to prevent accidental presses), press and hold it for about 3 seconds until you see the light begin to blink, then patiently wait around 15 minutes while your system reboots and reconfigures itself.
If you're using an older router model without a dedicated reset button, you'll need to perform the somewhat quirky "six-cycle power reset" method. This involves unplugging and replugging your router six times in succession. On that final sixth power-up, your router will automatically reset to factory settings.
Just remember – after any factory reset, you'll need to set up your WiFi network again with a new name and password. Keep this information handy before you begin so you're not scrambling to create new credentials while offline.
When to Log a Support Ticket
Some issues simply require the expertise of Starlink's technical team. It's time to create a support ticket when:
You've spotted what appears to be physical damage to your dish or router that troubleshooting can't fix. Those cyclonic winds in North Queensland can be particularly rough on equipment.
Your connection repeatedly drops during storms, even after you've secured your mounting and checked all cable connections.
You're seeing unusual error messages that aren't covered in the standard troubleshooting guides or community forums.
When reaching out to support, be thorough with your information. Include clear photos of your installation setup, details about your power configuration, when problems began, and whether issues only occur during certain weather conditions. Screenshots from the Starlink app showing specific error messages or statistics will help the support team understand your situation more quickly.
Storm-Specific Maintenance Schedule
A bit of preventative maintenance goes a long way toward reducing storm-related issues with your Starlink system. Consider adopting a seasonal approach:
Before storm season hits, run through a complete check of your system. Tighten all mounting hardware, clear any debris from around the dish, inspect and secure all cable connections, and if you have backup power solutions, test them to ensure they're ready when needed.
After each significant storm, take a few minutes to check for new debris on or around your dish, look for any signs of water getting into connections, verify your mount remains stable, and clear any water that might have accumulated in problematic areas.
Each season brings its own challenges across Australia's diverse climate zones. During summer, be mindful of bushfire smoke that can interfere with signals. Autumn brings falling leaves that might collect on your dish. Winter can mean frost or even snow accumulation in some regions, while spring often marks increased storm activity that requires extra vigilance.
Frequently Asked Questions about Starlink Troubleshooting
Why does my Starlink connection drop only during rain?
Light rain typically shouldn't cause complete disconnections. While minor performance drops during heavy downpours are normal due to signal attenuation, frequent or complete disconnections suggest there might be issues with your mounting or hardware that need addressing. The good news is that Starlink generally handles rain better than traditional satellite services.
How long should I wait after a storm before assuming there's a problem?
Give your system some grace period – about 15-30 minutes after a storm passes is reasonable for your Starlink to fully reconnect and stabilise. If problems persist beyond this window, it's time to start troubleshooting.
Will a factory reset delete my service information?
Rest easy – a factory reset only restores your router to default settings. Your service subscription and dish configuration remain intact in Starlink's systems. You'll just need to reconfigure your WiFi network name and password.
Is it normal for Starlink to be slower after storms?
A temporary reduction in speed immediately following severe weather isn't unusual as the system recalibrates. However, if speeds remain consistently slow days after the weather has cleared, that suggests an issue requiring further investigation.
Can I use a UPS (Uninterruptible Power Supply) with my Starlink?
Absolutely, and it's a brilliant idea for Australian conditions where power fluctuations during storms are common. A good UPS not only prevents disconnections during brief outages but also protects your valuable equipment from power surges during electrical storms. Many users report dramatic improvements in storm resilience after adding a UPS to their setup – it's one of the most cost-effective upgrades you can make.
Reliable Internet Starts with the Right Accessories
When it comes to keeping your Starlink connection stable through Australia's unpredictable weather, having the right supporting equipment makes all the difference. SpaceTek Australia's purpose-built mounting solutions and accessories are designed specifically with Australian conditions in mind – from cyclonic coastal regions to the harsh outback environment.
Reliable Internet Starts with the Right Accessories
When it comes to maintaining a rock-solid Starlink connection through Australia's wild weather, preparation and quality equipment make all the difference. We've seen how proper mounting can transform a frustrating, intermittent connection into a reliable lifeline during the worst storms.
At SpaceTek Australia, we've developed our mounting solutions specifically for the unique challenges of the Australian environment – from the cyclone-prone tropics to the fierce southerly busters that batter our coastlines. Our mounts aren't just accessories; they're essential infrastructure for anyone who depends on their Starlink connection.
Time and again, customers from the most remote corners of Australia tell us the same story: upgrading to SpaceTek mounts was the turning point in their Starlink experience. One customer from the Northern Territory put it perfectly: "After three wet seasons of frustration, my SpaceTek mount has kept me connected through monsoonal downpours that would have knocked out my old setup in minutes."
What makes our Starlink troubleshooting solutions different? It's all about understanding Australian conditions:
Superior Stability that eliminates movement even in cyclone-force winds, keeping your satellite connection steady when you need it most. Our engineering team has tested our mounts in wind tunnels simulating conditions up to Category 4 cyclone strength.
Corrosion Resistance using genuine marine-grade materials that stand up to everything from coastal salt spray to outback dust storms. We've seen too many imported mounts fail after just one season in harsh Australian conditions.
Customised Solutions for every installation scenario, ensuring you can achieve optimal positioning regardless of your property type – whether you're mounting to a tin roof in the outback or a tile roof along the coast.
Australian-Made Quality designed specifically for local conditions, meeting the unique challenges faced by Starlink users across the continent. We understand Australian building codes and construction methods, so our mounts integrate seamlessly with local structures.
For remote communities across Australia, Starlink has been nothing short of revolutionary. It's brought high-speed internet to places where the only options were painfully slow satellite connections or nothing at all. These communities rely on Starlink for everything from telehealth appointments to distance education and emergency communications – connections that simply can't afford to drop out when storms roll in.
Whether you're in Far North Queensland preparing for cyclone season, living along the storm-prone eastern seaboard, or dealing with the extreme temperature variations and dust storms of the outback, we've developed mounting solutions specifically for your conditions.
By following the Starlink troubleshooting steps outlined in this guide and ensuring your installation uses quality components designed for Australian conditions, you'll dramatically improve your system's resilience during stormy weather.
Remember the golden rule of satellite internet: your connection is only as good as your installation. Invest in quality, prepare for the elements, and enjoy reliable connectivity even when the weather turns wild. Your Starlink dish might be smart technology, but it still needs the right physical support to perform at its best when Mother Nature throws her worst at you.
Leave a comment
This site is protected by hCaptcha and the hCaptcha Privacy Policy and Terms of Service apply.