Why Off-Grid Starlink is Revolutionising Outback Connectivity
Off-Grid Starlink Set Up is becoming essential for Australians venturing beyond the reach of traditional internet infrastructure. Whether you're a grey nomad exploring the Kimberley, working remotely from a bush property, or living in a remote community, Starlink satellite internet can keep you connected—if you know how to power it properly.
Quick Guide to Off-Grid Starlink Setup:
- Choose your Starlink hardware: Mini (25-40W), Standard (75-100W), or High Performance (110-150W)
- Calculate your power needs: Daily usage × hours + 30% buffer
- Select power source: Solar panels + battery bank or portable power station
- Use DC power when possible: More efficient than AC inverters
- Mount for clear sky view: Minimal obstructions, stable platform
- Manage power consumption: Use sleep schedules and timers
"Going off-grid sounded like pure freedom. No cell towers. No outlets. No limits," shares one Starlink user who successfully powers their system with just a solar panel and battery bank.
The game-changer for remote Australians is that Starlink doesn't require the massive power systems that traditional satellite internet needed. A properly sized solar setup can keep you online indefinitely, even in remote locations.
For those travelling through the Outback or setting up in remote communities, the right power solution means the difference between reliable connectivity and frustrating outages. SpaceTek Australia's purpose-built DC power supplies are designed specifically for off-grid Starlink users, eliminating the inefficiency of power conversion.
Unlike older satellite systems with their high latency and data caps, Starlink delivers city-like internet speeds—but only if you can keep it powered reliably away from the grid.

Understanding Your Starlink Hardware & Power Basics
Getting your Off-Grid Starlink Set Up right starts with understanding what's actually in the box and how it all works together. Think of this as getting to know your travel companions before a long journey through the Outback—you'll want to understand their needs and quirks before you set off!
When I first unpacked my Starlink kit in the middle of nowhere, I was struck by how simple yet sophisticated the system is. Let me walk you through what you'll be working with.
Components Inside the Box
Your Starlink kit arrives with several key components, each playing a crucial role in keeping you connected:
"Dishy" is what everyone affectionately calls the satellite antenna (SpaceX officially named it "Dishy McFlatface"—gotta love their sense of humour). This clever piece of tech automatically positions itself to find the best signal from the satellites zooming overhead.
Your router creates the Wi-Fi network that connects all your devices to the internet. It's the bridge between Dishy and your laptop, phone, or smart devices.
The Power over Ethernet (PoE) adaptor is a vital bit that many people overlook. It sends both power and data through a single cable to Dishy, simplifying your setup considerably.
Lastly, there's the DC power supply that feeds electricity to the whole system. This is where your off-grid power solution will connect.
Different Starlink models have different dishes and power requirements:
Starlink Mini is the most power-friendly option, drawing only 25-40W during normal use and dropping to about 15W when idle. It's brilliant for campers and caravanners with limited power resources. As one grey nomad told me while camping in the Kimberley, "My Mini draws about 17W most of the time, sometimes jumping to 36W during heavy downloads, but that's still manageable with my small solar setup."
Starlink Standard (the rectangular dish) uses more power—about 50-75W during operation and 20W when idle.
Starlink High Performance is the power-hungry option, designed for enterprise use or extreme weather locations, drawing 110-150W average and 45W when idle.
Each model comes with specific cables and connectors, all designed to work seamlessly together. The Starlink Mini specifications are particularly impressive for remote users, offering solid performance with minimal power demands. For detailed technical specifications on latency and performance, you can check the official Starlink specifications page.
AC vs DC Conversion Essentials
When you're off the grid, every watt counts. Understanding power conversion becomes incredibly important for an efficient Off-Grid Starlink Set Up.
Most Starlink systems come with AC power supplies designed for standard household power points. When you're in the bush, you've got two paths to choose from:
The AC power path looks like this: Battery → Inverter → AC Starlink Power Supply → Starlink. It's straightforward because you're using the standard equipment, but there's a hidden cost—inverters typically waste 15-20% of your precious battery power through conversion inefficiency.
The DC power path is more direct: Battery → DC-DC Converter → Starlink. This approach is much more efficient because you're cutting out the power-hungry inverter. You'll need a specialised DC-DC supply, but the power savings are substantial, especially when every amp-hour matters out bush.
SpaceTek Australia's purpose-built DC power supplies are designed specifically for Starlink systems, delivering the exact voltage your Starlink needs directly from your 12V or 24V battery setup. This eliminates the inefficiency of AC conversion and helps your solar setup last significantly longer.
The difference becomes obvious when you're running on limited power. One remote station owner shared, "Switching to a direct DC setup for my Starlink saved about 20% of my daily power budget. That means I can stay online during cloudy periods without stressing about battery levels."
Understanding voltage drop is also important—the longer your cables, the more power you lose along the way. This is particularly relevant for off-grid setups where your power source might be some distance from your Starlink equipment.
More info about Starlink Standard DC-DC Supply can help you decide if this approach is right for your situation.
With the right power setup, your Starlink can keep you connected from the most remote corners of Australia—whether you're checking weather reports from your camp in the Kimberley or joining a Zoom meeting from your off-grid tiny home.
Calculating Power Needs for an Off-Grid Starlink Set Up
When you're venturing into the remote corners of Australia, getting your power calculations right isn't just about convenience – it's essential for keeping your digital lifeline intact. Too little power and you'll face those frustrating blackouts just when you need connection most. Too much, and you've lugged unnecessary weight and spent money that could've gone toward that extra jerrycan of fuel.
Daily Energy Budget for an Off-Grid Starlink Set Up
Let's break down your daily energy budget in plain terms. The maths isn't complicated, but getting it right makes all the difference between staying connected and staring at a dead router.
Start by working out how much power your specific Starlink model typically draws. The Mini is the most efficient at 25-40W, while the Standard pulls 75-100W, and the High-Performance model demands a hefty 110-150W during normal operation.
Next, multiply this by how many hours you'll actually use it. For most grey nomads and remote workers, that's around 12 hours daily. Then, add about 30% extra as a buffer – trust me, you'll thank yourself when that unexpected video call from the grandkids comes through or when cloud cover reduces your solar input.
Here's what this looks like in practice: if you're running a Starlink Mini averaging 30W for 12 hours, you'll need about 360 watt-hours daily. With your safety buffer, that becomes roughly 470Wh. Real-world testing confirms these numbers, with most off-grid users reporting that a setup drawing 50W for 12 hours needs about 600Wh of battery capacity per day.
For those planning to stay connected around the clock, your daily requirements jump significantly:
- Starlink Mini: You'll need between 720-960Wh daily
- Standard Starlink: Plan for 1,200-1,800Wh per day
- High Performance: Expect to provide 2,640-3,600Wh daily
Weather & Seasonal Factors
The Australian climate throws unique challenges at off-grid Starlink set ups that our Northern Hemisphere counterparts simply don't face.
If you're wintering in the Snowy Mountains or Tasmanian highlands, be aware that Starlink's built-in heater kicks in when temperatures drop below freezing. This can suddenly increase your power consumption by an extra 50-100W – a significant jump that can drain batteries faster than expected.
Seasonal sun variations also play havoc with power planning. Winter in southern Australia means fewer solar hours and weaker panel output precisely when you might need more power for that heater. Meanwhile, the Outback's extreme heat and dust can reduce both your solar panel efficiency and your Starlink's performance.
Experienced off-gridders recommend assuming about 75% solar panel efficiency and just five hours of peak sun when sizing your system. This conservative approach might seem excessive during perfect summer days, but it ensures you'll stay online through the less ideal conditions that inevitably come.
For a reliable year-round operation, aim to size your solar array to produce at least 750Wh per day for a basic Starlink setup. This accounts for those shorter winter days and the inevitable dust coating that will reduce panel efficiency between cleanings.
Proper power management isn't just about having enough capacity – it's about understanding how your specific Australian conditions will affect both power generation and consumption throughout the year. A setup that works brilliantly during a Darwin dry season might leave you disconnected during a Tasmanian winter.
Choosing the Right Off-Grid Power Sources
When you're setting up an Off-Grid Starlink Set Up in the Australian outback, your power system becomes as crucial as the internet connection itself. Let's explore the most reliable options that'll keep you connected through scorching summers and chilly winter nights.
Pure DC Solutions for an Off-Grid Starlink Set Up
The most efficient way to power Starlink off-grid is with a pure DC system. By avoiding the energy loss that comes with converting DC to AC and back again, you'll get more runtime from your batteries.
SpaceTek Australia's purpose-built DC power supplies connect directly to your 12V or 24V battery bank, delivering the exact 48V that Starlink needs without wasteful conversion steps. These units include built-in protection circuits that safeguard both your expensive Starlink equipment and your battery investment—particularly important when you're hundreds of kilometres from the nearest tech shop.
Many clever Aussies have crafted their own solutions using buck converters that step up battery voltage to Starlink's required level. Just remember to include a low-voltage disconnect in your setup to prevent your batteries from dropping below safe levels. This simple addition can save you from costly battery replacements down the track.
"Using a 24V to 48V buck converter with a modified ethernet adapter lets me power my dish straight from the battery bank," one grey nomad shared at a recent camping meetup. "I've cut my power losses by nearly 20% compared to using an inverter."
Portable Solar-Battery Combos
For travellers constantly on the move through remote Australia, all-in-one power solutions offer the perfect balance of convenience and capability.
Solar generators (portable power stations with built-in batteries) have become increasingly popular among Starlink users. These compact units combine battery storage, charge controller, and inverter in one portable package. For a Starlink Mini setup, a 300Wh battery paired with a 100W foldable solar panel provides enough juice for daytime operation plus several hours of evening use—perfect for checking weather forecasts or streaming a bit of telly after sunset.
Quality MPPT charge controllers make a significant difference in Australia's variable sunlight conditions. They can extract up to 30% more power from your solar panels compared to basic controllers, which means faster battery charging even during brief sunny periods between cloud cover.
One user testing their setup in mid-November found that "a 60W solar panel typically yields 40-45W in real-world conditions—enough to not only power Starlink Mini but also recharge the battery, extending runtime to 12-14 hours daily."
Vehicle & Generator Back-ups
Even the best solar setup can face challenges during extended cloudy periods or when you're camping under dense tree cover. That's when backup power sources become essential.
DC-DC chargers offer an efficient way to top up your battery bank while driving between locations. Unlike basic cigarette lighter sockets (which typically max out at 10-15A or 120-180W), proper DC-DC chargers connect directly to your vehicle's starting battery and can deliver significantly more charging power without risking damage to your vehicle's electrical system.
For extended stays in one location during poor solar weather, a small inverter generator can be a lifesaver. A 1000W model runs quietly and efficiently, quickly replenishing your batteries when needed. Just remember that generators should be your backup plan, not your primary power source—they're noisy neighbours in peaceful bush settings!
In consistently windy coastal areas or during the blustery winter months, small wind turbines can complement your solar setup beautifully. They're particularly valuable during winter when solar panel output drops but wind availability often increases.
With the right combination of primary and backup power sources, your Off-Grid Starlink Set Up will keep you connected reliably—whether you're checking work emails from a remote cattle station or video-calling the grandkids from your caravan in the Kimberley.
Mounting, Placement & Cable Management for Remote Australia
When you're setting up Starlink in the Australian outback, proper installation isn't just about convenience—it's essential for survival in our harsh climate. Your off-grid Starlink set up needs thoughtful placement and protection to withstand everything from scorching summer heat to tropical downpours.
Optimising Dish Angle & Height
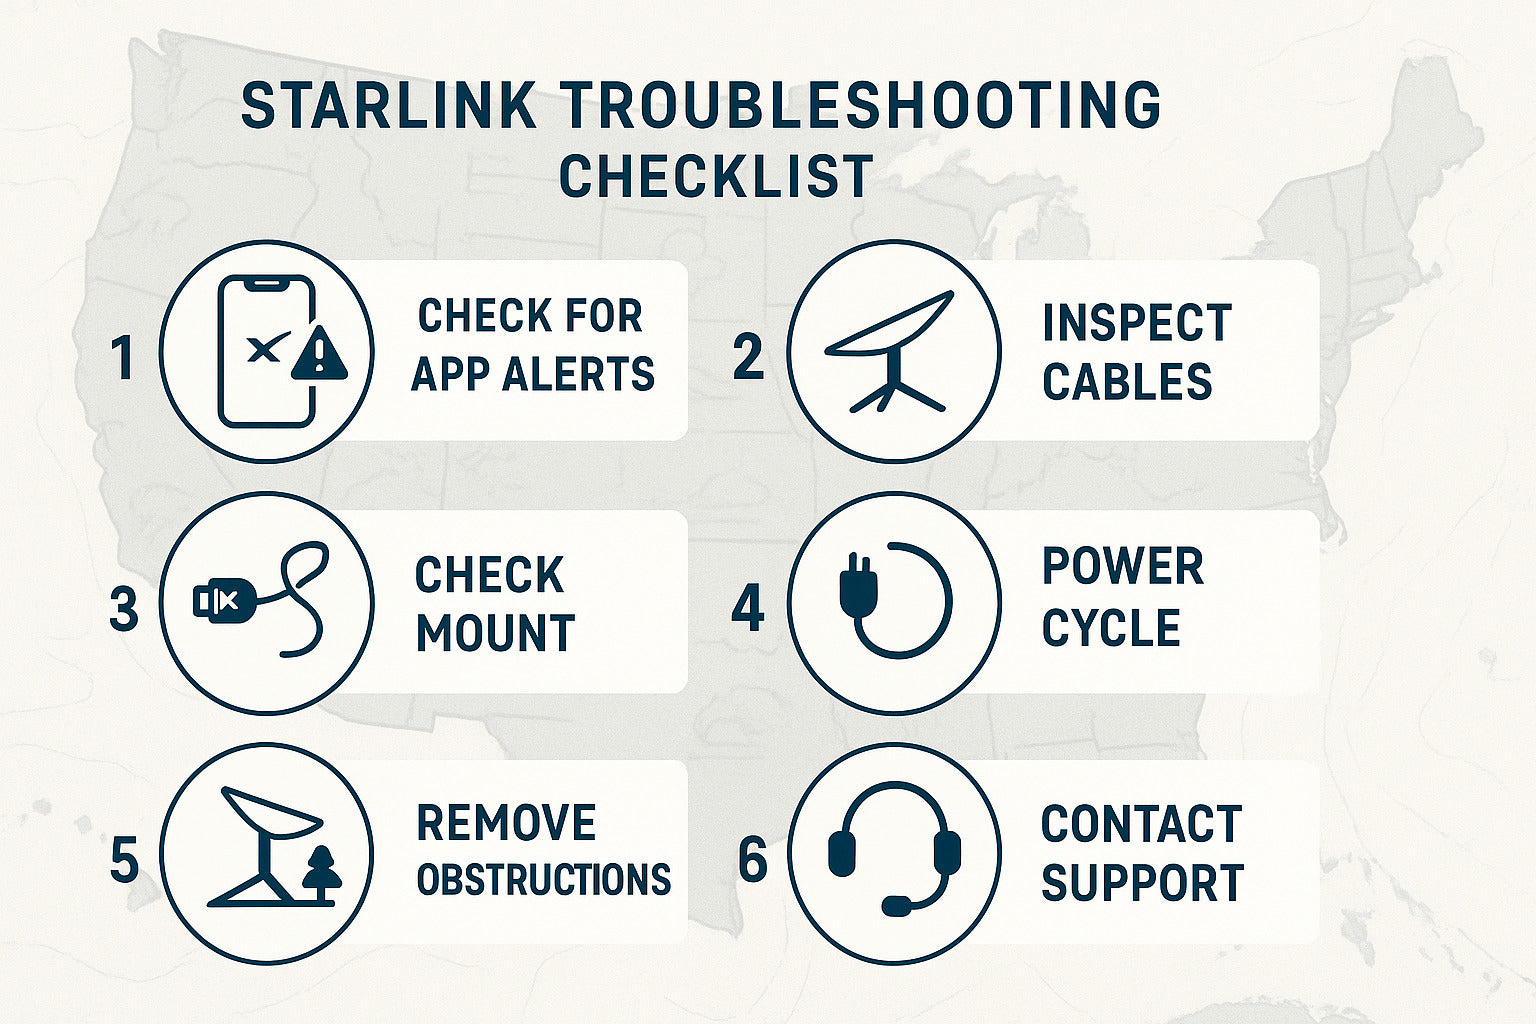
Finding the perfect spot for your Starlink dish can make all the difference between frustrating dropouts and rock-solid connectivity.
The first step is using the Obstruction Checker in the Starlink app. This nifty tool shows you exactly where satellites will be passing overhead, helping you find a location with clear views. In Australia, you'll want to ensure good visibility of the northern sky—the opposite of what our northern hemisphere mates need to worry about.
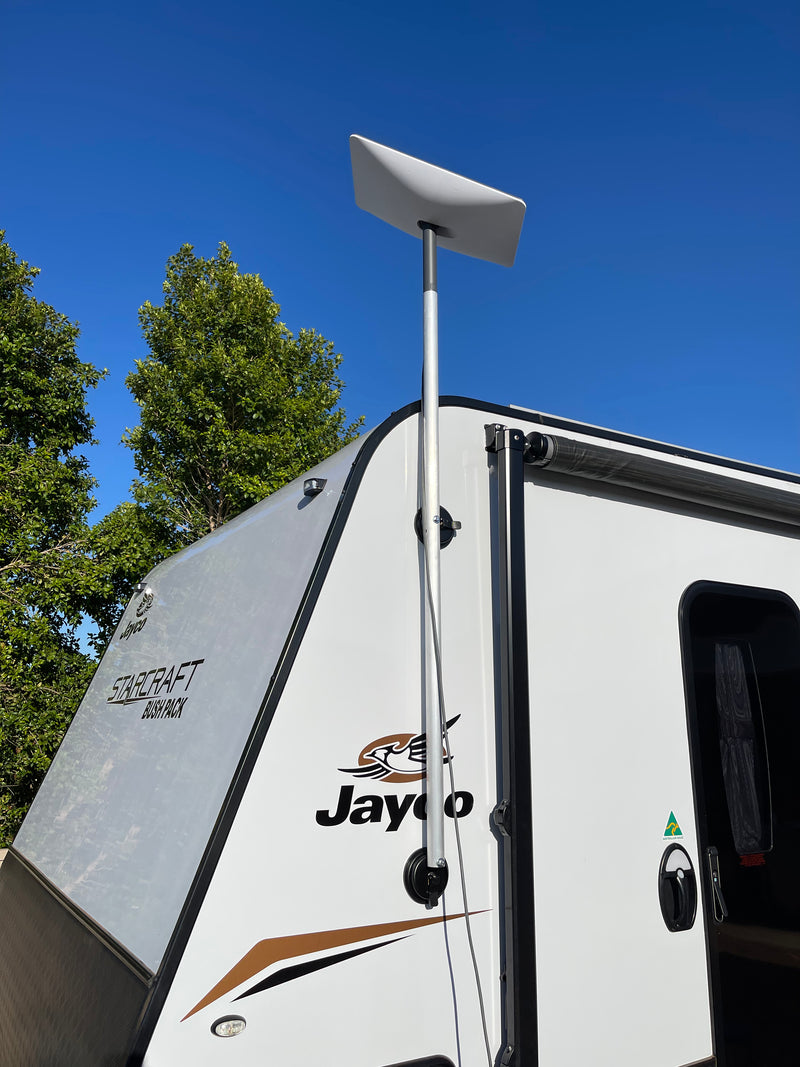
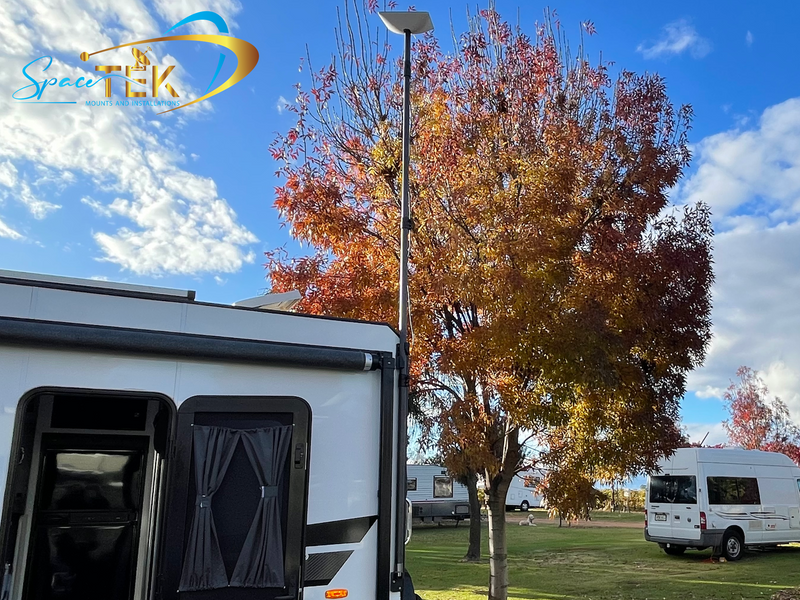
Sometimes, ground-level placement just won't cut it. Trees, buildings, and even your own caravan can block crucial satellite paths. When this happens, getting your dish up higher can solve the problem instantly.
SpaceTek Australia's mounting solutions are specifically designed for our unique conditions. Their roof mounts feature marine-grade stainless steel that won't rust in coastal areas, while their tripod stands offer quick setup for those who need portability without sacrificing stability. For the 4WD crowd, their vehicle mounts handle corrugated roads without letting your dish bounce around.
One remote cattle station owner noted: "After installing a proper roof mount, our connection went from spotty to rock-solid overnight. The difference was dramatic."
Keeping Cables Safe & Tidy
Cable management might seem like a boring afterthought, but in the Australian climate, it can be the difference between a system that lasts years and one that fails after a single wet season.
The harsh Aussie sun can destroy unprotected cables in months. UV-resistant cable sleeves are essential, not optional, especially if your setup is exposed to direct sunlight. SpaceTek's cable management accessories use materials tested in Australian conditions, with high UV resistance that won't crack or degrade like standard plastic covers.
Where cables enter your caravan, cabin or vehicle, weatherproof grommets prevent water ingress during those sudden tropical downpours. A proper drip loop—where the cable hangs down before going up into your structure—creates a low point that prevents water from tracking along the cable into your equipment.
Dust is another uniquely Australian challenge. In the outback, fine red dust finds its way into everything. SpaceTek's sealed cable entry points keep dust out of your connections, preventing the corrosion and signal degradation that can happen when grit works its way into connectors.
"I learned the hard way about proper cable protection," admits one Kimberley traveller. "One wet season with improper sealing, and I was replacing corroded connections. Now with proper grommets and sleeves, my setup handles everything from desert dust to monsoon rains."
For those mounting Starlink on vehicles, securing cables against wind force is crucial. At highway speeds, unsecured cables can whip around, causing damage or disconnection. SpaceTek's vehicle cable guides keep everything secure, even on rough outback tracks.
With thoughtful mounting and proper cable management, your off-grid Starlink set up can withstand everything Australia throws at it—from scorching Pilbara heat to Tasmanian winter storms. The small investment in quality mounts and cable protection pays dividends in reliability when you're far from the nearest service centre.
Smart Ways to Reduce Power Draw & Stay Online Longer
When you're running an off-grid Starlink set up, every watt counts. I've spoken with dozens of remote users who've finded clever ways to stretch their power resources without sacrificing connectivity. Let's explore some practical strategies that can make a significant difference to your runtime.
App-Based Power Management
The Starlink app isn't just for checking your connection status—it's a powerful tool for managing your system's energy consumption:
Sleep schedules are perhaps the most useful feature for off-grid users. By programming your Starlink to power down during specific hours (like overnight when you're sleeping), you can easily reduce daily consumption by 25-30%. Most users find scheduling operation from 6am to 10pm provides the perfect balance between connectivity and conservation.
Heater control is another game-changer, especially if you're in areas like the Snowy Mountains or Tasmanian highlands. The built-in snow-melting heater can draw an additional 50-100W when active, so disabling it when not needed makes a massive difference to your energy budget.
Performance data in the app helps you identify patterns and inefficiencies in real-time. Pay attention to these metrics to fine-tune your setup over time.
"Set up a sleep schedule in the Starlink app to save power," recommends one off-grid homesteader who has been using Starlink successfully for over a year. This simple adjustment can dramatically extend your battery life while ensuring your system is ready when you need it.

Network Tweaks for Efficiency
Beyond the Starlink hardware itself, your broader network setup can significantly impact overall power consumption:
Router placement matters more than most people realise. Position your router for maximum coverage with minimum power—this might mean placing it centrally in your space rather than right next to the Starlink equipment. Good placement means you can often run at lower power settings while maintaining coverage.
Mesh network configuration deserves careful consideration if you're using additional access points. Each mesh node adds to your power budget, so place them strategically to minimise the number needed while maximising coverage.
Wi-Fi standby modes are often overlooked but can make a meaningful difference. Enable power-saving features on all your network equipment—modern devices are designed to draw less power when not actively transmitting data.
For maximum savings, consider powering down the entire system when not in use. This approach works brilliantly for occasional users, though be aware that "it takes up to 30 minutes to reconnect after full power-down," according to experienced users. This reconnection time is worth considering when planning your power management strategy.
Many off-grid users report that combining these strategies has allowed them to run their Starlink systems indefinitely on modest solar setups. One user in the Kimberley region shared that by implementing sleep schedules and careful router management, they reduced their daily consumption by nearly 40%, allowing them to downsize their solar array significantly.
SpaceTek Australia's DC power supplies are designed specifically to maximise efficiency in off-grid situations, working harmoniously with these power-saving techniques to give you the longest possible runtime from your available power resources.
Frequently Asked Questions about Off-Grid Starlink Power
How big should my battery be?
Choosing the right battery size is one of the most common questions for anyone planning an off-grid Starlink set up. For the power-efficient Starlink Mini, a 100Ah (1200Wh) lithium battery will typically keep you connected for 24-30 hours without recharging. If you're running the Standard Starlink model, you'll want to double that capacity for similar runtime.
I've found that many successful off-grid users follow a simple rule of thumb: size your battery system to provide at least 2-3 days of autonomy without recharging. This buffer gives you peace of mind during cloudy days or when you're unable to generate power.
Real-world testing has shown that even smaller portable options can work in a pinch. A 24,000mAh power bank (like the Anker 737) can power a Starlink Mini for about four hours before needing a recharge. This might be enough for a quick check-in, but certainly not for sustained use.
For Australian outback conditions, LiFePO4 batteries have proven themselves as the gold standard. They handle our extreme temperatures beautifully, offer deeper discharge capability without damage, and generally last through many more charging cycles than traditional lead-acid batteries.
Can I run Starlink straight from 12V DC?
Yes, you absolutely can run your Starlink from a 12V DC source—but you'll need the right equipment to make it work efficiently. Each Starlink model has specific voltage requirements:
The Mini model is the most flexible, accepting 12-48V input, which means it can work with some direct 12V setups with minimal conversion.
Standard and High Performance models typically require 48V, necessitating a voltage step-up from your 12V battery bank.
This is where SpaceTek Australia's purpose-built DC power supplies shine. They're specifically designed to safely convert your 12V or 24V battery voltage to exactly what your particular Starlink model needs. This eliminates the guesswork and protects both your satellite equipment and your battery bank from potential damage.
Some resourceful users have found that the Starlink Mini can even be powered by a 65W USB-C power bank in a pinch, though compatibility varies significantly depending on the quality of both the power bank and the cable you're using.
What if clouds block my solar for days?
Let's face it—even in sunny Australia, we occasionally face stretches of gloomy weather. A properly designed off-grid Starlink set up should include multiple layers of weather resilience:
First, ensure you have sufficient battery capacity to carry you through 2-3 days without any charging. This is your first line of defence.
Second, incorporate alternative charging methods into your system design. This might include a connection to your vehicle's alternator through a DC-DC charger, or perhaps a small portable generator kept for emergencies.
Third, develop power management strategies such as reduced operating hours during extended cloudy periods. The sleep schedule feature in the Starlink app is brilliant for this purpose.
Field testing across various Australian locations has shown that two 100W solar panels produce approximately 750Wh per day at 75% efficiency in typical conditions. This provides a good baseline for planning, though your actual production will vary with location and season.
For those venturing deep into remote Australian territory, where weather can be unpredictable and help far away, I've found a hybrid approach works best. Combining solar as your primary source with occasional generator charging for backup provides the most reliable solution and ensures you're never left without connectivity when you need it most.
Stay Connected, No Matter Where You Are
There's something truly liberating about having reliable internet in the most remote corners of Australia. Whether you're parked beside a billabong in the Kimberley or setting up camp on a distant property, an off-grid Starlink set up doesn't need to be complicated or intimidating.
The beauty of modern satellite technology is how accessible it's become. With the right equipment and a bit of planning, you can enjoy the same streaming, video calls, and browsing that city-dwellers take for granted – all while watching the sunset over the Outback.
At SpaceTek Australia, we've designed our DC power supplies and mounting solutions specifically for the unique challenges of the Australian environment. From the relentless UV radiation that deteriorates lesser equipment to the corrosive salt spray along our coastlines, our gear is built to last where others fail.
Our rust-resistant mounts handle everything from tropical downpours to desert dust storms. The weatherproofing on our accessories means you won't be replacing them every season, saving you both money and the frustration of equipment failures when you're far from the nearest shop.
For communities in remote areas, reliable internet isn't just a luxury – it's increasingly essential for education, healthcare, and staying connected with loved ones. An off-grid Starlink set up with proper power management can transform isolated locations into connected hubs where distance becomes irrelevant.
The difference between a frustrating, unreliable connection and seamless internet often comes down to how you power your system. Our purpose-built DC power supplies eliminate the inefficiency of converting power multiple times, meaning your solar panels and batteries work smarter, not harder.
Ready to power your Starlink anywhere? Explore SpaceTek Australia's range of Starlink accessories, DC power supplies, and mounting solutions – all designed specifically for Australian off-grid conditions, by Australians who understand our unique challenges.
Leave a comment
This site is protected by hCaptcha and the hCaptcha Privacy Policy and Terms of Service apply.