When you're on the road with your RV, staying connected is key. Starlink Mini RV roof mount offers a reliable solution for internet access, no matter where your travels take you. Designed for easy installation and optimal performance, this mounting kit allows you to securely set up your Starlink Mini satellite dish on the roof of your RV.
Here's a quick overview of how the Starlink Mini RV roof mount makes sure you stay online during your journeys:
- Durable Construction: Made from sturdy metal to withstand tough weather.
- Ease of Installation: Installs easily with just a few screws.
- Portability: Small and light, perfect for both temporary and permanent setups.
- Versatility: Suitable for both RV and home roof installations.
Whether you're camping in the Australian Outback or parked by a serene lakeside, having a strong internet connection is more than a luxury—it's a necessity. The Starlink Mini RV roof mount ensures that your internet service remains reliable, giving you the freedom to explore remote areas without losing touch.

Choosing the Right Mount
Selecting the right mount for your Starlink Mini RV roof mount can make all the difference in maintaining a strong internet connection while traveling. Here’s what you need to consider:
Weather-Resistant Features
When choosing a mount, ensure it's weather-resistant. This is crucial for withstanding the elements, especially if you’re traveling through areas with harsh weather conditions. A mount made from durable materials like metal, as found in the Starlink Mini mounting kit, can offer better protection against wind and rain.
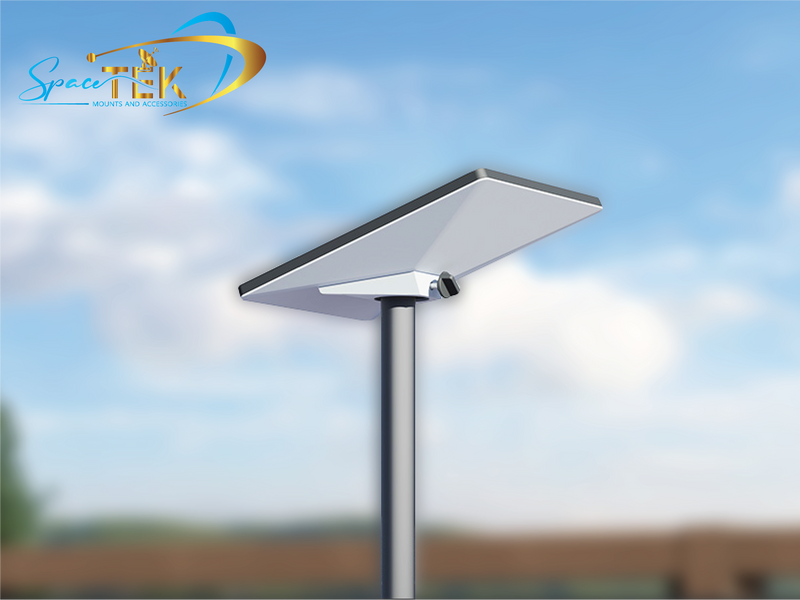
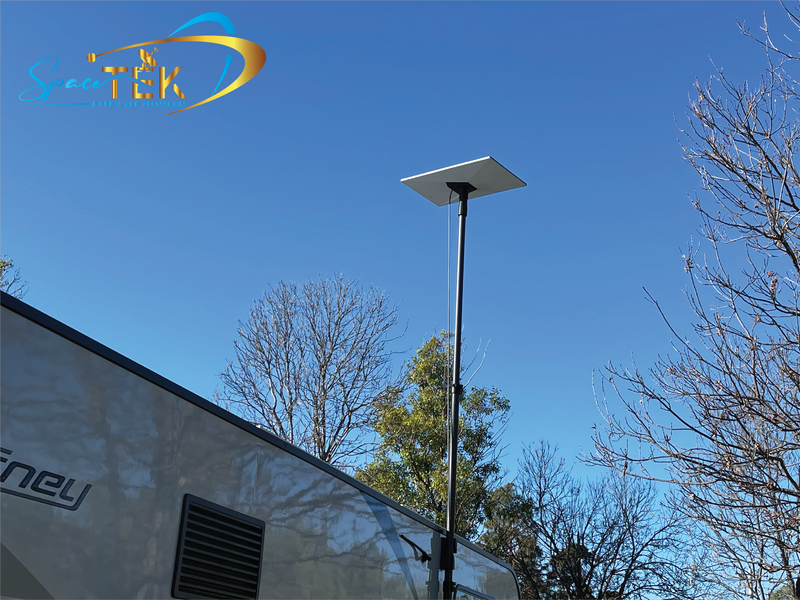
Pole Mounts
Pole mounts are a popular choice for many RV owners. They provide a stable base and can be adjusted to achieve the best possible signal reception. This type of mount is ideal if you have a flat surface on your RV roof and prefer a more permanent installation.
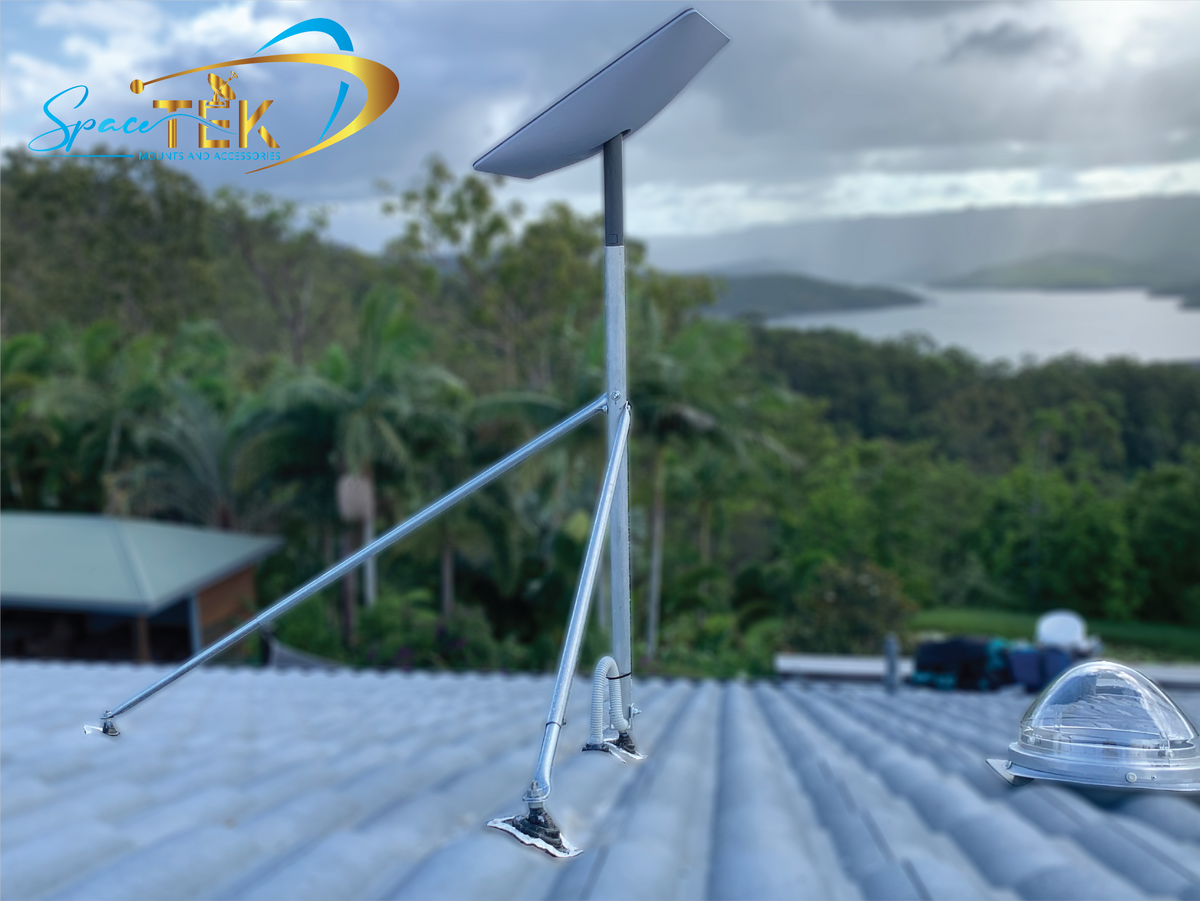
Tripod Mounts
If you’re looking for flexibility, consider a tripod mount. These are portable and can be set up quickly at campsites. They allow you to place your Starlink dish away from your RV, which can be useful for avoiding obstructions like trees or other vehicles.
Flat Roof Mounts
For those with flat RV roofs, flat roof mounts are a fantastic option. They are designed to sit flush against the roof, providing a low-profile setup. This type of mount is especially useful for RVs with limited roof space or for those who prefer a sleek look.
Quick-Release Mounts
If you plan to frequently remove your Starlink dish, a quick-release mount is the way to go. This mount type allows for easy detachment and reattachment, which is perfect for travelers who move often or want to store the dish securely while driving.
Incorporating these considerations will help ensure that your Starlink Mini is securely and effectively mounted, allowing you to enjoy uninterrupted internet access during your travels.
Using the Starlink App for Optimal Placement
Finding the best spot for your Starlink Mini RV roof mount is crucial for a strong and stable internet connection. The Starlink app makes this process easier with its built-in obstruction checker.
Obstruction Checker
Before you mount your Starlink Mini, open the Starlink app and use the obstruction checker. This tool helps identify any potential obstacles blocking the dish's view of the sky. Trees, roof racks, or even air conditioners can interfere with the signal. The app provides a visual representation, making it easy to spot and avoid these obstructions.
Finding the Best Spot
Once you've identified potential obstructions, use the app to find the best spot on your RV roof. Ideally, you want a location with a clear, unobstructed view of the sky. This ensures the satellite dish can receive signals without interference. If your RV has solar panels or other equipment on the roof, consider these when choosing your spot.
Signal Quality
The app also evaluates signal quality in real-time. As you move the dish around, it will show you where the signal is strongest. This feature is incredibly helpful for ensuring that you're maximizing your internet speed and reliability.
By utilizing the Starlink app, you can make informed decisions about where to place your dish, ensuring optimal performance as you travel. This way, you can enjoy seamless internet connectivity no matter where your journey takes you.
Securing Cables Properly
Properly securing the cables for your Starlink Mini RV roof mount is essential. Loose or exposed cables can pose hazards, especially when you're on the move. Here are some tips to keep everything tidy and safe:
Weatherproof Cable Clips
Using weatherproof cable clips is a smart choice to keep your cables secure. These clips not only hold your cables in place but also protect them from harsh weather conditions. This is crucial, as exposure to rain or snow can damage the cables and affect your connection.
Adhesive Mounts
Adhesive mounts offer a simple yet effective way to secure your cables without drilling holes. They are perfect for RVs, where you might want to avoid permanent alterations. Just peel and stick them onto a clean, dry surface. They hold the cables tightly, preventing them from flapping around while driving.
Preventing Hazards
Loose cables can be a tripping hazard or get caught on branches or other obstacles. By securing them properly, you reduce the risk of damage to both the cables and your RV. Make sure to check the cables regularly and adjust the clips or mounts if needed to maintain a tidy setup.
By taking these steps, you ensure that your Starlink Mini setup remains safe and functional, no matter where your travels take you. This attention to detail can make a big difference in maintaining a reliable internet connection on the road.
Considerations for Non-Permanent Mounts
When you're constantly on the move, a non-permanent mount for your Starlink Mini RV roof mount can be a game-changer. These options offer flexibility and ease of use, ensuring you can set up and pack down quickly without compromising on connectivity.
Magnetic Mount
Magnetic mounts are a solid choice for those who need a quick and easy setup. They use strong magnets to hold the Starlink dish securely in place. This mount is perfect if you want to avoid drilling into your RV. The magnets are coated in rubber to protect your vehicle's surface.
This option is ideal for travelers who frequently change locations and need a reliable, non-permanent solution.
Suction Cup Mount
The Starlink RV Compatible Suction Cup Mount is another excellent option. It's designed to attach to any smooth surface on your RV without the need for tools. The suction cups create a strong hold, but it's wise to reapply them in hot weather as the air behind the rubber can expand and cause them to lose grip.
Using soapy water can improve the adhesion, ensuring a firm attachment. This mount is compact and portable, making it a favorite among digital nomads and remote workers.

Portable Stand
A portable stand offers the ultimate flexibility. You can set it up on the ground at campsites, giving you the freedom to position the dish for the best signal. It's a great option if you're parked under trees or in an area with obstructions.
The stand is lightweight and easy to store, making it a practical choice for those who travel light but still want reliable internet access.
Each of these non-permanent mounting options provides a balance of convenience and performance. Whether you choose a magnetic mount, suction cup mount, or portable stand, you'll enjoy the freedom to stay connected without the hassle of permanent installations.
Ensuring a Clear View of the Sky
To get the best performance from your Starlink Mini RV roof mount, it's crucial to ensure an unobstructed view of the sky. This clear line of sight helps your Starlink dish connect effectively with satellites, minimizing interference and ensuring a stable internet connection.
Avoid Obstructions
The most common obstacles that can block your Starlink signal include roof racks, antennas, and solar panels. While these are essential features for many RV enthusiasts, they can interfere with your dish's ability to maintain a clear signal path.
Roof Racks and Antennas: Position your Starlink dish away from roof racks and antennas. These can cast shadows that disrupt the signal. If possible, mount the dish at a higher elevation than these elements or choose a location on the RV roof where the dish has a clear view.
Solar Panels: If your RV is equipped with solar panels, ensure they do not block the dish’s line of sight. Consider placing the dish in a spot where the panels do not cast any shadows, especially during key satellite pass times.
Minimize Interference
Interference can also come from nearby electronic devices. It's important to keep the dish away from devices that might emit signals on similar frequencies, like microwaves or cordless phones. This helps maintain a clean signal path.
Optimize Placement
Use the Starlink app to find the best spot for your dish. The app's obstruction checker can guide you to areas on your RV roof that provide the clearest view of the sky. This tool is invaluable for ensuring you set up your dish in the most optimal location.
- Dynamic Environments: When parked in dynamic environments, like campgrounds with trees or other RVs, the app can help you adjust the dish placement to avoid temporary obstructions.
Flexibility is Key
The ability to adjust your setup is vital. Whether you use a telescopic mount or a portable stand, having the flexibility to reposition your dish ensures you always have the best possible connection.
By taking these steps to ensure a clear view of the sky, you’ll maximize your Starlink Mini’s performance and enjoy reliable internet access wherever your travels take you.
Next, let's explore how to weatherproof your setup for long-lasting durability.
Weatherproofing Your Setup
Ensuring your Starlink Mini RV roof mount withstands the elements is crucial for long-term performance and reliability. Here are some key tips to weatherproof your setup effectively.
Waterproof Sealant
Using a waterproof sealant is essential when mounting your Starlink on an RV roof. It seals any drilled holes and prevents water ingress, protecting both the RV and the dish from potential water damage. For best results, choose a sealant specifically designed for outdoor use. This ensures that your setup remains watertight, even in heavy rain or snow.
Rust-Resistant Hardware
Opt for rust-resistant hardware when securing the Starlink mount. This includes screws, bolts, and brackets. These materials are designed to withstand harsh weather conditions, preventing corrosion over time. Rust can weaken the structure of your mount, leading to instability and potential damage to your Starlink equipment.
Longevity
The longevity of your setup is directly influenced by the quality of materials used. Investing in high-quality, weather-resistant components will save you time and money in the long run. SpaceTek's carbon fibre mounts, for instance, are not only lightweight but also incredibly durable, offering excellent resistance to environmental wear and tear.
Regular Maintenance: Periodically check your mount for any signs of wear or damage. Tighten loose screws and replace any corroded parts immediately to maintain the integrity of the setup.
Protective Covers: Consider using a protective cover for your Starlink dish. This can shield it from minor knocks and environmental exposure, further extending the life of your equipment.
By implementing these weatherproofing strategies, you can ensure that your Starlink Mini remains secure and operational, regardless of the weather conditions you encounter on your travels.
Next, let's discuss how to stow your dish safely while driving to prevent damage.
Stowing the Dish Safely While Driving
When you're on the move, ensuring your Starlink Mini RV roof mount is safe from potential harm is essential. Here's how to protect it from wind, low-hanging branches, and other travel-related hazards.
Protect Against Wind Damage
Wind can be a formidable force when driving at highway speeds. To prevent your Starlink dish from becoming a casualty of strong gusts, it's best to stow it securely before hitting the road. The Starlink app offers a convenient "stow" feature. Use this to automatically position the dish in a safe, compact form that minimizes wind resistance.
Avoid Low-Hanging Branches
Low-hanging branches pose a risk to any rooftop equipment. Before setting off, ensure your dish is lowered or stowed to avoid being snagged. This is especially important when navigating through wooded areas or under bridges.
Use a Protective Cover
While the dish is stowed, consider using a protective cover. This adds an extra layer of defense against scratches and minor impacts. A cover can also shield the dish from dust and debris, keeping it clean and ready for use at your next stop.
Regular Checks
Before each journey, perform a quick inspection of your Starlink setup. Check that all mounts and brackets are secure. Ensure there are no loose components that could rattle or become detached while driving.
By following these precautions, you can ensure your Starlink Mini remains safe and functional, no matter where your travels take you.
Next, we'll address frequently asked questions about mounting Starlink on your RV roof, including non-drilling options and anchoring techniques.
Frequently Asked Questions about Starlink Mini RV Roof Mount
Mounting a Starlink Mini on your RV roof can be a game-changer for connectivity on the road. Here are some common questions and solutions for mounting without drilling, ensuring secure attachment, and exploring different mount types.
How to Put Starlink on Roof Without Drilling?
For those who prefer not to drill into their RV roof, non-penetrating clamps and magnetic mounts are excellent options. Non-penetrating clamps securely hold the dish without damaging your vehicle. They work well with metal roof profiles, offering a stable and secure setup. Additionally, magnetic mounts provide a flexible, non-permanent solution. They allow you to reposition the dish easily and are ideal for those who want a quick setup without permanent alterations.
Can Starlink Be Mounted on RV Roof?
Yes, Starlink can be mounted on an RV roof using several methods. The Flat High Performance Starlink kit is designed for such installations, offering a streamlined setup that ensures optimal signal reception. This kit is perfect for RV owners who want a sleek, low-profile solution. Additionally, wedge mounts can be used to adjust the angle of the dish, enhancing signal strength and stability.
How Do You Anchor a Starlink to a Roof?
Anchoring your Starlink securely is crucial for reliable performance. Non-penetrating clamps are a popular choice, as they avoid roof damage while providing a firm hold. For metal roof profiles, these clamps work exceptionally well, ensuring the dish remains stable even in windy conditions. If you prefer a more permanent solution, wedge mounts can be used to secure the dish at an optimal angle, improving signal quality and ensuring consistent connectivity.
By choosing the right mounting method, you can enjoy the benefits of Starlink on the road without compromising the integrity of your RV. Next, we'll dig into the best practices for maintaining your Starlink setup over time.
Conclusion
At SpaceTek Australia, we understand the unique challenges of mounting a Starlink Mini on your RV roof, especially in diverse Australian conditions. Our custom Starlink mounting kits are designed to provide robust, reliable solutions that cater specifically to the needs of travelers and triprs.
Why Choose SpaceTek Australia?
Custom Solutions: Our mounts are crafted with the Australian climate in mind, ensuring they withstand harsh weather conditions, from intense sun to heavy rain. This means your Starlink setup remains secure and functional, no matter where your journey takes you.
High-Quality Materials: We use premium, rust-resistant materials that promise durability and longevity. This ensures your Starlink dish remains securely mounted, providing uninterrupted connectivity on the road.
User-Friendly Design: Our mounts are compatible with Starlink's self-installer kits, making installation straightforward and hassle-free. Whether you're a seasoned traveler or a weekend explorer, you can set up your Starlink Mini with ease.
Versatile Options: From magnetic mounts to non-penetrating clamps, we offer a range of mounting solutions that cater to different preferences and RV setups. This flexibility allows you to choose the best fit for your needs without compromising on performance or security.
For those ready to improve their RV experience with reliable internet connectivity, explore our range of Starlink Mini mounts and find the perfect solution for your journey. With SpaceTek Australia, you can stay connected, no matter where the road leads.
Leave a comment
This site is protected by hCaptcha and the hCaptcha Privacy Policy and Terms of Service apply.