Starlink Mount for Caravan, Van or RV: Complete Installation Guide (2026)
Reliable internet has become essential for van life, remote work, and off-grid travel across Australia. Starlink has made that possible, but mounting it correctly is what determines whether your setup performs reliably long term.
This guide explains:
- The different types of van mounts
- Permanent vs temporary installs
- Power considerations
- Cable routing best practice
- Compatibility between Starlink models
- Common installation mistakes
Where relevant, we’ll reference mounting and power solutions engineered specifically for vehicle use in Australian conditions.
Why Proper Mounting Matters
Starlink isn’t just another roof accessory.
Unlike a solar panel, it:
- Generates heat
- Needs clear sky visibility
- Is affected by vibration
- Has specific mounting geometry
A poor install can lead to:
- Signal dropouts
- Premature wear from vibration
- Water ingress
- Power inefficiency
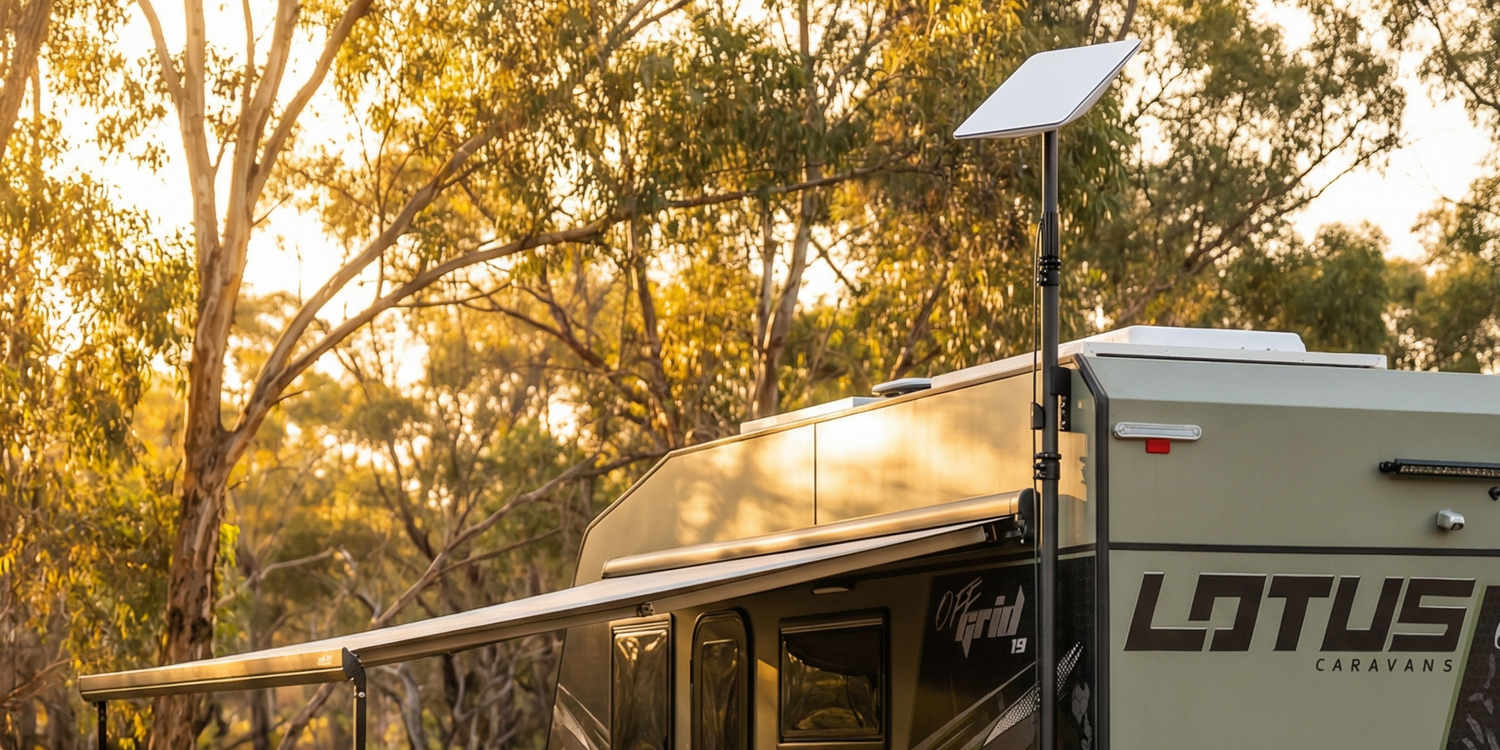
Purpose-built vehicle mounts are designed to handle vibration, wind load, and corrugated roads - not just static campsite setups.
For example, the Spacetek Starlink Mini In-Motion Powder-Coated Aluminium Vehicle Mount was designed with highway travel and rough Australian terrain in mind. It’s built for people who don’t want to remove their dish every time they hit a corrugated section - and who need something that stays solid beyond a smooth caravan park.
Step 1: Choose the Right Mounting Approach
There is no universal “best” mount - it depends on how you travel.
1. Permanent Roof Mount (Best for Full-Time or Frequent Travellers)
Ideal if you:
- Travel regularly
- Want a clean, fixed installation
- Require in-motion capability
- Don’t want daily setup
A rigid aluminium vehicle mount helps distribute load correctly and reduces long-term vibration fatigue - especially on corrugated roads.
Spacetek options that suit permanent installs:
- Gen3: Spacetek Starlink Gen 3 In-Motion Aluminium Vehicle Mount
- Mini: Spacetek Starlink Mini In-Motion Aluminium Vehicle Mount
Heavy-duty and built tough for travelling on corrugated tracks or open highways.
The in-motion mounts are ideal if you're mounting to a roof rack system rather than drilling directly into the roof.
Key considerations:
- Mount to structural supports
- Use correct sealing methods
- Allow airflow underneath
2. Temporary or Magnetic Mount (Best for Flexible Setups)
Ideal if you:
- Rent your van
- Travel occasionally
- Use multiple vehicles
- Want quick removal
Magnetic mounts provide flexibility without permanent drilling - but must be rated for real-world travel conditions.
For example, Spacetek offers several flexible solutions depending on how you use your setup:
- Starlink Mini Magnetic Roof Mount provides strong magnetic hold while still allowing quick removal when needed. It’s well suited to travellers who want a secure roof option without permanent install.
- Heavy-duty suction cup windscreen mount can be useful for stationary use, particularly when repositioning the dish temporarily for better sky visibility.
- Telescopic Pole Mount Kit is lightweight and fast to deploy, and allows you to elevate your Starlink for clearer line-of-sight when parked in partially obstructed areas.
Temporary setups work extremely well - provided they’re engineered for wind load and vibration.
Step 2: Confirm Your Starlink Model Compatibility
Before selecting any mount, confirm your dish model:
- Starlink Gen 2
- Starlink Gen 3
- Starlink Mini
Each model differs in:
- Mounting interface
- Weight
- Wind profile
- Power requirements
Using a mount engineered for your specific model ensures proper load distribution and stability.
Step 3: Power Setup - The Most Overlooked Factor
Mounting gets attention. Power efficiency often doesn’t.
Running Starlink through a 240V inverter from a 12V battery works - but it introduces:
- Conversion loss
- Additional heat
- Shorter battery runtime
Over long off-grid stays, that inefficiency adds up.
A properly integrated 12V DC solution is significantly more efficient and reduces unnecessary strain on your battery system.
For example, Spacetek offers model-specific DC conversion options:
- For Gen 3 - the Starpower V3 provides direct 12V conversion designed specifically for Starlink.
-
For Gen 2 - the Starpower V2 achieves the same result for earlier systems.
- For Starlink Mini, a dedicated DC-DC Power Regulator Booster ensures stable voltage supply from vehicle systems.
- Often overlooked but a great way to save on power consumption is. It’s a favourite of our customers.
These solutions reduce reliance on inverters and help improve overall system efficiency - particularly important in lithium battery setups and extended off-grid travel.
Another often overlooked upgrade is Spacetek’s inline wireless relay for Starlink Mini & Gen 3. It allows you to remotely power the dish on or off, which can help prevent unnecessary battery drain when the system isn’t in use. It’s a small addition, but one many travellers find useful once installed.
For vans, caravans, and RVs running fully off-grid, efficient power integration can materially extend usable runtime.
Step 4: Cable Routing & Weatherproofing
Long-term reliability depends heavily on cable management.
Common issues arise from:
- Poor sealing
- Sharp bends
- Exposed connections
- Compression damage
When installing permanently:
- Use proper cable glands
- Seal entry points
- Plan routing before drilling
One option designed specifically for clean vehicle integration is the Spacetek Starlink Recessed Data Socket (IP68-rated). It allows you to create a sealed external connection point on a caravan, RV, or canopy build, rather than running the cable directly through improvised holes or temporary seals.
Solutions like this help achieve a cleaner finish and reduce the risk of water ingress over time - particularly important for long-term touring setups.
Step 5: Airflow & Heat Management
Starlink dishes generate heat during operation.
Avoid:
- Mounting flush without clearance
- Enclosing the dish
- Blocking ventilation
Spacetek aluminium vehicle mounts are designed to elevate the dish slightly to encourage airflow - something often overlooked in DIY flat mounting approaches.
Airflow directly impacts thermal regulation and long-term reliability.
Step 6: In-Motion vs Stationary Use
Not all setups are intended for in-motion connectivity.
If you require internet while driving:
- Confirm your Starlink plan supports it
- Use mounts rated for highway speeds
- Ensure structural stability
Spacetek in-motion rated mounts are engineered specifically for this use case, rather than static-only installations.
Common Installation Mistakes
- Mounting to unsupported sheet metal
- Ignoring wind load
- Blocking airflow
- Using inefficient inverter-only power
- Buying mounts without confirming compatibility
- Poor cable sealing
- When using magnetic mounts , ensure vehicle can work with magnets (try with a fridge magnet first)
- Make sure surface is clean and free from dust or debris
A purpose-built mount and power solution prevents most of these issues.
Choosing the Right Setup
The right configuration depends on:
- Starlink model
- Vehicle type
- Travel frequency
- In-motion needs
- Whether drilling is acceptable
Spacetek designs Starlink mounting and power solutions specifically for Australian vehicle conditions - including:
- In-motion aluminium vehicle mounts
- Mobility and magnetic options
- DC power supply kits
- Cable routing accessories
But regardless of brand, focus on:
- Structural stability
- Correct fitment
- Weatherproofing
- Power efficiency
- Airflow
These factors determine long-term performance.
Final Thoughts
Starlink has transformed connectivity for van travellers across Australia.
But reliability doesn’t come from the dish alone - it comes from how it’s mounted, powered, and protected.
Choose components engineered for vehicle use, confirm compatibility before installing, and plan your setup carefully.
A well-designed system should survive corrugations, weather, and long-distance travel - not just a weekend campsite.


Leave a comment
This site is protected by hCaptcha and the hCaptcha Privacy Policy and Terms of Service apply.