Why Your Starlink Mount is Your Connection's Lifeline
Starlink Mount Failures can be the difference between reliable high-speed internet and frustrating dropouts. For remote residents across Australia, a failed mount means more than just inconvenience—it can lead to lost work, missed connections, and expensive roof repairs.
7 Key Ways to Prevent Starlink Mount Failures
- Conduct a Thorough Site Survey - Use the Starlink app to check for obstructions and plan for the future.
- Invest in High-Quality Hardware - Choose corrosion-resistant materials like stainless steel or aluminium.
- Select the Right Mount - Match your mount to your specific Starlink kit (Gen 2, Gen 3, or Mini).
- Perfect Your Anchoring - Use proper sealing techniques and secure to structural supports.
- Implement Smart Cable Management - Protect cables with drip loops and weatherproof glands.
- Secure Against Wind - Add bracing and ensure stability to prevent mast sway.
- Perform Regular Inspections - Check for rust, loose fittings, and new obstructions.
Up to 75% of connectivity issues stem from improper installation and signal obstruction. A wobbly mast or poorly positioned dish can degrade your service, leaving you staring at buffering screens. The consequences extend beyond connectivity. Improper penetrations can cause roof leaks costing thousands to repair, while corroded hardware can fail during storms, sending your expensive dish tumbling.
But here's the good news: nearly all these failures are preventable.
Common causes include using ballast blocks that trap moisture, drilling unsealed holes, and using untreated timber or mild-steel screws that corrode in Australia's harsh climate. Australia's environment is unforgiving. Coastal salt spray, cyclonic winds, and relentless UV radiation demand robust mounting solutions.
I'm Aaron Wroblewski, founder of SpaceTek Australia. With over 25 years in satellite communications, I've witnessed countless preventable common mistakes in mounting Starlink devices. This guide distils those lessons into seven actionable strategies to protect both your investment and your connection.
What We Learned From Common Mistakes
Many frustrating Starlink connectivity issues—from intermittent dropouts to complete signal loss—trace back to preventable Starlink mount failures. The good news is you can avoid most of them. Here’s what we’ve learned from real installations across Australia.
Ways 1–3: Planning and hardware to avoid common mistakes
A reliable connection starts with thoughtful planning and choosing equipment that won’t let you down.
1. Conduct a thorough site survey
Your Starlink dish needs a clear, 100-degree view of the sky. Too many setups go in the convenient spot, not the right spot, and the result is constant dropouts.
The Starlink app’s “Check for Obstructions” tool is essential. Use its augmented reality feature to scan several potential locations; moving just a few metres can make all the difference.
Crucially, think ahead. That small tree will grow, and deciduous trees will get their leaves back in summer. Future-proofing your installation means considering what the view will look like in a few years. For detailed guidance, check out the official FAQ on checking for obstructions.
2. Invest in high-quality hardware
Australia’s harsh climate—coastal salt spray, relentless UV, and extreme temperatures—demands quality hardware. Cheap materials simply don’t last and are behind many of the mount failures we see.
Mild-steel screws can corrode within months, especially near the coast. Makeshift solutions like concrete blocks or timber ballast on metal roofs trap moisture, accelerate rust, and can even void your roof warranty.
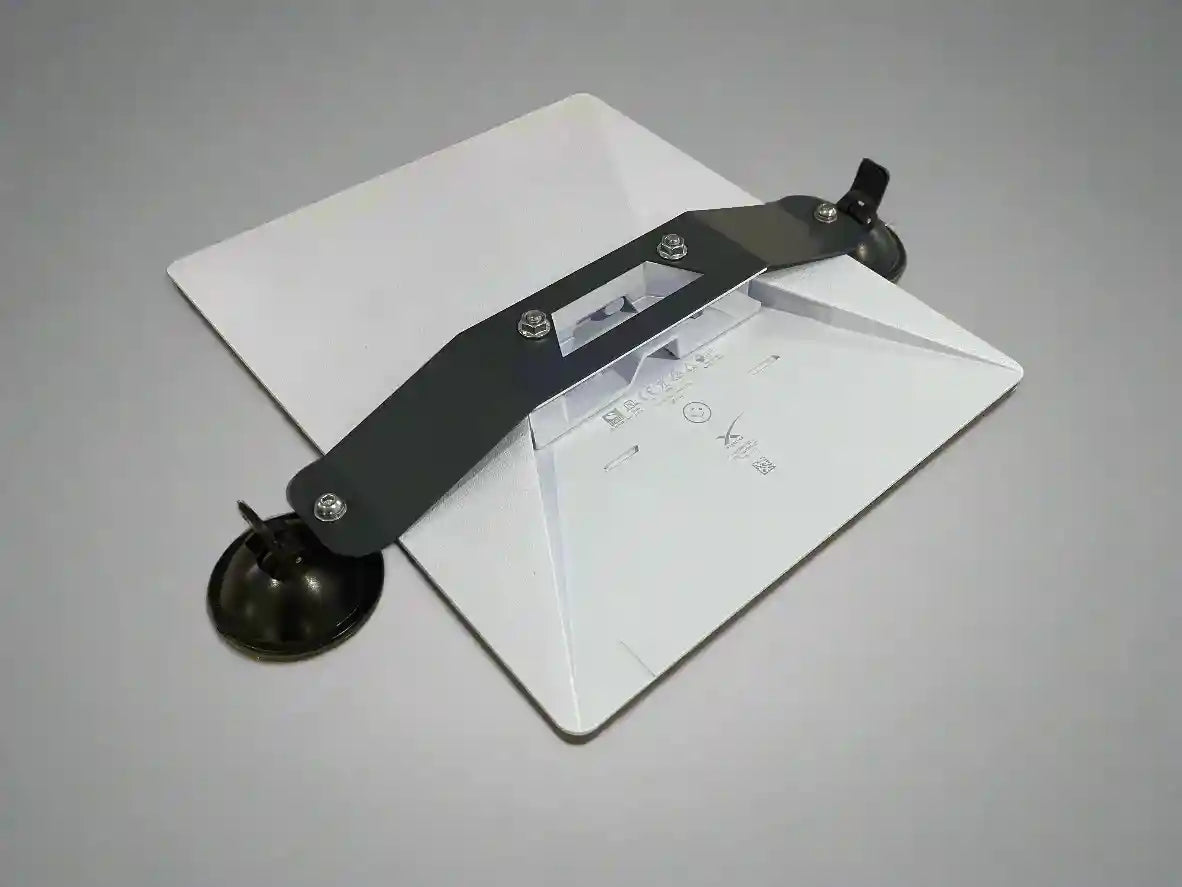
Look for corrosion-resistant materials engineered for the elements: marine‑grade stainless steel fixings, aluminium mounts, and carbon fibre components where appropriate for strength-to-weight benefits. These choices improve reliability, weather resistance, and long-term stability. While they cost more upfront, it’s far cheaper than repairing a collapsed mount or a leaking roof. For more detail, see our guide on how to find durable Starlink mounts for harsh Aussie conditions.
Also check compatibility with your Starlink dish. The right adapter or bracket reduces play, limits vibration, and prevents stress points that can lead to wobble or water ingress over time.
3. Choose the right mount for your kit: dedicated options
Different Starlink kits have unique mechanical interfaces and wind profiles. A one‑size‑fits‑all approach often leads to instability. Match your mount and adapters to your specific kit for the best result.
Gen 2 (rectangular dish) The original rectangle dishes benefit from robust mast adapters and properly braced roof mounts that limit sway and keep the mast vertical in gusts. If you’re upgrading or re‑mounting, prioritise weather-sealed fixings and corrosion-resistant materials. For a feel of what “heavy duty” means in practice, see our overview of SpaceTek high duty mounts: secure, reliable, and built for Australian conditions. These approaches pair well with the Gen 2 dish and help prevent movement that causes dropouts.
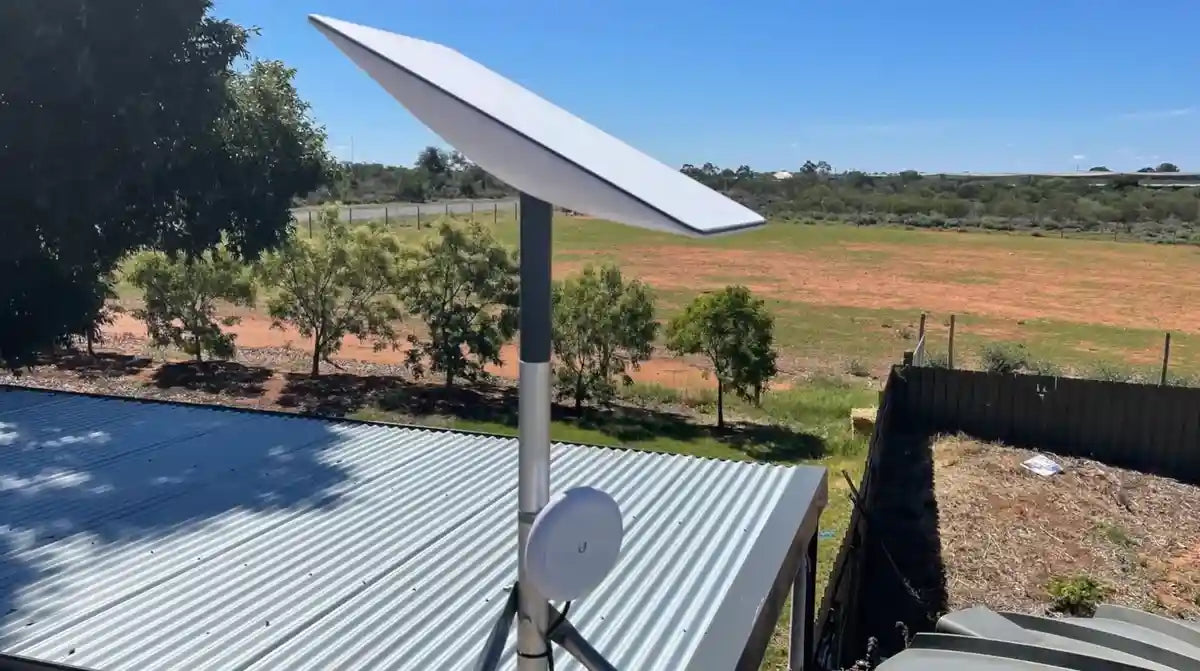
Gen 3 / V4 The newer dish designs have different mounting geometries and load considerations. Use mounts made specifically for Gen 3 / V4 to ensure a secure fit and correct alignment. Explore our Gen 3 / V4 mounts and accessories for purpose-built solutions designed to resist corrosion and handle strong winds when installed correctly.
Starlink Mini The compact Mini is ideal for travel or temporary setups, but it still needs a secure mount that prevents movement and protects cabling. Lightweight aluminium and carbon fibre elements shine here—they’re strong, weatherproof, and easy to handle. See our Starlink Mini collection for portability-focused options that remain stable in changing conditions.
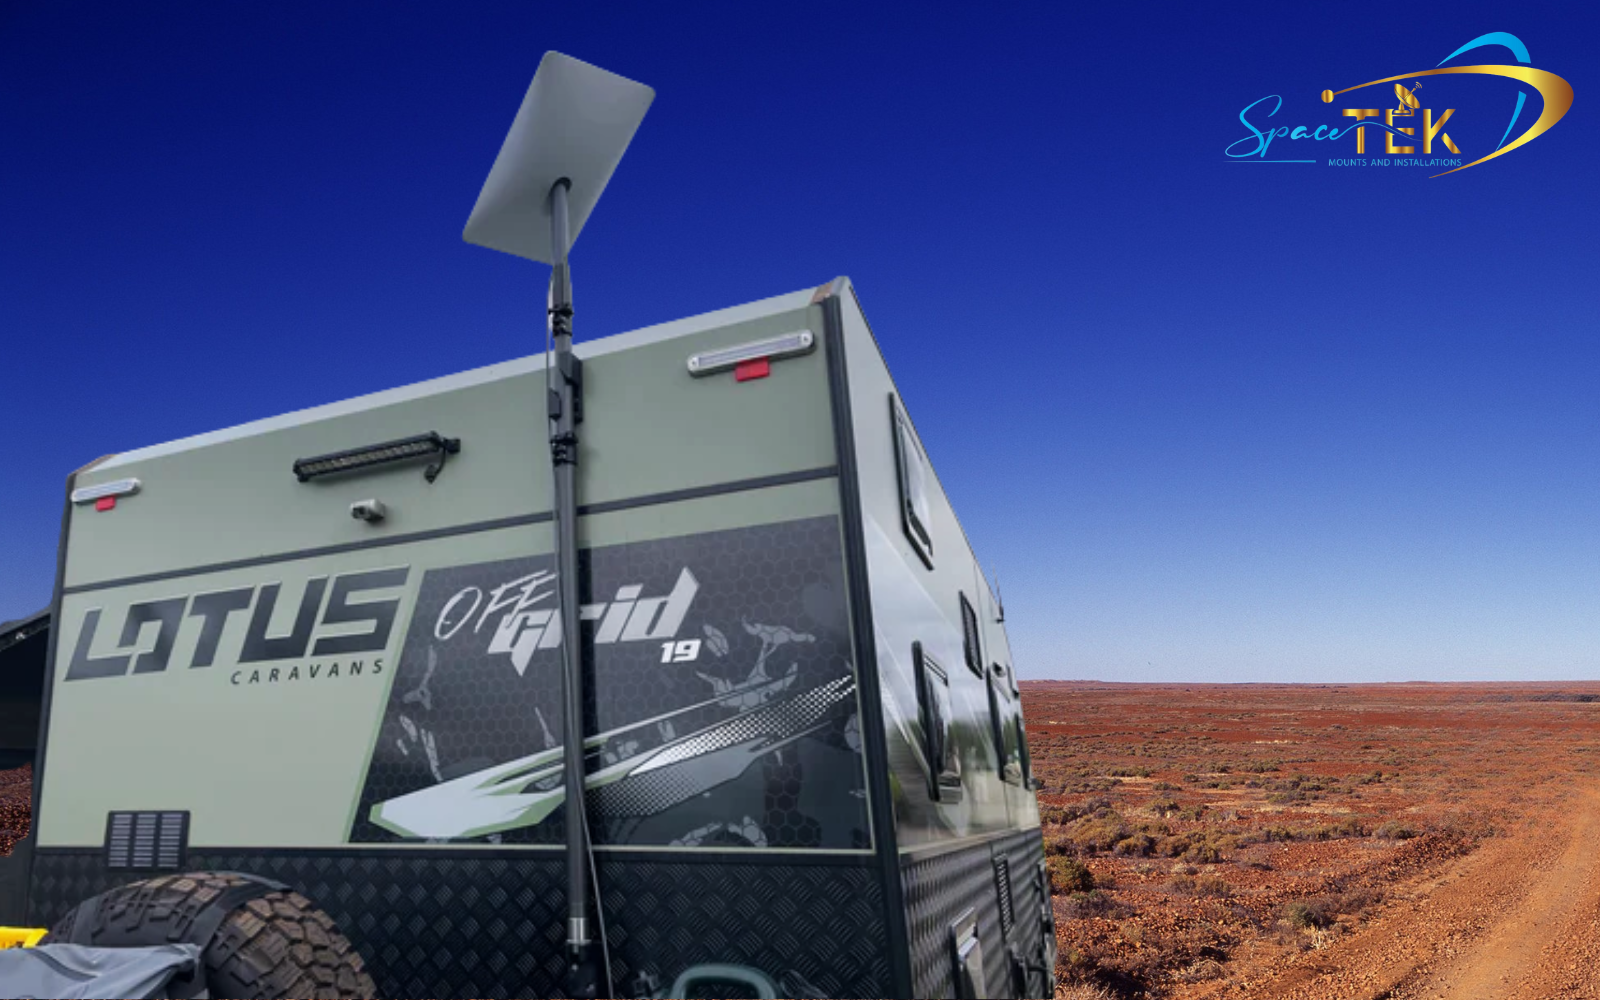
RV and Portability Caravans, motorhomes, and 4WDs introduce vibration and constant setup/takedown. You need hardware that’s quick to deploy, rigid under load, and compatible with your Starlink system. Our Starlink RV and portability mounts are engineered with weather resistance and repeatable alignment in mind.
Ways 4–6: Installation best practices to prevent Starlink mount failures
Even with perfect planning and quality hardware, a sloppy install can undo everything. These practices separate success from expensive failures.
4. Perfect your anchoring and sealing
Improper roof penetrations can cause leaks costing thousands to repair. It’s one of the most common and costly DIY mistakes.
Always anchor your mount to structural beams or rafters, not just the roof sheeting. Use EPDM‑sealed screws for a watertight seal, and drill through the high ridges of corrugated roofing—not the valleys where water flows. Apply neutral‑cure silicone around all penetrations as an extra barrier. On metal roofs, consider non‑penetrating clamps to avoid drilling altogether. If you’re unsure, professional installation is the safest bet. For more tips, read 7 clever ways to avoid DIY Starlink mounting mistakes.
Good anchoring supports your dish in wind, prevents mast movement, and reduces strain on cables and connectors. It also preserves the integrity of your roof.
5. Implement smart cable management
Poor cable management leaves your connection vulnerable to damage from wildlife, UV exposure, and accidents.
Add a drip loop—a simple downward curve in the cable before it enters the building—so water drips off instead of flowing inside. Use weatherproof cable glands for a tight seal at entry points. For extra protection against physical damage or wildlife, run the cable through rigid conduit. Secure with UV‑resistant clips to stop wind chafe. All of this complements the Starlink system and helps avoid intermittent faults caused by water ingress or damaged connectors.
6. Secure against wind and weather
From cyclonic winds to sudden gusts, your mount must stand firm. A wobbly mast causes signal disruptions and can lead to catastrophic failure.
Even minor movement can trigger a “Mast Not Vertical” alert in the Starlink app. While the dish can fine‑tune aim, it can’t compensate for an unstable mount. Our mounts are engineered for winds up to 115 km/h when installed correctly. In high‑wind or cyclone‑prone areas, additional bracing or tethering cables often make the difference. Lightweight, stiff materials such as carbon fibre and aluminium help reduce flex under load. Don’t let your connection blow away; learn more about protecting your Starlink mount from wind: tips that work.
Way 7: Proactive maintenance for long‑term stability
Even perfectly installed systems benefit from regular attention. Proactive maintenance is the final step in preventing long‑term failures.
7. Perform regular inspections
A “set and forget” approach can lead to problems. Regular inspections catch issues before they become major failures.
Periodically, gently test the mount for any wobbling, which indicates loose fittings. Look for rust spots and address them promptly. Check that all nuts, bolts, and clamps are tight—vibration can loosen them over time. Inspect sealant for cracks and the cable for any signs of damage.

Finally, re‑scan for obstructions with the Starlink app—especially after storms or as seasons change—to account for new tree growth. We recommend a quick visual check monthly and a more thorough inspection quarterly. Our SpaceTek high duty mounts: secure, reliable, and built for Australian conditions are designed for minimal maintenance, but even the best hardware benefits from a watchful eye.
Conclusion: A secure mount is a smart investment
We’ve covered the most common mount-related pitfalls and how to prevent them. From a careful site survey to corrosion‑resistant hardware and sound anchoring, each step directly affects performance and longevity. Most connectivity hiccups stem from mounting errors, not the Starlink technology itself. Get the basics right and you’ll protect your roof, safeguard your dish, and keep your connection stable in Australia’s tough conditions.
A secure mount does more than hold the dish: it optimises signal, resists the weather, and delivers long‑term reliability. Materials matter—aluminium, carbon fibre, and marine‑grade stainless steel hardware help keep rust at bay and movement under control. Match your mount to your kit—Gen 2, Gen 3/V4, Mini, or RV/Portability—and make sure it integrates neatly with the Starlink dish and cabling for a clean, stable result.
At SpaceTek Australia, we design for our environment. We build for reliability, weather resistance, and ease of use because that’s what works in the real world. Whether you need a Gen 3 / V4 mount, a portable solution for your Starlink Mini, or guidance on best practice installs, quality gear pays for itself over time. For background reading, see why invest in a quality roof mount kit.
In short: correct installation is the key to optimal performance and long service life. And if you want confidence long after the job is done, SpaceTek provides the most secure, rust‑resistant, and user‑friendly Starlink mounts in Australia—built for Australian conditions.
If you’d like tailored advice for your location, please contact us. We’re here to help you get it right the first time.
Leave a comment
This site is protected by hCaptcha and the hCaptcha Privacy Policy and Terms of Service apply.