Where should I install my Starlink? To achieve the best performance, your Starlink dish needs an unobstructed view of the sky. Here are some tips:
- Lift your dish: Install on a roof, pole, or wall for a clear sky view.
- Avoid obstructions: Ensure no trees, buildings, or structures block the dish's line of sight.
- Use the Starlink App: This app helps optimally align your dish by checking for obstructions.
In an age when being connected matters more than ever, SpaceX's Starlink satellite internet service is revolutionizing connectivity by reaching even the most remote locations. Designed to provide high-speed internet to areas where traditional services fall short, Starlink relies on a sophisticated network of low Earth orbit satellites. This setup not only ensures faster speeds and lower latency but also expands internet access to underserved areas globally. However, to get the most out of Starlink, correct dish placement is crucial. Read on to explore the best way to set up your Starlink for optimal performance.

Understanding Starlink Installation Requirements
To get the best out of your Starlink setup, understanding its installation requirements is key. The primary factor? A clear view of the sky.
Clear View of the Sky
Starlink works by connecting with satellites that orbit the Earth. For this connection to be strong and stable, your dish needs an unobstructed line of sight to the sky. Obstructions such as trees, buildings, or even tall power lines can interfere with this connection, causing slower speeds or dropped connections.
Obstructions: What to Look For
Before installation, survey your chosen location for potential obstructions. Even a small branch can cause service interruptions. Using the Starlink App can simplify this process. The app features a "Check for Obstructions" tool that helps identify any potential barriers that might affect your dish's performance.
Starlink App: Your Setup Companion
The Starlink App is an invaluable tool for ensuring optimal dish placement. Available on both iOS and Android, it guides you through the installation process step-by-step. Here's how it helps:
- Check for Obstructions: This tool uses augmented reality to help you find the best spot for your dish, ensuring minimal interference.
- Alignment Assistance: Once installed, the app helps align your dish to maximise satellite connectivity.
By leveraging the app's capabilities, you can ensure your Starlink dish is perfectly positioned for optimal performance.

With these requirements in mind, you’re on your way to setting up a reliable and high-speed Starlink internet connection. Next, we’ll dive into specific installation tips for various environments to further improve your Starlink experience.
Where Should I Install My Starlink?
Using the Starlink App for Optimal Placement
When deciding where to install your Starlink, choosing the right location is crucial for optimal performance. Your Starlink dish needs a clear line of sight to the sky to maintain a strong connection with satellites. Let's explore how you can find the perfect spot.
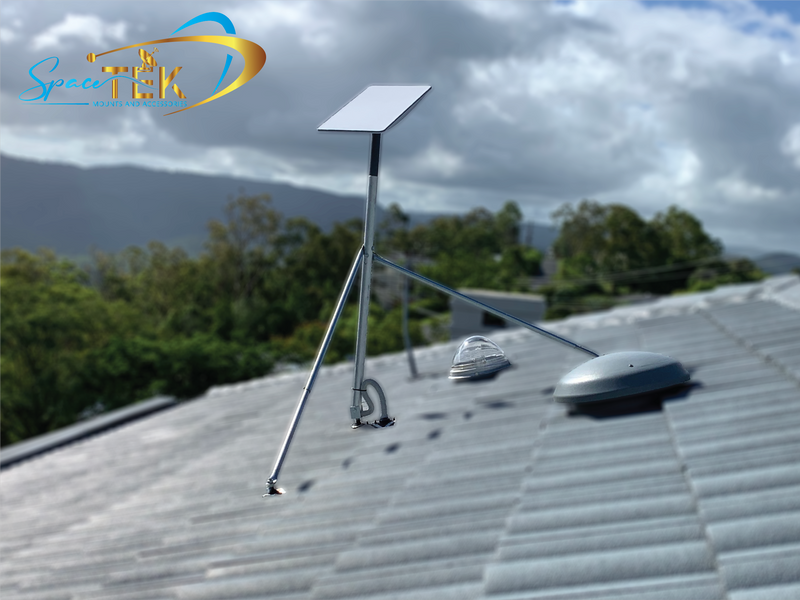
Lifted Location: Roof, Pole, or Wall?
For many users, a lifted location such as a roof, pole, or wall offers the best results. Elevating your dish reduces potential obstructions from trees, buildings, or other structures. Here's a quick breakdown of each option:
- Roof Mounting: Ideal for avoiding obstructions and gaining a wide view of the sky. Many customers find roof installations provide the most reliable service.
- Pole Mounting: Useful if roof access is challenging. Poles can be installed in open spaces to lift the dish above obstacles.
- Wall Mounting: A practical choice for those with limited space or specific structural needs. Ensure the wall is high enough to avoid nearby obstructions.
Check for Obstructions Tool
The Starlink App is your go-to tool for finding the best installation spot. The Check for Obstructions feature uses augmented reality to help you visualize potential barriers. Simply point your phone's camera at the sky, and the app will highlight any obstructions that could interfere with your dish's signal.
Alignment Tool
Once you've chosen your spot, the app's Alignment Tool helps fine-tune the dish's positioning. This feature ensures your dish is correctly aligned with the satellites overhead, maximizing your connection strength. For some Starlink kits, like the Standard Actuated and High Performance, the dish will automatically level itself.
By leveraging these tools, you can ensure your Starlink dish is set up for the best possible performance. Whether you're mounting on a roof, pole, or wall, following these guidelines will help you achieve a reliable and high-speed internet connection.
Next, we'll explore specific installation tips for different environments, ensuring your Starlink setup is custom to your unique location.
Installation Tips for Different Environments
Starlink in Australia
Whether you're in a busy city or the remote outback, Starlink offers a powerful solution for internet connectivity across Australia. Let's dig into how you can optimize your setup for various environments, ensuring you get the best performance wherever you are.
Rural Properties
For those living in rural areas, Starlink is a game-changer. Traditional internet options are often limited or non-existent, making satellite internet a vital resource. Installing your Starlink dish in an liftd location—such as a roof or a tall pole—can significantly improve performance by avoiding obstructions like trees or hills. Chris Miller, a real estate expert, shared his experience setting up Starlink for his mother in rural North Carolina, emphasizing how straightforward the process was and the dramatic improvement in internet quality.
Urban Settings
In urban areas, the challenge often lies in navigating the dense environment of buildings and other structures. Wall mounting your Starlink dish can be a practical solution here. Ensure it’s placed high enough to avoid nearby obstructions. The Starlink App can assist in finding the optimal spot, using its Check for Obstructions tool to scan for potential barriers.
Remote Areas and Remote Australia
The vast expanses of remote Australia present unique challenges for connectivity. Here, Starlink shines by providing internet access where traditional methods fall short. Pole mounting is often the best choice in these areas, as it allows for flexible placement in open spaces, ensuring a clear line of sight to the sky. According to a study by RMIT University, mobile data in rural Australia can be up to 90% slower than urban speeds, making Starlink an attractive alternative.
Remote Communities
For remote communities, reliable internet can transform access to education, healthcare, and economic opportunities. Starlink's satellite internet can bridge this gap effectively. The key is ensuring your dish is placed in the most advantageous position. Spacetek’s adjustable mounts can help achieve this, offering stability and adjustability to fine-tune your dish's angle for optimal reception.
By tailoring your Starlink installation to your environment, you can enjoy consistent, high-speed internet regardless of your location. Whether in a rural property, urban setting, or remote community, the right setup makes all the difference.
Next, we’ll address common questions about Starlink installation to further assist you in optimizing your setup.
Frequently Asked Questions about Starlink Installation
How do I check for obstructions?
To ensure your Starlink dish functions optimally, it's crucial to have a clear view of the sky. Obstructions like trees, buildings, or even power lines can interfere with the satellite signal. Luckily, the Starlink App offers a handy feature called the Check for Obstructions tool. This tool helps you identify potential barriers that could disrupt your connection.
- Using the Starlink App: Open the app and steer to the obstruction-checking feature. Follow the on-screen instructions to scan your surroundings. The app will guide you in finding an installation spot with minimal interference.
Do I need a permanent mount?
A permanent mount is highly recommended for Starlink installations. It provides the stability needed to maintain a consistent connection with the satellites overhead. A secure mount ensures your dish remains in the optimal position, minimizing the risk of signal drops due to movement or misalignment.
- Liftd Location: Elevating your dish can improve its performance by minimizing obstructions. Whether on a roof, pole, or wall, choose a location that offers a clear line of sight to the sky. This is particularly important in areas with dense foliage or buildings.
What are the best mounting options?
Choosing the right mounting option is key to optimizing your Starlink setup. Here are some popular choices:
Roof Mounts: Ideal for urban and rural settings where buildings or trees might obstruct the view. Roof mounts provide elevation and stability, ensuring a clear path for the satellite signal.
Pole Mounts: Perfect for open areas or remote locations. Pole mounts allow flexibility in positioning and can be adjusted for the best angle and height.
Wall Mounts: Useful in urban areas where space is limited. Wall mounts can be installed on the side of a building, providing a secure and liftd platform for your dish.
By selecting the appropriate mounting option and using the Starlink App to check for obstructions, you can ensure a reliable and high-speed internet connection. Next, we'll explore the rugged accessories available for tough Australian conditions to further improve your Starlink experience.
Rugged Accessories for Tough Australian Conditions
When it comes to installing your Starlink dish in Australia, the environment can be quite challenging. From scorching heat to heavy rain, ensuring your setup can withstand these conditions is crucial. That's where SpaceTek Australia steps in with their custom mounts and accessories, specifically designed for the Australian climate.
Why Choose SpaceTek Australia?
SpaceTek Australia offers custom mounts that are not just compatible with Starlink's self-installer kits, but are also built to endure the harsh Australian weather. Our mounts are made from high-quality, rust-resistant materials, ensuring long-lasting durability and stability.
Rust-Resistant Materials: Our mounts are designed to resist corrosion, a common issue in areas with high humidity or coastal environments. This ensures your Starlink dish remains securely in place without the risk of rust-related failures.
Customised for Australian Conditions: Each mount is custom to handle the unique challenges posed by the Australian climate, from high winds in the Outback to the salty air of coastal regions.
Benefits of Using SpaceTek's Mounts
Superior Stability: Designed to hold your dish steady even in extreme weather, our mounts prevent the dish from shifting, which could disrupt your connection.
Ease of Installation: Compatible with Starlink's self-installer kits, our mounts make the installation process straightforward, even for those with minimal technical expertise.
Long-Term Durability: With materials that resist both rust and wear, you can trust that your Starlink setup will stand the test of time without frequent maintenance or replacements.
By choosing SpaceTek's mounts, you're investing in a solution that not only improves your Starlink experience but also ensures reliable internet connectivity in even the toughest conditions.
Ready to upgrade your Starlink setup? Explore our range of rugged, high-quality accessories designed for the Australian environment. Visit SpaceTek Australia to find out more about our products and how they can improve your Starlink installation.
Leave a comment
This site is protected by hCaptcha and the hCaptcha Privacy Policy and Terms of Service apply.