Why Starlink Cable Extension Adapters Matter for Remote Connectivity
A starlink cable extension adapter is essential when you need to position your dish away from your router for optimal signal reception. Here's what you need to know:
- Purpose: Extends your Starlink cable reach using standard Ethernet cables
- Compatibility: Different adapters for Gen 2, Gen 3, and Mini dishes
- Performance: Quality adapters support speeds up to 2000Mbps without signal loss
- Range: Extend up to 175 feet (50 meters) with proper Cat6+ cables
- Weather Protection: Look for IP68-rated waterproof designs for Australian conditions
For many Australians living in remote areas, getting your Starlink dish in the perfect spot can mean the difference between frustrating dropouts and rock-solid internet. The standard cable that comes with your Starlink kit might not reach that ideal location on your roof or property where you get the clearest view of the sky.
Rural properties often face unique challenges - trees blocking signals, buildings creating dead zones, or simply needing more cable length to reach from the best dish location to your home office. That's where a quality cable extension adapter becomes crucial for maintaining the high-speed connectivity you need for work and staying connected.
I'm Aaron Wroblewski, and with over 25 years of experience in satellite communications and remote connectivity solutions, I've helped countless Australians optimize their Starlink setups using the right starlink cable extension adapter for their specific needs. At SpaceTek Australia, we've tested these adapters in harsh Australian conditions to ensure they deliver reliable performance when and where you need it most.
Why You Might Need a Starlink Cable Extension Adapter
Picture this: you've just received your shiny new Starlink kit, and you're eager to get connected. But as you start planning the installation, you quickly realize that perfect spot for your dish – the one with the crystal-clear view of the sky – is nowhere near where your router needs to be. Sound familiar?
This is exactly when a starlink cable extension adapter becomes your best mate. The standard cable that comes with your Starlink system might look generous, but Australian properties have a way of testing those limits.
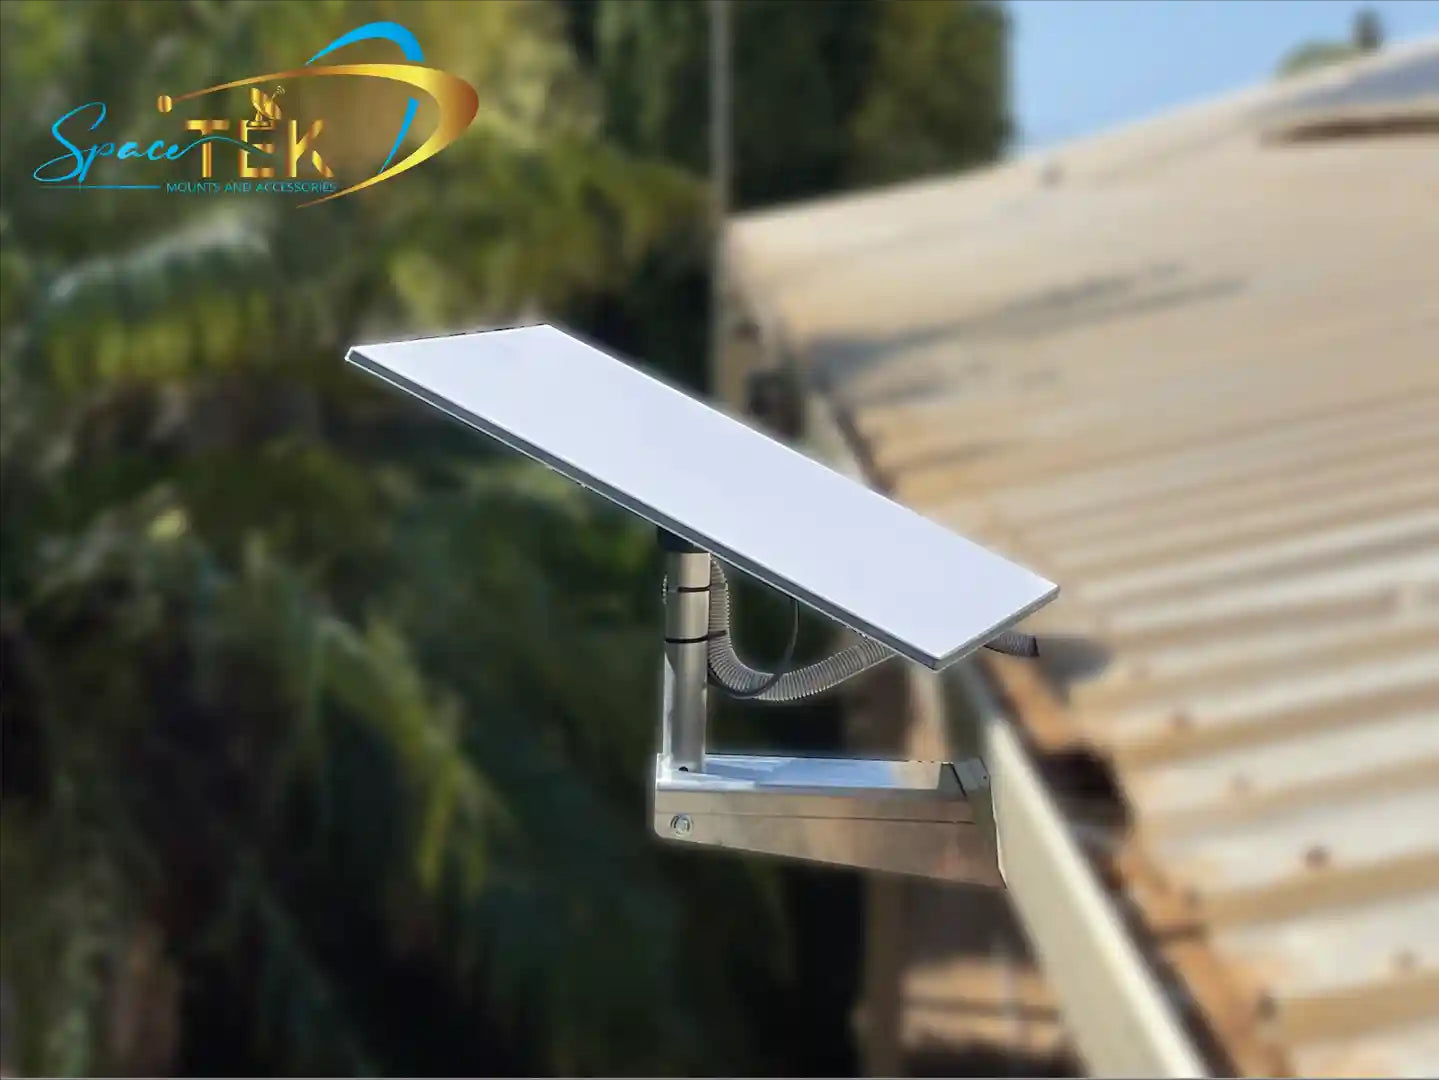
Optimal dish placement is the number one reason our customers reach out for extension solutions. Your Starlink dish is a bit like a solar panel – it needs that unobstructed view to perform at its best. When tall gum trees, the neighbor's shed, or even your own roof line creates shadows in the sky, you'll need to get creative with positioning. Moving the dish just a few meters can transform a frustrating connection into blazing-fast internet that actually works when you need it most.
Large properties and multi-story homes present their own unique challenges. We've worked with customers who need to run cables from a high roof mount down through multiple floors, or across sprawling rural blocks to reach an office in a separate building. The standard cable simply won't stretch that far, and that's perfectly normal.
Then there are those unique installation scenarios that make Australian living so interesting. Maybe you need internet in the workshop out back, or you're setting up a home office in a converted shipping container. A starlink cable extension adapter gives you the flexibility to get reliable internet exactly where life takes you.
For our adventurous customers, Starlink RV and portable setups add another layer of complexity. When you're camped beside a beautiful lake but surrounded by trees, you might need to position your dish well away from your caravan or motorhome to get a clear signal. The ability to extend that cable means you're not stuck with poor internet just because of where you've parked. Our range of portable accessories work seamlessly with extension adapters to give you maximum flexibility – you can learn more about optimizing your mobile setup in our guide to Starlink RV and Portability Accessories That Make Sense.
The bottom line? Improved internet speed and stability comes from getting your dish in the right spot, not the convenient spot. With the right extension adapter, you're not compromising on performance just because of cable length limitations.
Choosing the Right Starlink Cable Extension Adapter
When you're standing in your backyard, looking up at the perfect spot for your dish, the last thing you want is to find your cable won't reach. But here's the thing - not all starlink cable extension adapters are created equal, and choosing the wrong one can turn your dream setup into a connectivity nightmare.
The key to success? Understanding exactly what you're working with and what you need.
Compatibility with Your Starlink Generation
Think of Starlink generations like different car models - they might look similar, but the keys definitely won't work interchangeably! Each generation of Starlink dish uses its own unique connector system, and trying to force the wrong adapter is like trying to charge your phone with the wrong cable - frustrating and potentially damaging.
Gen 2 Rectangular Dish is what most Australians have in their backyards right now. This popular rectangular dish comes with a 15-meter cable that uses Starlink's proprietary connectors on both ends. The connectors lock securely in place, carrying both power and data through the same cable. Any starlink cable extension adapter for Gen 2 needs to match these specific connectors perfectly.
Gen 3 Standard Dish represents Starlink's latest evolution. While it might look similar to Gen 2 from a distance, the cable and connector system is completely different. Gen 3 adapters are specifically engineered for this newer hardware and won't work with older dishes. The good news? Gen 3 cables are often detachable, making extensions more straightforward.
Starlink Mini brings portability to the forefront with its compact design. This little powerhouse has its own connector requirements, designed for the mobile lifestyle. If you're planning to take your internet on camping trips or need a portable solution, make sure your extension adapter specifically supports the Mini.
Here's why getting this right matters so much: Starlink cables aren't just carrying internet data - they're also powering your dish through Power over Ethernet (PoE). Using an incompatible adapter can damage your equipment, void your warranty, or leave you with a very expensive paperweight.
We've created detailed guides to help you steer these differences. For the latest hardware, our Ultimate Guide to Starlink Gen 3 Compatible Accessories covers everything you need to know. If you're working with the popular rectangular dish, our Gen 2 Gear Guide: Top Accessories for Your Starlink System is essential reading.
Key Features to Look For in a Starlink Cable Extension Adapter
Once you've confirmed compatibility, it's time to separate the good adapters from the great ones. After all, you're not just buying a cable - you're investing in reliable internet that needs to work flawlessly, whether it's a scorching summer day or a torrential downpour.
Getting the length right is your first consideration. Measure twice, buy once, as they say! Walk the actual path your cable will take, accounting for any routing around obstacles, through walls, or up to liftd mounting points. Extension cables range from compact 5-meter options for simple installations to impressive 75-meter lengths for those challenging setups. Don't go longer than necessary, but definitely don't cut yourself short.
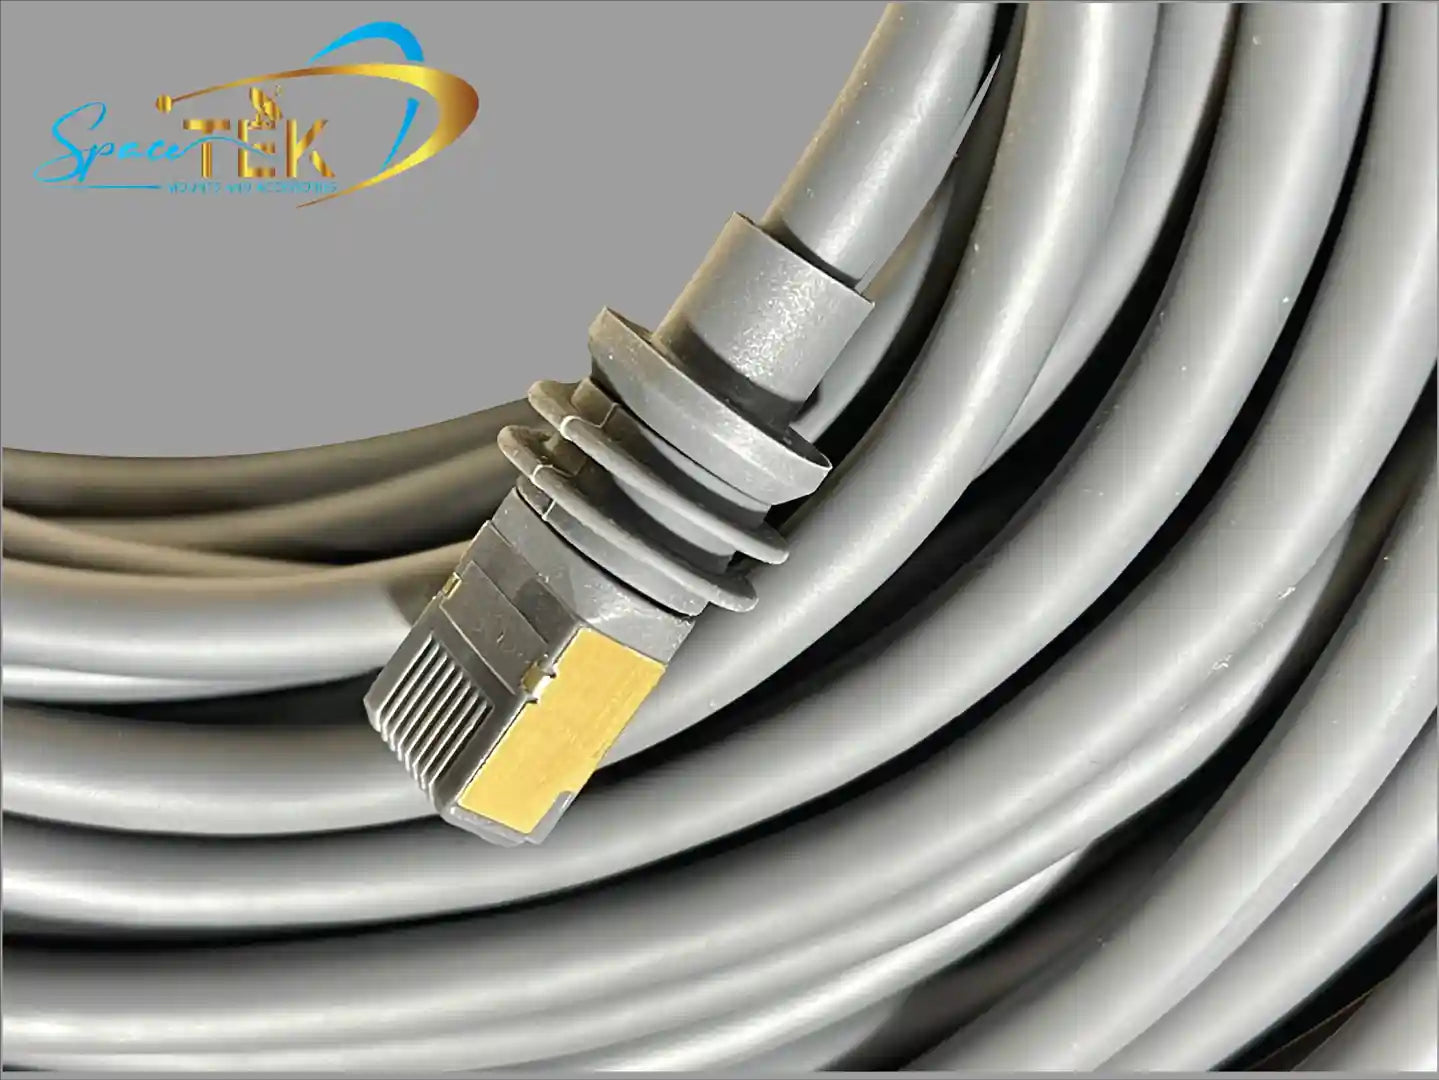
Weather protection is absolutely crucial in Australia's challenging climate. The harsh sun, sudden storms, and temperature extremes will test any outdoor equipment. Look for IP68 waterproof rating - this means your adapter can handle complete dust protection and can survive underwater immersion up to 1.5 meters for 30 minutes. That's serious weather protection.
UV resistance is equally important. The Australian sun can be brutal on cable jackets, causing them to crack and fail over time. Quality adapters feature anti-aging rubber outer jackets that resist UV damage and maintain flexibility even after years of sun exposure.
Performance specifications determine whether your extended setup will deliver the speeds you're paying for. Look for adapters supporting speeds up to 2000Mbps - this ensures your extension won't become a bottleneck in your system. The wire gauge matters too, with 24AWG or thicker wiring providing better signal integrity over longer distances.
Signal shielding protects your internet connection from interference caused by power lines, other electronics, or environmental factors. Full-metal shielding is your friend here, keeping your data signal clean and stable even in electrically noisy environments.
The best starlink cable extension adapter combines all these features into a package designed specifically for Australian conditions. It's not just about making your cable longer - it's about extending your reach without compromising the reliable, high-speed internet that made you choose Starlink in the first place.
How to Install Your Starlink Cable Extension Adapter
Getting your starlink cable extension adapter installed properly doesn't require a PhD in engineering – just a bit of common sense and some careful planning. Think of it like connecting LEGO blocks, but with the added bonus of getting brilliant internet at the end!
Preparation and Safety
Before you start fiddling with cables, let's make sure you're set up for success. The last thing we want is you getting a nasty shock or damaging your shiny new Starlink gear.
Power off first – no exceptions! This might sound obvious, but you'd be surprised how many people skip this step. Always disconnect your Starlink power supply from the wall before touching any cables. Electricity and outdoor installations can be a dangerous combination, and we want you safe and sound.
Next up, grab your phone and open the Starlink app. Put your dish into "Stow" mode – this tells the dish to park itself in a safe, flat position. No one wants their dish doing gymnastics while they're trying to work on it!
Now's the time to gather everything you'll need. Your starlink cable extension adapter and extension cable are obvious must-haves, but don't forget cable ties for neat routing, a measuring tape (if you haven't already double-checked your distances), and any mounting bits if you're relocating your dish. Quality adapters should already be IP68 rated, but having some waterproof tape handy never hurts for extra peace of mind.
Before you start running cables willy-nilly, take a moment to plan your route. Walk the path your extended cable will take and look out for potential trouble spots. Sharp corners that might kink the cable, door frames that could pinch it, or areas near electrical equipment that might cause interference. A little planning now saves headaches later.
Step-by-Step Installation Guide
Right, let's get this starlink cable extension adapter connected and get you back online with better signal coverage!
Start by unplugging everything. Carefully disconnect the original Starlink cable from both your dish and your router or power supply. These proprietary connectors often have specific release mechanisms, so don't force anything – a gentle touch usually does the trick.
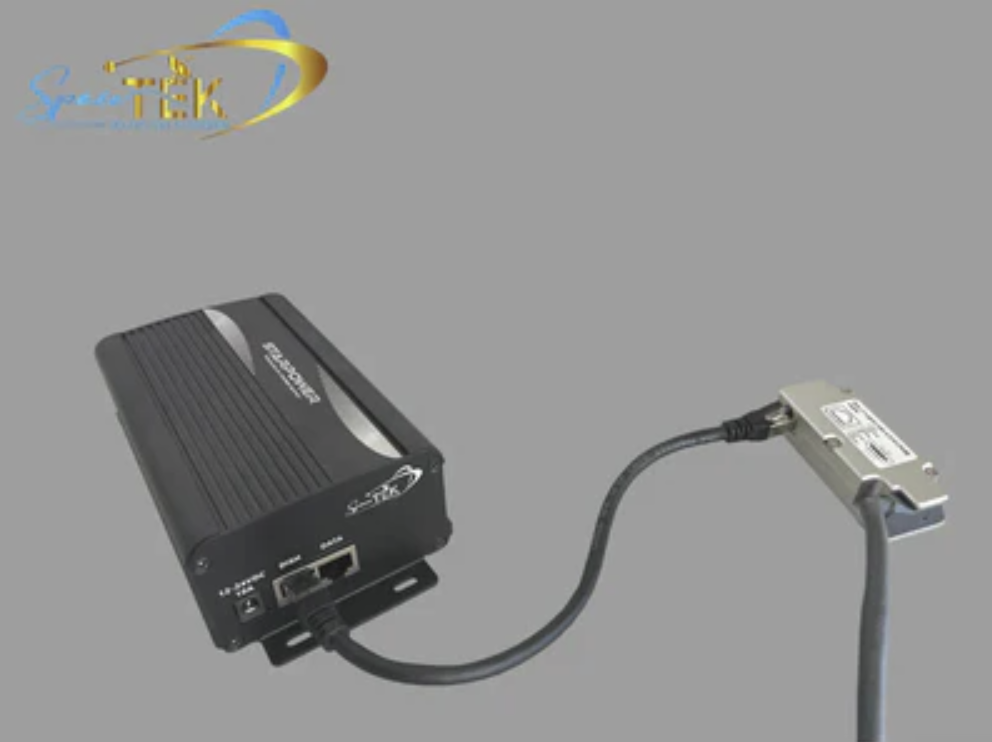
Connect your SpaceTek adapter to the dish cable. Take your starlink cable extension adapter and connect it firmly to the Starlink cable coming from your dish. You should hear or feel it click securely into place, creating that all-important watertight seal. This clever little adapter is essentially translating between Starlink's proprietary connector and standard Ethernet – pretty neat, right?
Attach your extension cable. Now connect your high-quality Ethernet extension cable (we always recommend Cat6 or better for top performance) to the adapter's Ethernet port. Make sure it's snug and secure – loose connections are the enemy of good internet.
Route your cable thoughtfully. This is where that planning pays off. Follow your predetermined path, using cable ties or clips to keep everything tidy and secure. Remember our golden rules: no sharp bends that could damage the cable, keep it away from power lines to avoid interference, and make sure it won't become a tripping hazard or get damaged by weather or curious animals.
Connect to your router or power supply. Once your extended cable reaches its destination, connect the free end to the appropriate port on your Starlink equipment. Almost there!
Fire it up and test everything. Reconnect your power supply to the mains and watch your dish come to life. It'll go through its startup routine, searching for satellites like a loyal dog looking for its favourite stick. Open your Starlink app and check the "Obstructions" and "Statistics" sections to confirm everything's working beautifully. You're looking for minimal obstructions and stable speeds that make you smile.
If you need additional guidance during installation, Starlink's support team has put together some helpful resources – you can find additional installation guidance here.
And that's it! You've successfully installed your starlink cable extension adapter and given your Starlink dish the freedom to find that perfect spot with crystal-clear sky views. Time to enjoy that improved internet connection!
Best Practices and Potential Risks
Installing a starlink cable extension adapter opens up fantastic possibilities for your internet setup, but it's not a case of "set and forget." Like any good piece of tech, it needs a bit of love and attention to deliver its best performance. Let's chat about the golden rules that'll keep your connection humming along nicely, and the potential pitfalls to watch out for.
Best Practices for a Reliable Connection
Think of these practices as your insurance policy for rock-solid internet. Get them right, and you'll wonder how you ever managed with a short cable!
Quality cables are your best friend. When extending your Starlink connection, always reach for Cat6 or higher Ethernet cables. You might save a few dollars with older Cat5e cables, but trust me, it's not worth the headache. Cat6, Cat6A, or Cat7 cables are built for higher speeds, resist interference better, and maintain signal strength over longer distances. For the best results, especially on longer runs, look for cables with 23AWG or thicker wiring - the lower the number, the thicker the wire, and the better your signal integrity. Our Essential Guide to Buying Starlink Cables dives deeper into making the right choice for your setup.
Waterproofing is non-negotiable in the Australian climate. Even with an IP68-rated starlink cable extension adapter, I always recommend adding an extra layer of protection around outdoor connections. A wrap of self-amalgamating tape can be the difference between years of reliable service and a frustrating outage after the next storm. Make sure every connection clicks firmly into place and feels secure.
Your cables hate sharp turns just as much as you'd hate a kinked garden hose. Ethernet cables carrying power and data need gentle curves, not tight bends that can damage the delicate wiring inside. When routing your extended cable, think "flowing river" rather than "sharp corners." This simple approach prevents signal loss and extends your cable's lifespan significantly.
Good cable management pays dividends down the track. Secure your cables with UV-resistant ties or clips - don't let them flap around in the wind like washing on a line! Proper securing prevents damage from weather, animals, and garden equipment, while also eliminating tripping hazards. Keep your cables away from power lines and other sources of interference, and you'll thank yourself later when troubleshooting becomes a breeze.
Regular visual inspections, especially after wild weather, can catch small problems before they become big headaches. A quick walk around your cable run every few months is time well spent.
Understanding the Risks
Now, let's be honest about the potential challenges. Knowledge is power, and understanding these risks helps you make smart decisions about your setup.
Distance has its limits, and signal degradation is the biggest concern with any cable extension. Every metre of cable introduces tiny signal losses that can add up. The good news? Quality adapters can extend your network up to 175 feet (50 metres) while maintaining speeds up to 2000Mbps. However, when your total cable length (including the original Starlink cable) approaches 300 feet, you might need professional consultation or signal amplifiers. My advice? Keep extensions as short as practically possible while still achieving your placement goals.
Cheap components are false economy. We've all been tempted by bargain-basement cables and adapters, but they often deliver bargain-basement performance. Poor-quality components can cause frustratingly slow speeds, dropouts, or complete connection failures. This is why we emphasise features like 24AWG pure copper wiring and full-metal shielding in quality adapters - these aren't marketing buzzwords, they're the difference between reliable performance and endless frustration.
Warranty considerations deserve careful thought. Starlink officially states they "do not recommend modifying your cable or combining it with another cable" and warn that third-party accessories might void your warranty. Here's where our approach at SpaceTek Australia makes sense - our starlink cable extension adapter solutions connect to your existing cable without requiring any cutting or modification of the original Starlink equipment. This preserves your warranty protection while giving you the extension capability you need.
While some may consider simply splicing cables together, this is asking for trouble—power and data integrity issues can permanently damage your dish. A purpose-built adapter designed for your specific Starlink generation, paired with a quality Ethernet cable, remains the most reliable and safe extension method available. For many real-world situations, a carefully chosen third-party adapter is the only practical solution to achieve the ideal dish placement.
Understanding these trade-offs helps you make informed decisions that balance performance, reliability, and warranty protection for your specific situation.
Where to Find Reliable Adapters in Australia
When you're looking for a starlink cable extension adapter in Australia, quality and local expertise should be at the top of your priority list. You don't want to be stuck with a cheap adapter that fails during a crucial video call or leaves your dish vulnerable to our unpredictable weather.
At SpaceTek Australia, we've made it our mission to provide Australians with tested, high-quality Starlink accessories that can handle everything from scorching Queensland summers to torrential downpours in Tasmania. We understand that when you're investing in satellite internet for your remote property or business, you need gear that simply works - day in, day out.
The beauty of shopping with a reputable Australian supplier is that we've already done the hard work for you. Every starlink cable extension adapter in our range has been put through its paces in real Australian conditions. We're not just selling products; we're providing solutions that we'd happily use on our own properties.
When you're exploring extension adapters, you'll often find they work brilliantly alongside other essential Starlink accessories that can transform your entire setup. Mounting kits help secure your dish in that perfect spot where it can see the sky clearly. DC power conversion kits are absolute lifesavers for off-grid adventures, letting your Starlink run directly from 12V or 24V power without the energy waste of AC inverters. Carry bags protect your investment when you're moving between locations, while tripod mounts make temporary setups at campsites or work sites a breeze. And don't forget ethernet adapters - particularly useful for integrating older Gen 1 systems into larger home networks.
We've put together comprehensive resources to help you steer all these options. Our guide on Starlink Accessories: Everything You Need to Know covers the essentials, while our Where to Buy Starlink Parts and Accessories: Your Ultimate Shopping Guide takes you through the entire selection process.
At the end of the day, we're committed to helping Australians get the most out of their Starlink systems. Whether you're extending your cable to reach that perfect rooftop position or setting up a mobile office in the middle of nowhere, we've got the reliable, locally-tested solutions you need.
Conclusion
Getting the perfect starlink cable extension adapter setup isn't just about adding a bit more cable length – it's about open uping your Starlink's true potential. When you can position your dish exactly where it needs to be for that crystal-clear view of the sky, everything changes. Your speeds improve, those frustrating dropouts become a thing of the past, and you finally get the reliable internet connection you've been dreaming of.
Throughout this guide, we've covered the essential basics: why you might need that extra reach for optimal dish placement, how to choose the right adapter for your specific Starlink generation, and what features really matter when it comes to weatherproofing, speed support, and durability. We've walked you through the installation process step by step, shared our best practices for maintaining a rock-solid connection, and been honest about the potential risks and how to avoid them.
The key takeaway? Quality and compatibility matter. A cheap adapter might seem like a bargain, but when your internet cuts out during an important video call or your favourite streaming show starts buffering, you'll quickly realise that investing in the right equipment from the start is always worth it.
At SpaceTek Australia, we've spent years understanding what works in our unique Australian conditions. From the scorching outback sun to tropical downpours, we know what it takes to keep your connection strong and stable. That's why every starlink cable extension adapter and accessory we recommend has been thoroughly tested to handle whatever Mother Nature throws at it.
Whether you're setting up a permanent installation on your rural property, planning an epic RV adventure, or just need the flexibility to get your dish away from those pesky tree branches, the right extension solution gives you the freedom to put your Starlink exactly where it performs best.
Ready to take your setup to the next level? Explore our complete range of Starlink parts and accessories to find the perfect solution that'll have you connected faster and more reliably than ever before.
Leave a comment
This site is protected by hCaptcha and the hCaptcha Privacy Policy and Terms of Service apply.