Starlink Mounting Options: Find the Right Fit for Your Home, RV, or Boat

The mounting options for Starlink you choose will make or break your satellite internet experience. Pick the wrong mount and you're dealing with signal drop-outs, a wobbly dish in the next storm, or a landlord knocking on your door.
Here's a quick overview of the high-quality SpaceTek mounting options available:
- SpaceTek Pivot Mount - for slanted roofs and gable walls; suits Gen 2 and Gen 3
- SpaceTek Wall Mount - attaches to exterior walls near fascia or gable; permanent install
- SpaceTek Ground Pole Mount - elevates the dish up to 5 feet above obstructions like shrubs and trees
- SpaceTek Ridgeline Mount - no-drill, weighted ballast solution ideal for renters; handles roof slopes up to 45 degrees
- SpaceTek Roof Rack Mount - clamps to vehicle roof bars; suits Starlink Mini and Standard
- SpaceTek Mobility Mount - vehicle and vessel mounting; rated for winds up to 280 km/h
- SpaceTek Pipe Adapter - connects to existing metal poles 38-60 mm in diameter; great for repurposing old satellite masts
- SpaceTek Flashing Mount - used with Pivot Mount on metal roofs for a weatherproof seal
- No-drill options - SpaceTek ladder mounts, hitch mounts, tire mounts, and magnetic bases for renters and RVers
Not every mount suits every dish. Compatibility varies across the Starlink Mini, Gen 2, and Gen 3 models, so getting this right from the start saves time and money.
Getting satellite internet connected in Australia isn't always as simple as pointing a dish at the sky. Roof pitches vary. Weather gets brutal. And not everyone can drill into their home or vehicle.
That's why choosing the right mount matters just as much as choosing the right Starlink plan.
Comprehensive Mounting Options for Starlink Across All Models
When selecting mounting options for Starlink, the first thing we must consider is whether the installation is permanent or temporary. A residential install on a farmhouse in the Riverina requires a different level of structural integrity than a weekend setup for a caravan in Exmouth.
Australian conditions are famously harsh. Between the blistering UV rays that can degrade cheap plastics and the high wind loads during storm season, your mounting hardware needs to be "over-engineered" for peace of mind. SpaceTek’s custom Australian-made solutions (compatible with Starlink hardware) provide the extra rust resistance and height needed to clear local obstructions and withstand our unique climate.

Residential Mounting Options for Starlink Gen 2 and Gen 3
For most Australian homes, the roof or the eave is the go-to location. The Gen 2 (Actuated) and Gen 3 (Standard) dishes have different physical connections. While Gen 2 uses a "plug and click" mast, the Gen 3 features a kickstand that often requires a specific adapter to fit traditional poles.
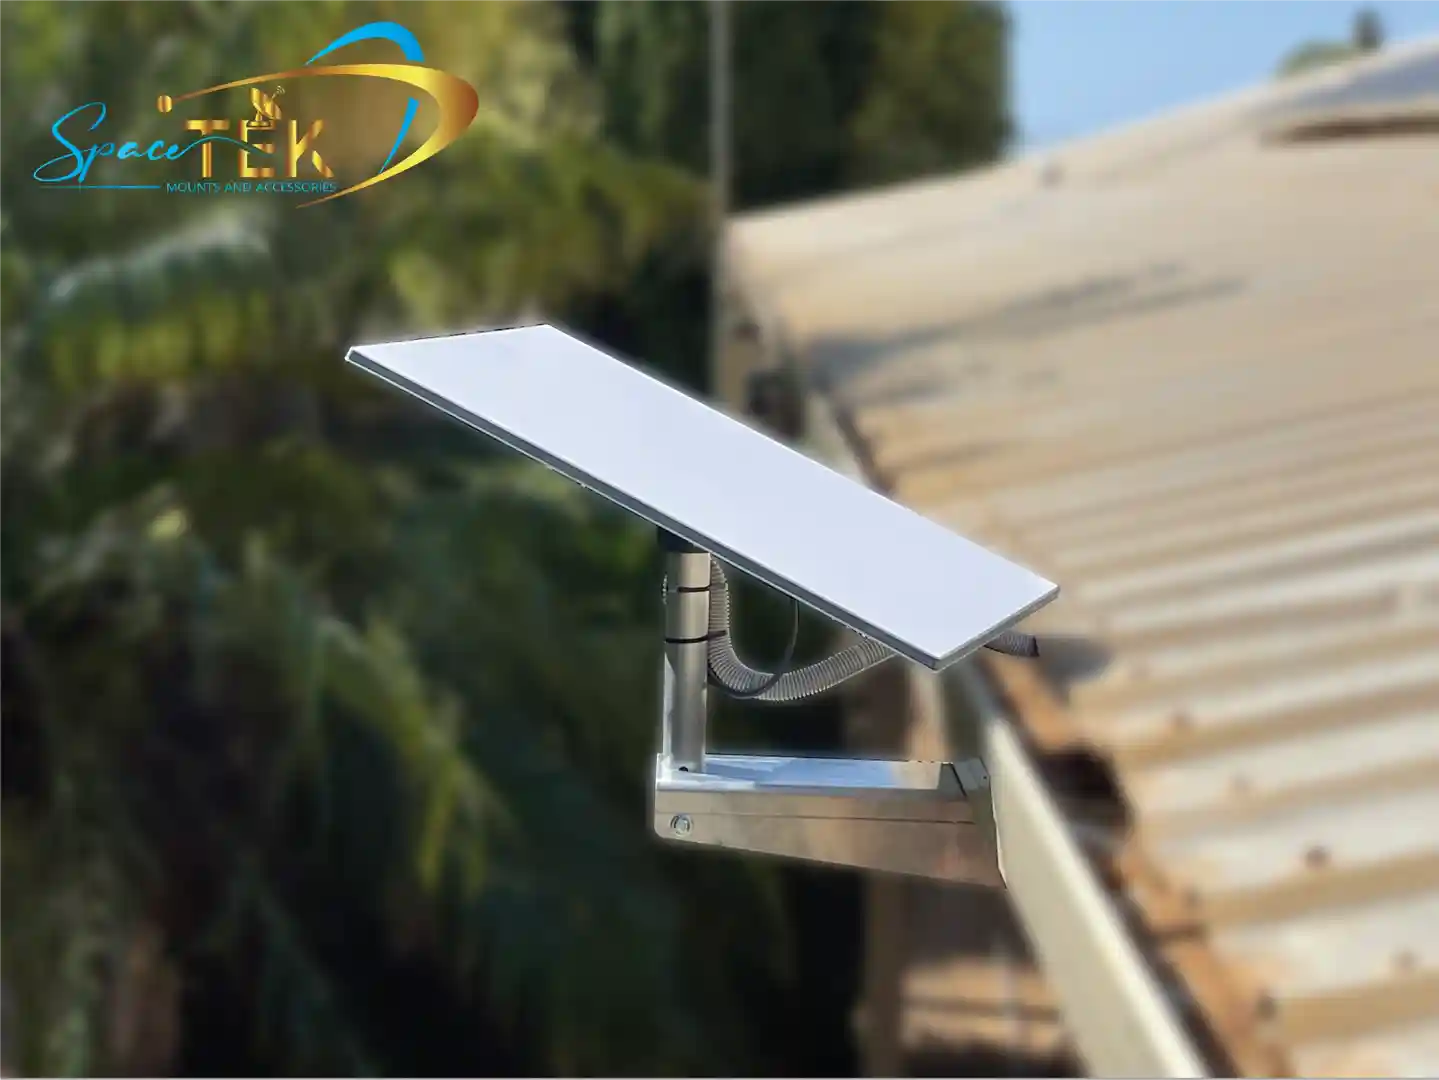
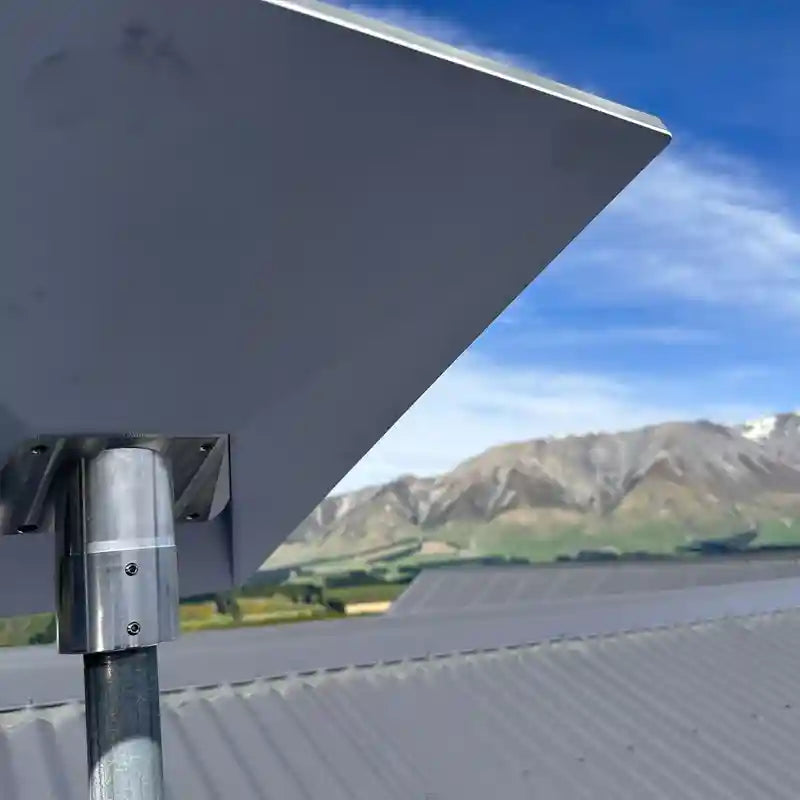
- Pivot Mounts: These are the "bread and butter" of residential installs. They allow the dish to maintain a vertical orientation regardless of the roof pitch. For those with newer equipment, a Starlink Roof Mounts Complete Guide can help navigate the nuances of tile versus tin.
- Wall Mounts: If your roof is inaccessible or too steep, mounting to the fascia or a structural gable beam is a smart move. Our compatible wall mounts for the latest generation are designed to provide enough eave clearance (usually up to 4 inches or 100mm) so the dish can tilt and rotate without hitting the gutters.
- Roof Types: In Australia, we mostly deal with corrugated iron (tin) or concrete tiles. Tin roofs are straightforward but require high-quality silicone sealant and roofing screws. Tile roofs require more care; you’ll often need to slide a bracket under the tiles to bolt directly to the rafters to ensure the install is "storm-proof."
Portable and RV Mounting Options for Starlink Mini
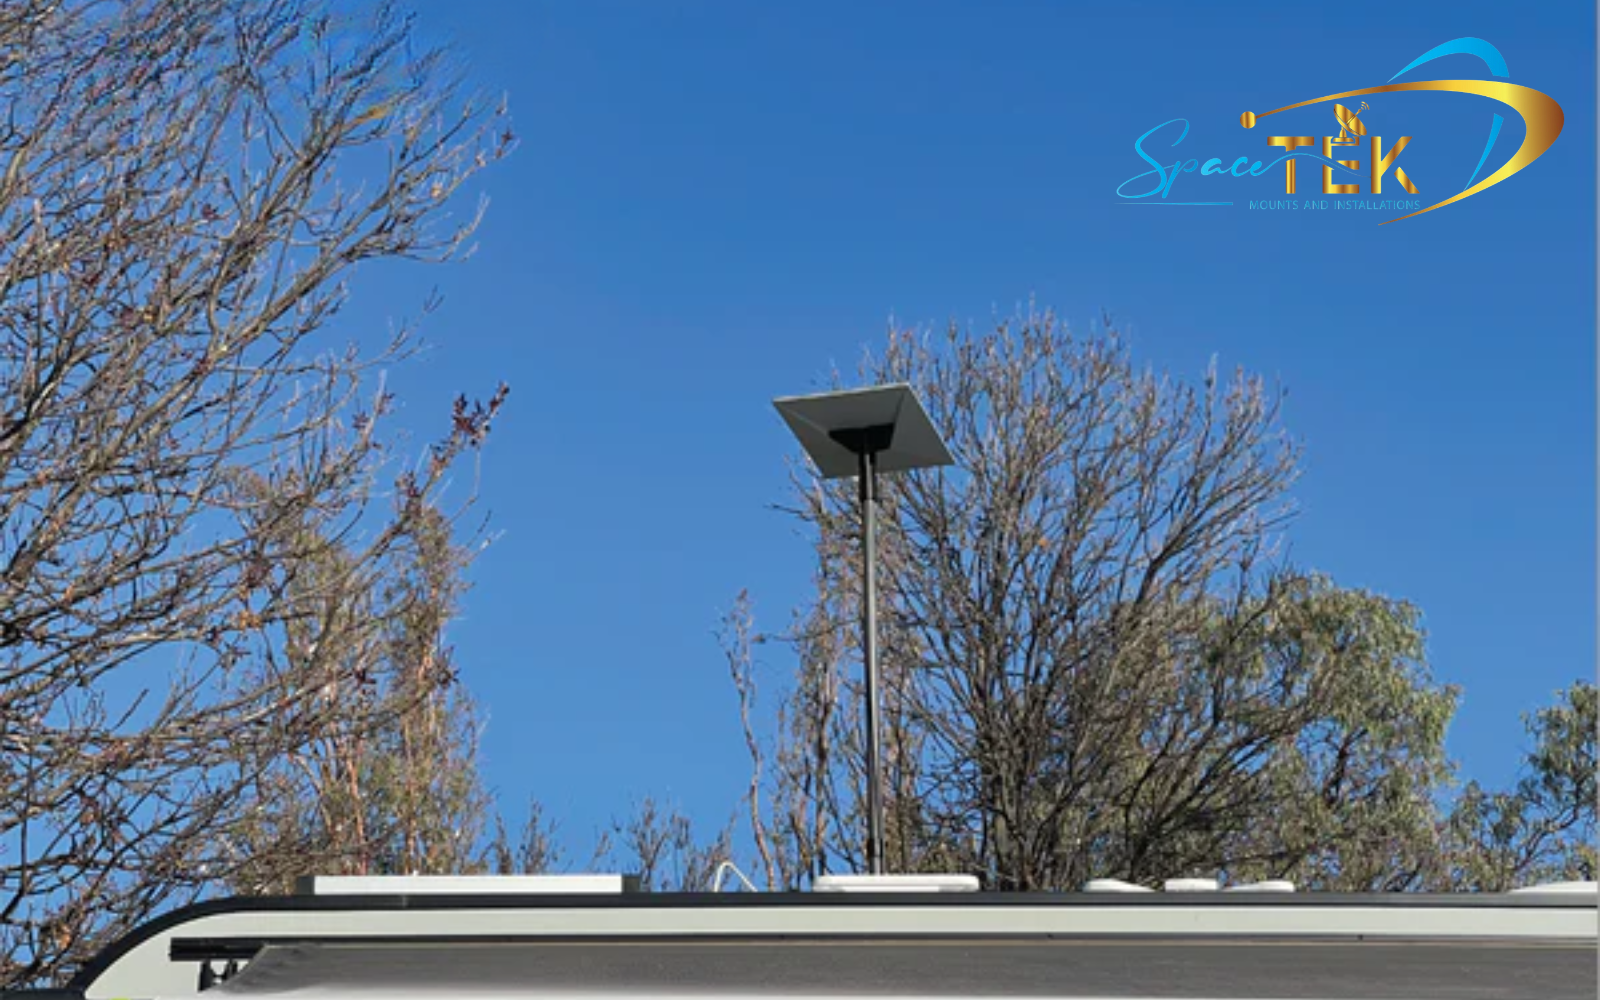
The Starlink Mini has changed the game for regional travel. Because it’s smaller and has a lower power draw, the mounting options for Starlink Mini focus heavily on portability and "on-the-move" use.
- Mobility Mounts: These are designed for permanent or semi-permanent attachment to vehicle roofs. They often set the dish at a 9-degree tilt, which is the "sweet spot" for shedding rain while maintaining a lock on satellites.
- Suction Cups: For a truly temporary setup, a Starlink RV Compatible Suction Cup Mount allows you to stick the dish to a window or a smooth caravan side panel. This is perfect for avoiding obstructions like trees at a campsite without drilling holes.
- Roof Rack Clamps: Many Aussie explorers use roof racks. Specialist clamps can secure the Mini or the Standard Gen 3 dish to flat bars or T-slots. For more details on these rugged setups, check out The Starlink Mini Mount That Survives the Road.
- Poles: If you are parked in a forest, you need height. Carbon fibre telescopic poles are lightweight and can elevate your Mini several metres into the air. You can find more ideas in our Starlink Mini Mounting Options A Complete Guide.
No-Drill Solutions for Renters and Apartments
We hear from renters every day who want high-speed internet but can't go drilling holes in the landlord's roof.
- Ridgeline Mounts: This is a clever "ballast" system. It sits across the ridge of a roof and uses weighted bags to stay in place. No screws, no holes, no bond issues. Learn more in our Starlink Ridgeline Roof Mount Guide.
- Magnetic Bases: For those with a metal patio or a vehicle, high-strength magnetic mounts can hold a dish secure even in high winds. If your surface isn't magnetic (like a fibreglass caravan), you can stick down steel discs to create a mounting point.
- Apartment Balconies: A simple pole clamp attached to a balcony railing is often all you need. Just ensure you have a clear northern or southern view (depending on your specific location in Australia) to avoid "obstruction" drop-outs.
Marine and High-Wind Installation Essentials
If you're mounting Starlink on a boat or in a coastal area like the Gold Coast or Perth, salt air is your enemy.
- 316 Stainless Steel: Standard steel will rust in months near the ocean. We always recommend 316-grade stainless steel hardware for marine environments.
- Wind Resistance: High-performance mounts are often rated for winds up to 280 km/h. This isn't just for cyclones; it’s for the force generated when driving a vehicle at 110 km/h into a 50 km/h headwind. Discover more about durability in Can Starlink Mounts Survive Winds.
- Wedge Mounts: These provide a fixed 8-degree tilt. Unlike flat mounts, the wedge ensures water sheds off the face of the dish immediately, preventing "rain fade" where signal is lost during heavy downpours.
Repurposing Existing Structures and DIY Adapters
You might already have a mount on your roof from an old Foxtel dish or a defunct satellite phone system. Don't tear it down!
- Pipe Adapters: These are the most versatile mounting options for Starlink. A simple metal cuff slides over your existing pole and tightens with bolts. Our Starlink Pole Mount Adapter Guide explains how to match diameters (usually 38mm to 60mm).
- J-Poles: Old antenna masts are often perfect. By using a pipe adapter, you solve the "alignment problem" where the Starlink mast is a different size than standard Aussie hardware. Read how this Starlink Pipe Adapter Solves the Alignment Problem for a quick DIY fix.
Essential Tools for a Secure Installation
Before you climb that ladder, make sure you have your "kit" ready. A secure install requires more than just a screwdriver.
- Drill and Bits: You'll need a 6mm (1/4") bit for pilot holes in wood or a masonry bit for brick.
- 9/16 Inch Hex Socket: This is the standard size for most Starlink lag screws.
- Silicone Sealant: Essential for every hole you drill to prevent leaks.
- Torque Specs: Don't just "crank it." Most mounts require between 7 Nm and 8 Nm of torque to stay secure without snapping the hardware.
- Safety Gear: Gloves, eye protection, and a sturdy ladder are non-negotiable.
For a deeper dive into the nitty-gritty of hardware, check out Starlink Mounting Hardware Everything You Need to Know.
Mounting options with SpaceTek
Choosing the right mounting options for Starlink is about more than just getting online; it’s about protecting your investment. In the Australian climate, "cheap" often ends up being expensive when a mount rusts out or a dish flies off a roof rack.
At SpaceTek Australia, we specialise in high-quality, rust-resistant designs built specifically for our local conditions. Our mounts are fully compatible with Starlink self-install kits, ensuring that your setup is secure, professional, and provides the best possible signal.
If you’re unsure which mount fits your specific roof type or vehicle setup, we’re here to help. Get in touch with us today for expert advice on custom Starlink solutions that won't leave you hanging.
Leave a comment
This site is protected by hCaptcha and the hCaptcha Privacy Policy and Terms of Service apply.