Bringing Space to the Outback: Starlink in Australia
Starlink in Australia is a game-changing satellite internet service that's now available nationwide, providing high-speed connectivity to remote, rural and metropolitan areas with speeds typically ranging from 50-200 Mbps.
| Starlink Australia Quick Facts | Details |
|---|---|
| Monthly Cost | $139 for standard residential plan |
| Hardware Cost | $599 + $30 shipping |
| Typical Speeds | 50-200 Mbps download, 10-20 Mbps upload |
| Latency | 25-50ms (significantly lower than traditional satellite) |
| Coverage | Available Australia-wide |
| Installation | Self-install (DIY) or professional options |
| Data Caps | Unlimited with no hard caps |
For many Australians living beyond the reach of reliable fixed-line NBN, Starlink has transformed internet access from a frustrating experience to a seamless one. Unlike traditional satellite services that use geostationary satellites positioned 35,000km above Earth, Starlink uses a constellation of low-Earth orbit (LEO) satellites just 550km above us. This dramatically reduces latency and increases speeds, allowing for video calls, streaming, and even online gaming from the most remote locations.
Setting up Starlink in Australia is straightforward, even for the non-technically inclined. The system is designed for DIY installation, requiring just a clear view of the sky and a power source. However, getting the most from your system requires understanding a few key Australian considerations - from extreme heat tolerance to positioning for our southern hemisphere location.
Whether you're a remote property owner tired of unreliable connectivity, a grey nomad wanting internet on the road, or simply someone in a regional area underserved by existing options, this guide will walk you through everything you need to know to get Starlink up and running in Australia.
Important Starlink in Australia terms:
1. Check Availability, Place Your Order & Prep Your Site
The journey to better internet across Starlink in Australia begins with confirming availability at your location. Thanks to an impressive network of 20 ground stations strategically positioned throughout New South Wales, Queensland, South Australia, Victoria, and Western Australia, most Australians now have access to this service.
Many outback users report life-changing improvements after switching. For instance, beekeepers in remote areas now maintain constant communication from isolated locations, and sheep station owners who struggled with Sky Muster for years find they can be up and running within minutes, connecting from places that previously had no reception at all.
Use the Starlink App to Scan for Obstructions
Your first practical step is downloading the Starlink app (available on both iOS and Android). This isn't just a control panel—it's your essential companion for finding the perfect dish location.
The app's brilliant obstruction scanner uses your phone's camera to analyse your surroundings, creating a visual map of potential signal blockers. Simply open the app, tap "Check for obstructions," and follow the on-screen guidance as you pan your phone across the sky. Within moments, you'll see a clear visualisation showing any trees, buildings or other objects that might interfere with your signal.
The app generates an "obstruction grade"—aim for as close to 0% as possible. Even small obstructions can create brief outages that you might not notice while browsing, but could disrupt your Zoom calls or online gaming sessions. Finding that perfect spot with clear sky visibility will save you countless headaches down the track.
When installation day arrives, the app also provides a handy QR code scanner to make setup quick and painless—no technical expertise required!
Confirm "Starlink in Australia" Service Zones (2024-2025)
Good news for Aussies everywhere—as of 2024, Starlink in Australia has achieved nationwide coverage. This marks significant progress from the early rollout days when service was limited to areas below the 32° latitude line.
Checking availability at your specific address is straightforward:
- Visit the Starlink website
- Enter your exact service address (not just your suburb)
- The site will instantly confirm availability and estimated shipping times
Delivery times typically range from 2-3 business days for city dwellers to 7-10 days for regional areas. If you're truly off the beaten track, it might take a bit longer, but rest assured—your kit is coming.
It's worth noting that Starlink operates under licence from the Australian Communications and Media Authority (ACMA). Initially, regulations restricted the service to low-density and remote areas, but these limitations have eased considerably as the network has expanded.
Before ordering, take a moment to visit Starlink Support if you have specific questions about your location or installation requirements. The comprehensive postcode search tool can provide detailed information about service availability in your area, and the support team is well-versed in Australian-specific queries.
With availability confirmed and your obstruction-free installation spot identified, you're ready to place your order and prepare for a whole new internet experience—one where "the bush" no longer means sacrificing connectivity.
2. Unboxing Your Kit & Understanding the Hardware

There's something genuinely exciting about that moment when your Starlink kit arrives at your doorstep. For many Australians living in remote areas, this box represents a dramatic shift from frustrating, laggy internet to a world of reliable connectivity.
The latest Generation 3 hardware is sleeker and more efficient than its predecessors, making setup even more straightforward for first-time users. When you open that box, you're just hours away from streaming, video calls, and browsing at speeds previously unimaginable in rural Australia.
What's Inside the Box?
Your Starlink in Australia kit comes with everything you need to get connected right away. Pop open the box and you'll find:
The rectangular Starlink dish itself (affectionately nicknamed "Dishy McFlatface" by the Starlink community). This impressive piece of technology contains a phased-array antenna that automatically tracks satellites as they move overhead.
A Wi-Fi router with a simple LED indicator that shows your connection status. The router creates your home network and distributes your satellite connection throughout your home.
A 22.9 metre cable connecting the dish to your router – this generous length gives you flexibility with your installation location.
A tripod mount for temporary ground-based setups. This is perfect for testing your connection before committing to a permanent installation.
And of course, a quick-start guide to walk you through the basics of setting everything up.
The standard cable length is sufficient for most installations, but it's worth planning your setup carefully. The dish needs a clear view of the sky, while your router works best when centrally located in your home.
Power consumption is another consideration, especially for off-grid Australians. During normal operation, the system typically draws between 50-75 watts, though this can increase to around 100-110 watts during periods of heavy use or when the dish activates its heating elements (rarely needed in most parts of Australia, but essential in alpine regions).
Compatible Accessories for "Starlink in Australia" Users
While the standard kit includes everything you need to get online, there are several accessories that can significantly improve your Starlink in Australia experience:
The Ethernet adapter is perhaps the most popular add-on. The standard router doesn't include an Ethernet port, so if you need wired connections for gaming, work, or to connect other network devices, this adapter is essential.
For larger homes, Starlink mesh nodes can extend your Wi-Fi coverage to every corner of your property, eliminating dead zones and ensuring consistent connectivity throughout.
Given Australia's occasionally unpredictable electrical grid, a quality surge protector is highly recommended to protect your investment from power fluctuations.
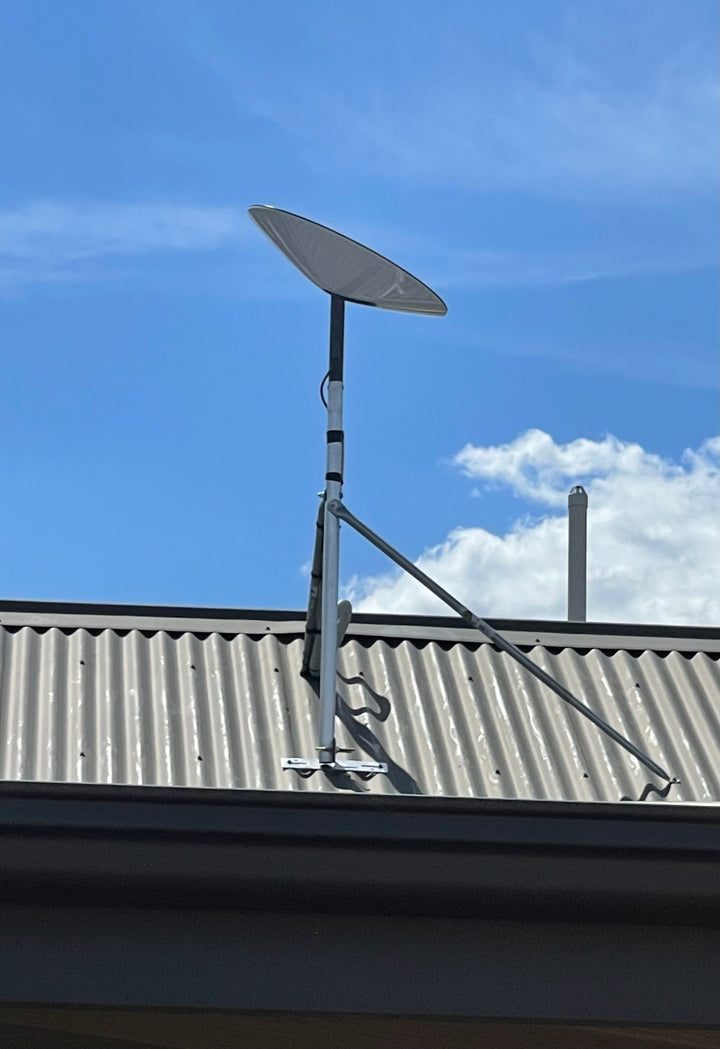
At SpaceTek Australia, we've designed our range of mounting solutions specifically for Australian conditions. Our mounts are compatible with all Starlink generations and built to withstand everything from scorching Outback heat to tropical cyclones in northern regions.
Our mounting options include roof mounts for permanent installations, pole adapters for attaching to existing structures, wall mounts for vertical surfaces, and ground mounts for temporary or permanent installation where roof access isn't practical.
What sets our mounts apart is their construction from marine-grade materials that won't corrode even in coastal areas where salt air quickly degrades standard hardware. We've seen too many Starlink installations compromised by rusty, failing mounts, which is why we focus on long-term durability for Australian conditions.
For a complete breakdown of compatible accessories and which ones might be right for your unique setup, our Starlink Generations and Accessories guide provides detailed information on everything from router accessories to mounting solutions.
The right accessories not only improve performance but can also extend the lifespan of your Starlink in Australia system by protecting it from our harsh environmental conditions – something many first-time users don't consider until they've experienced their first summer heatwave or tropical downpour.
3. Roof-Top, Ground or Mobile: Installing the Dish
When it comes to installing your Starlink in Australia dish, finding the perfect spot is essential for getting those lightning-fast speeds we all crave. Whether you're mounting it on your roof, setting it up on the ground, or preparing for a mobile setup, proper installation makes all the difference between frustrating dropouts and reliable connectivity.
"The dish doesn't just need a good view of the sky," explains Tom from Broken Hill, "it needs the right mounting solution to keep it secure through everything Australia throws at it – from scorching summers to those unexpected thunderstorms."
Step-by-Step Mounting Guide
Getting your Starlink in Australia dish up and running doesn't have to be complicated. For those wanting a quick temporary setup while you plan your permanent installation, the process is remarkably straightforward.
First, consider site safety – this is non-negotiable. If you're uncomfortable working at heights or unsure about roof structures, it's worth hiring a professional. Australian building codes may require certified installation for permanent roof mounts, especially in bushfire-prone areas or regions with specific wind ratings.
For a temporary ground setup, simply assemble the included tripod mount on a stable, flat surface with clear sky visibility. Connect your cables, power everything up, and wait about 5-15 minutes while the dish orients itself. This is perfect for testing your connection before committing to a permanent location.
When you're ready for a permanent roof mount, start by using the Starlink app to identify the optimal position with minimal obstructions. Install your SpaceTek Australia roof mount according to the included instructions – our mounts are specifically designed for Australian conditions, from cyclone-prone northern regions to salt-spray coastal areas.
Once the mount is secure, attach your dish and carefully route the cable to your home. Create a proper drip loop before the cable enters your house to prevent water ingress during heavy rains. Properly seal any penetrations to maintain your roof's waterproofing – this step is crucial for preventing those nasty leaks during our notorious summer storms.
Fine-Tuning for Remote Communities & Off-Grid Sites
For remote properties and off-grid installations, Starlink in Australia requires some additional considerations to ensure reliable performance in challenging environments.
Power management becomes critical when you're running on limited resources. Your Starlink system typically draws 50-75W continuously, so if you're on solar power, ensure your system can handle this load, especially during cloudy periods. A quality UPS (Uninterruptible Power Supply) is worth its weight in gold for maintaining your connection during brief power fluctuations, while a voltage regulator can protect your equipment if you're running on generator power.
The harsh Australian environment demands proper weather protection. If you're in cyclone territory, invest in mounts rated for extreme wind conditions. Those in areas regularly hitting 40-50°C should ensure the router has adequate ventilation while keeping the dish unobstructed. For coastal installations, marine-grade mounts like those from SpaceTek Australia are essential to prevent the rapid corrosion that salt air causes.
Don't underestimate our wildlife either! Cockatoos find cables particularly tasty, so protective conduit is a must in many areas. Secure all cables properly to prevent damage from curious kangaroos, wallabies, or other wildlife that might decide your installation looks interesting.
Lightning protection is another crucial consideration, especially in storm-prone regions. Install a proper grounding rod and consider a lightning arrestor for the cable. Maintain appropriate separation between your Starlink cables and other services to prevent cross-interference during electrical storms.
With these considerations addressed, even the most remote communities can enjoy reliable Starlink in Australia service, changing connectivity in places that have struggled with poor internet for decades. The difference isn't just about faster downloads – it's about enabling telehealth consultations, remote education, business opportunities, and staying connected with loved ones, no matter how far from the city you might be.
4. Optimising Performance in 2025 and Beyond
As we move deeper into 2025, Starlink in Australia continues to evolve at an impressive pace. The constellation is constantly expanding with more satellites being launched and additional ground stations coming online across the country. This means your Starlink system's performance can actually improve over time - something almost unheard of with traditional internet connections!
The key to maximising your Starlink experience lies in understanding how to optimise your setup for Australian conditions. From the scorching summer heat of the outback to the cyclonic winds up north, our unique environment presents challenges that require thoughtful solutions.
"My Starlink dish survived the recent storms that knocked out power to half the town," shares Emma from Broome. "While everyone else was scrambling for connection, we were streaming movies without a hitch. It's all about how you set it up."
Upgrade Path: Better Mounts, Cables & Covers
While the standard kit that comes with your Starlink in Australia package works perfectly fine for basic setups, investing in quality accessories can dramatically improve both performance and longevity - especially in our harsh climate.
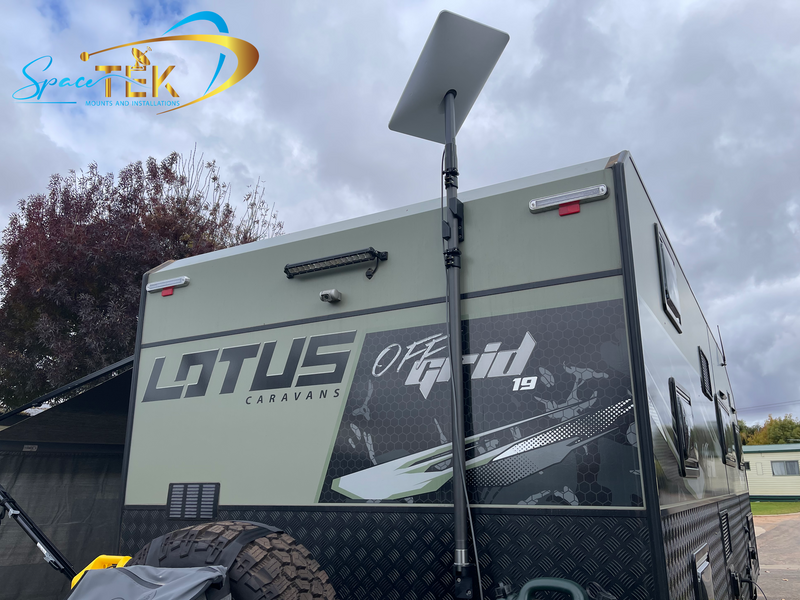
The standard tripod mount is adequate for temporary installations, but for permanent setups, SpaceTek Australia's premium mounting solutions offer significant advantages. Our adjustable roof mounts allow you to fine-tune the dish angle for optimal signal reception, while our liftd pole mounts help raise the dish above potential obstructions like growing trees or nearby structures.
For Australians living in cyclone-prone regions, our vibration-dampening mounts are particularly valuable, keeping your dish stable even during high winds. These mounts are engineered specifically for Australian conditions, using marine-grade materials that resist corrosion from coastal salt spray – a common issue that can quickly degrade standard hardware.
Cable management is another area where a little investment goes a long way. The Australian sun can be brutal on exposed cables, with UV damage causing premature deterioration. Our UV-resistant conduit protects your cables from sun damage, while proper strain relief at connection points prevents wear and tear from movement. For homes in bushfire-prone areas, metal conduit offers additional protection against extreme heat.
Protective covers and shields complete the trifecta of essential upgrades. Our heat shields reflect extreme summer heat away from sensitive components, preventing overheating during those blistering 40°C+ days. For those in alpine regions like the Snowy Mountains, snow shields prevent accumulation that could block signal reception. And if you've ever had to deal with curious cockatoos or other birds damaging equipment, our bird deterrents can save you significant headache and repair costs.
For more information on essential accessories suited to Australian conditions, visit our comprehensive guide: Starlink Essentials: Must-Have Accessories in Australia.
Troubleshooting Slow Speeds on "Starlink in Australia"
Even the best Starlink in Australia setup can experience occasional performance issues. Understanding the common causes can help you quickly identify and resolve problems when they arise.
Physical obstructions remain the number one culprit behind slow speeds. Trees that didn't initially block your signal can grow into the path over time, creating intermittent disruptions. This is particularly common with fast-growing eucalypts and other native species. New construction in your area might also create obstructions that weren't present during your initial setup.
Seasonal changes can have surprising effects too. Deciduous trees might cause minimal obstruction in winter but create significant signal blockage once they leaf out in summer. The Starlink app's obstruction viewer is invaluable for identifying these issues – run it seasonally to catch potential problems before they impact your service.
Network factors also play a role in performance. Like all internet services, Starlink in Australia can experience some slowdown during peak evening hours (typically 7-11pm) when more users are online. Heavy rain or dust storms can temporarily reduce signal quality, though the impact is usually minimal compared to traditional satellite services.
As more users join the network in your area, you might notice some fluctuation in speeds due to increased network congestion. Starlink continues to address this by launching more satellites and optimising their network, but it's something to be aware of if you notice changes over time.
Equipment optimisation can make a big difference in your day-to-day experience. Keep your router centrally located and away from interference sources like microwaves or cordless phones. Ensure both your dish and router have the latest firmware installed – updates often include performance improvements and bug fixes. For larger homes, consider Starlink's mesh nodes to extend coverage to every corner.
If you're experiencing persistent issues, try these diagnostic steps:
- Check the Starlink app for outages or known issues in your area
- Run speed tests at different times of day to identify patterns
- Temporarily relocate your router to test if placement is affecting Wi-Fi distribution
- Use the app's obstruction viewer to check for newly developed obstructions
- Try a simple reboot of both the dish and router if performance suddenly drops
Most Starlink in Australia users report consistent speeds between 50-200 Mbps even during peak times, with latency typically between 25-50ms. This is remarkably better than traditional satellite internet and comparable to many fixed-line services in regional areas.
By understanding these common issues and implementing the right solutions, you can ensure your Starlink connection remains fast and reliable throughout 2025 and beyond, regardless of where in Australia you call home.
5. Connectivity Alternatives & Why Starlink Shines in the Bush
When you're living in the Australian outback or a remote community, internet options have traditionally been limited and frustrating. Starlink in Australia has changed this reality for many rural Australians, but it's worth understanding how it compares to alternatives to appreciate why it's making such a difference.
For many rural Australians, the internet decision comes down to what's actually available at their location. In many cases, the options are severely limited – perhaps Sky Muster satellite and maybe patchy mobile coverage. However, for those lucky enough to have multiple choices, here's how they stack up:
Starlink vs Sky Muster: The difference is night and day. While both are satellite services, Starlink in Australia offers dramatically lower latency (25-50ms compared to Sky Muster's 600-800ms), which transforms the user experience. Video calls, online gaming, and real-time applications that were impossible on Sky Muster work smoothly on Starlink. Plus, Starlink's unlimited data means no more anxiously watching your usage meter.
Starlink vs Fixed Wireless NBN: For those within the Fixed Wireless footprint, NBN can provide good service at a lower price point. However, Starlink in Australia typically offers faster upload speeds and more consistent performance, especially during peak hours. The biggest advantage of Starlink is its universal coverage – it works anywhere with a clear view of the sky.
Starlink vs 5G Home Internet: 5G can deliver impressive speeds when available, but the key word is "when." Rural 5G coverage remains extremely limited in Australia, with most towers concentrated in population centers. Starlink in Australia provides reliable high-speed internet regardless of your distance from the nearest town.
The change Starlink in Australia has brought to remote communities cannot be overstated. Schools in isolated areas can now conduct virtual excursions and access online learning resources without constant buffering. Healthcare improves as telehealth becomes viable, allowing remote consultations without connection drops. Farmers can implement precision agriculture technologies that require reliable connectivity. And perhaps most importantly for quality of life, families can enjoy the same streaming entertainment services as their city counterparts.
For many rural Australians, the decision to switch to Starlink isn't about comparing specifications – it's about finally having internet that just works. The combination of universal coverage, high speeds, low latency, and unlimited data makes Starlink in Australia the clear choice for those living beyond the reach of traditional broadband infrastructure.
While the $139 monthly cost is higher than some alternatives, most rural users find the premium well worth it for the dramatic improvement in reliability and performance. As one cattle station owner put it: "After years of making do with patchy internet, Starlink has brought us into the 21st century. The kids can do their distance education without frustration, and I can run our business properly. It's not just better internet – it's a completely different experience."
Frequently Asked Questions about Setting Up Starlink
When you're preparing to join the Starlink in Australia community, you'll likely have some questions about what to expect. Let's walk through the most common queries that first-time users have before getting their dishes up and running.
How long does delivery take across Australia?
The excitement of ordering your Starlink in Australia kit is often followed by the anticipation of waiting for it to arrive. Delivery timeframes vary depending on where you call home:
If you're in a metropolitan area, you'll typically see your Starlink kit arrive within 2-3 business days – perfect for those eager to get connected quickly. Regional areas usually experience slightly longer wait times of about 7-10 business days, while those in remote outback locations might need to be a bit more patient, with deliveries sometimes taking up to 2 weeks.
Once your order ships, you can easily track its journey through the Starlink account portal. You'll receive tracking information via email, allowing you to watch as your gateway to reliable internet makes its way to your doorstep.
Do I need a professional installer or can I DIY?
One of the beauties of Starlink in Australia is that it's designed with self-installation in mind. The basic ground mount setup is remarkably straightforward – many users report having their system up and running in less than 30 minutes, even with minimal technical experience.
That said, there are certain situations where calling in a professional makes good sense. Consider professional installation if:
You're planning a roof mount that requires creating penetrations in your roof (which could affect waterproofing) You live in a cyclone-prone area where reinforced mounting is essential for safety You're not comfortable working at heights or with electrical equipment You want a permanent, weatherproof installation that will stand the test of time
SpaceTek Australia's mounting solutions come with comprehensive DIY instructions, but for roof installations, we do recommend professional help to ensure everything complies with Australian building codes. This gives you peace of mind that your system is installed safely and correctly.
Are there any data caps or peak-hour slow-downs?
Unlike traditional satellite internet services that often come with frustrating data limits, Starlink in Australia offers truly unlimited data with no hard caps. This means you can stream, video conference, and download to your heart's content without watching a data meter.
That said, like any internet service, Starlink can experience some fluctuations during peak usage hours (typically 7-11pm) when more users are online simultaneously. The good news is that these variations are usually minimal compared to other rural internet options.
According to Ookla speed tests, Australian Starlink users enjoyed median download speeds of 106.43Mbps and upload speeds of 11.44Mbps in Q4 2022, with average latency around 66ms. Most users report that these impressive speeds remain relatively stable even during busy evening hours, though some minor fluctuations are normal.
While Starlink does maintain a "Fair Use" policy, this is primarily designed to prevent commercial-scale operations from running on residential plans – not to limit normal household internet usage. For typical families, even those with multiple streaming services and gamers, the unlimited data truly means unlimited.
Reliable Internet Starts with the Right Accessories
After setting up your Starlink in Australia system, you might wonder how to protect your investment and optimize performance for years to come. This is where quality accessories make all the difference.
SpaceTek Australia specializes in high-quality mounts and accessories designed specifically for Australian conditions. Our products are built with rural durability in mind, crafted from marine-grade materials that resist corrosion even in coastal areas where salt air quickly deteriorates lesser materials.
Our mounting solutions are engineered to withstand everything Australia throws at them – from scorching summer heat to cyclonic winds in northern regions. Unlike generic mounts, ours are designed specifically for Starlink systems, ensuring perfect compatibility and optimal performance.
For those in remote communities who rely on their Starlink connection for essential services like telehealth appointments or distance education, having reliable accessories isn't just about convenience – it's about maintaining a critical lifeline.
Ready to upgrade your Starlink experience with accessories that are built to last? Visit us for More info about our accessories and find how the right equipment can improve your connection's reliability for years to come.
Reliable Internet Starts with the Right Accessories
At SpaceTek Australia, we've seen how proper mounting and accessories can transform a good Starlink experience into a great one. Our team has designed mounting solutions specifically for Australian conditions – because let's face it, from tropical cyclones up north to scorching desert heat in the centre to salty coastal air, our country throws some serious challenges at outdoor equipment!
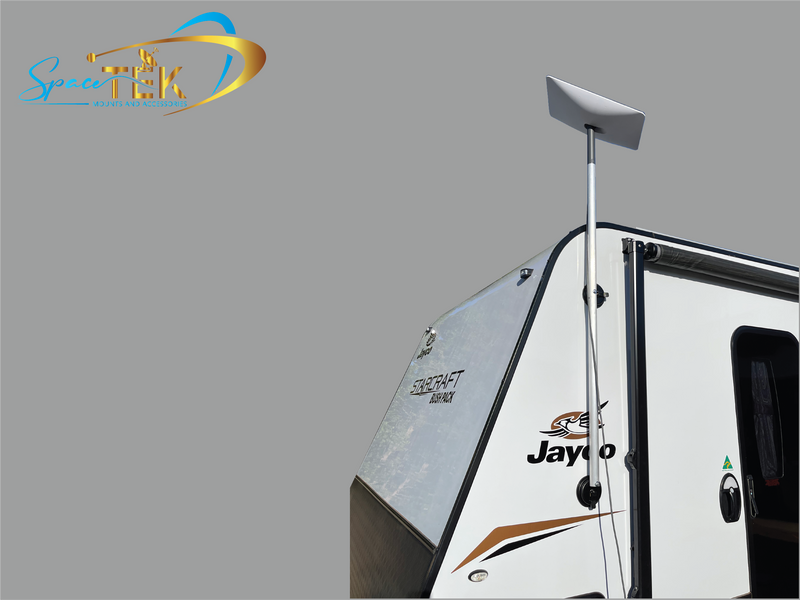
Our Australian-designed mounts aren't just accessories – they're insurance for your Starlink investment. They're built for extremes, crafted from corrosion-resistant marine-grade materials that stand up to coastal salt spray that would eat through standard mounts in months. We've made sure they're UV-stabilised too, because nothing ages outdoor equipment faster than our harsh Australian sun.
We've even thought about our unique wildlife challenges – our mounts are designed to be wildlife-proof, deterring curious cockatoos and other birds that seem magnetically attracted to new installations. And because we know not everyone is a professional installer, we've made them easy to install with clear instructions and all the necessary hardware included in the box.
Whether you're setting up your Starlink dish in the Kimberley during wet season, battling dust storms in the Simpson Desert, or dealing with snow in the Victorian Alps, our mounting solutions ensure your dish stays perfectly positioned for optimal signal strength year-round. The difference between a wobbly, rusting mount and a rock-solid SpaceTek mount can mean the difference between frustrating dropouts and reliable connectivity when you need it most.
For those in remote communities and properties, reliable internet isn't just nice to have—it's essential for education, telehealth appointments, running businesses, and staying connected with family. By pairing Starlink in Australia's service with SpaceTek Australia's purpose-built mounting solutions, you're ensuring the most reliable connection possible, no matter how far from the nearest town you might be.
Ready to upgrade your Starlink setup with accessories that are built to last? Our full range of Starlink-compatible mounts, cable management solutions, and accessories can be found on our website.
With the right setup, Starlink in Australia delivers internet speeds that rival urban connections to even the most remote locations. It's bridging Australia's digital divide – and with SpaceTek's quality accessories, you can be confident your connection will stay strong through whatever our beautiful but challenging country throws at it.
Leave a comment
This site is protected by hCaptcha and the hCaptcha Privacy Policy and Terms of Service apply.