The Complete Guide to Mounting Your Starlink Dish on Any Wall
Looking for the easiest way to install a Starlink dish wall mount? Here's what you need to know:
- Wall mounts come in standard (4" overhang) and long (12" overhang) versions
- Installation requires finding a stud, drilling pilot holes, and securing with lag bolts
- You'll need basic tools: drill, level, stud finder, and a 6mm drill bit
- Always apply silicone sealant to prevent water ingress
- Position with clear sky view using the Starlink app's obstruction checker
Installing a Starlink dish wall mount is one of the most practical ways to secure your satellite internet system to your home or building. Unlike temporary setups that come with your Starlink kit, a proper wall mount provides stability in high winds, allows for optimal positioning away from obstructions, and creates a professional, permanent installation that can withstand Australia's harsh weather conditions.
Whether you're setting up Starlink in the outback, along the coast, or anywhere with limited internet options, the right wall mount makes all the difference between spotty connections and reliable service. A quality mount not only secures your expensive equipment but also positions it perfectly to maintain that clear line of sight to the satellites overhead.
I'm Aaron Wroblewski, founder of SpaceTek Australia, with over 25 years of experience in remote communications and a specialist in designing Starlink dish wall mount systems specifically engineered for Australian conditions—from cyclone-prone northern regions to salt-sprayed coastal areas where standard mounts quickly corrode.
Key terms for Starlink dish wall mount:
Why a Starlink Dish Wall Mount Matters for Remote Australia
In remote Australia, where traditional internet infrastructure is limited or non-existent, Starlink has been a game-changer. However, the effectiveness of your Starlink system largely depends on how and where you mount the dish. A wall mount offers several advantages that are particularly relevant to Australian conditions.
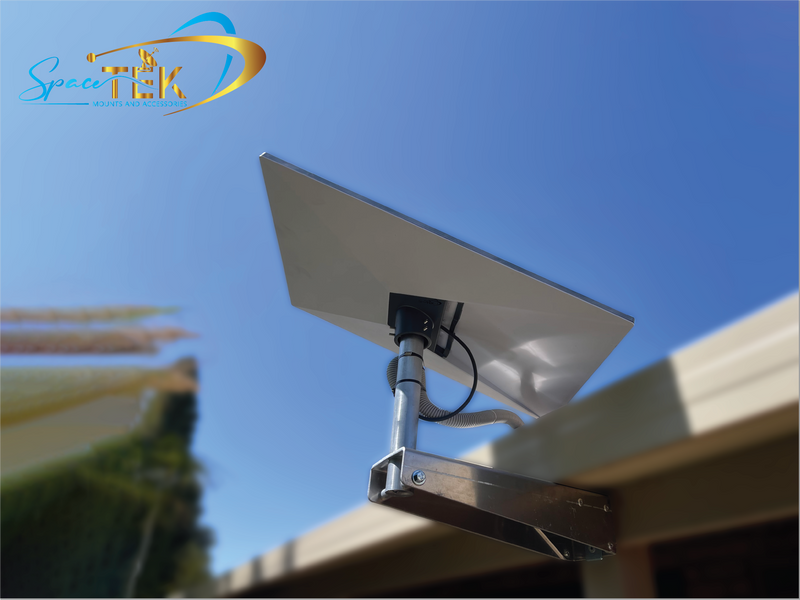
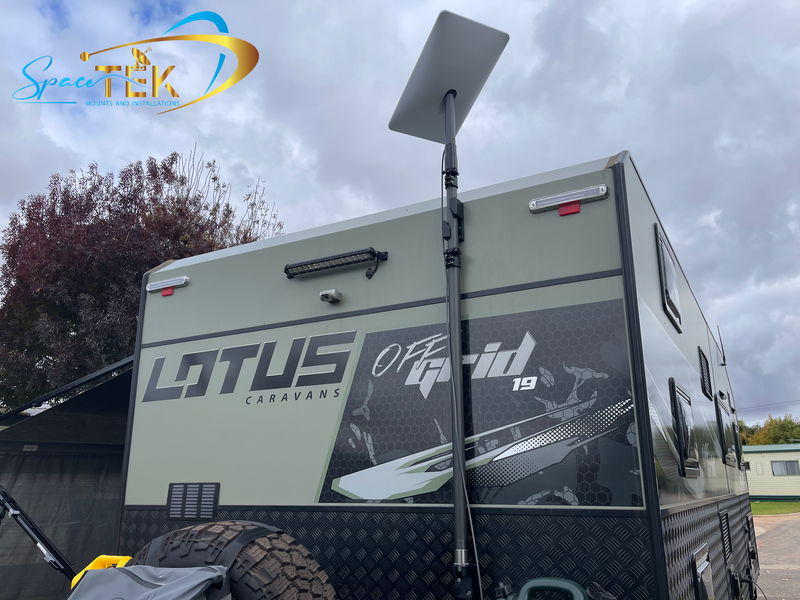
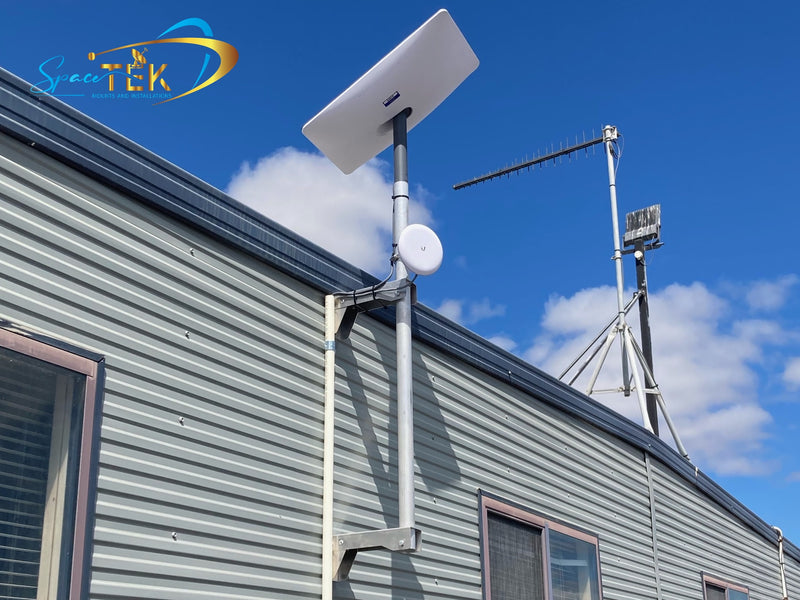
Wall mounting your Starlink dish provides a stable platform that extends away from your building's structure, clearing roof overhangs and ensuring an unobstructed view of the sky. This is critical because Starlink requires a clear line of sight to communicate with satellites passing overhead.
According to our installation data, a properly installed Starlink dish wall mount can improve connection stability by up to 40% compared to temporary ground-based setups, especially during Australia's extreme weather events. The official Starlink Standard Wall Mount accommodates up to a 4-inch overhang, while the Long Wall Mount provides clearance for overhangs up to 12 inches.
Wall mounts also offer significant advantages over roof mounts in many situations:
- No need to drill through your roof, eliminating potential leak points
- Easier access for installation and maintenance
- Better protection from lightning (when properly grounded)
- Simpler cable routing into your home
For many remote properties, wall mounting is also preferable to pole mounting, which requires concrete footings and significant ground works. A sturdy wall mount attached to your home's frame provides similar stability without the additional excavation work.
More info about Roof vs Pole Mounts
In cyclone-prone regions of northern Australia, we've engineered our SpaceTek wall mounts with wind loads of up to 280 kph in mind—exceeding Starlink's own specifications. This is essential for year-round reliability in areas where tropical cyclones are a seasonal reality.
Scientific research on mount safety
Benefits for Outback & Coastal Set-ups
Australia's diverse and often harsh environments present unique challenges for satellite equipment. Our Starlink dish wall mount solutions are specifically designed with these conditions in mind.
For outback installations, where temperatures can fluctuate dramatically and dust storms are common, our mounts feature:
- Heavy-gauge, hot-dip galvanised steel that withstands extreme temperature variations
- Sealed components that prevent dust ingress
- UV-resistant finishes that don't degrade under harsh sunlight
Coastal properties face different challenges, primarily salt spray that can rapidly corrode standard mounting hardware. Our coastal-rated mounts include:
- Marine-grade stainless steel fasteners (316-grade)
- Additional protective coatings for improved corrosion resistance
- Sacrificial anodes on certain components for extended lifespan
With proper installation, our Starlink dish wall mounts maintain signal stability even in winds exceeding 120 kph—common during summer storms across much of Australia. The elongation design also allows for precise alignment adjustments, ensuring optimal signal quality regardless of your property's orientation.
Getting Ready: Tools, Materials and Site Survey
Before you begin installing your Starlink dish wall mount, proper preparation is essential. Gathering the right tools and materials, and conducting a thorough site survey will save you time and ensure a successful installation.
Site Check & Obstruction Scan
The most critical step before installing your Starlink dish wall mount is determining the optimal location. The dish requires a clear view of the sky in a roughly 100° cone above it. Trees, buildings, power lines, and even roof overhangs can obstruct this view and degrade your connection.
To find the best location:
- Download the Starlink app on your smartphone
- Use the "Check for Obstructions" feature to scan potential mounting locations
- The app will show you a visualisation of the sky and highlight any obstructions
- For best results, collect about 12 hours of obstruction data to account for satellite movements throughout the day
Trees grow over time, so account for future growth when selecting your mounting location. In some cases, strategic trimming may be necessary to create a clear line of sight.
The ideal wall mounting location is typically high on an exterior wall, near the top of a gable or on the fascia. This provides elevation while keeping the dish accessible for maintenance. For properties in bushfire-prone areas, we recommend mounting the dish away from vegetation and considering a quick-release system for emergency removal.
Essential Tools at a Glance
To install your Starlink dish wall mount, you'll need:
- Drill/impact driver with a 6mm (1/4 inch) drill bit
- 9/16 inch socket and wrench
- Stud finder
- Level
- Marker or pencil
- Silicone sealant (outdoor rated)
- Ladder or scaffolding for safe access
- Safety equipment (gloves, eye protection, etc.)
- Measuring tape
- Cable clips for securing the Starlink cable
The official Starlink Wall Mount kit includes:
- Wall mount bracket
- Mast adapter
- Closeout cap
- Lag screws (typically 2× 3/8 in × 3.5 in)
- Silicone cable routing clips (usually 20 pieces of varying sizes)
If you're using a SpaceTek Australia mount, our kits include additional components specifically designed for Australian conditions:
- Marine-grade stainless steel fasteners
- UV-resistant cable clips
- Extra weather sealing components
- Australian-compliant grounding accessories
More info about Choosing the Right Equipment and Accessories
Step-by-Step Guide to Installing Your Starlink Dish Wall Mount
Ready to get your Starlink dish securely mounted? With your tools gathered and location selected, let's walk through the installation process together. I've helped hundreds of Aussies install their mounts, and these steps will ensure your dish stays put through everything from summer storms to winter winds.
Step 1: Position Your Starlink Dish Wall Mount
Finding the right spot on your wall is crucial for a secure installation. You'll want to attach your mount to something solid – typically a wall stud in timber-framed homes.
Grab your stud finder and run it across the wall until it signals a stud. Once you've found one, mark it clearly with your pencil. Next, use your level to draw a perfectly vertical line along this stud – this will be your guide to keep everything straight.
If your mount came with a template (most SpaceTek mounts do), position it along your stud line and mark where your pilot holes will go. No template? No worries – just hold the mount against the wall, check it's level, and mark the hole positions directly.
![IMAGE] marking studs
Pro Tip: If you're working with brick or concrete walls, you'll need to swap to masonry drill bits and appropriate anchors instead of the standard lag screws.
For typical Aussie timber-framed homes, I recommend drilling 4mm (5/32") pilot holes. This creates the perfect guide that prevents timber splitting while still allowing the lag screw to grip firmly.
When deciding how high to position your mount, consider how easily you'll be able to reach it for maintenance, the most direct path for cable routing, and keeping it clear of ground-level obstacles. Your dish will extend both upward and outward from the mount, so factor in this extra space in your planning.
Step 2: Secure Lag Bolts and Mount Arm
Now it's time to attach your Starlink dish wall mount securely to the wall.
First, squeeze a generous amount of silicone sealant into each pilot hole. This creates a waterproof barrier that prevents moisture from seeping into your wall – particularly important in our rainy coastal regions.
Drive the top lag bolt into the upper pilot hole, but don't tighten it completely. Leave it about 12mm (1/2 inch) loose. This allows you to slide the keyhole slot on the back of the wall mount over this partially tightened bolt.
Once the mount is hanging on the top bolt, insert the bottom lag bolt through the lower mount hole and into its corresponding pilot hole. Now you can tighten both bolts securely. For SpaceTek Australia heavy-duty mounts, aim for a torque of 20-25 Nm – tight enough for security without risking damage to your mounting hardware or wall.
The galvanised steel construction of quality mounts offers excellent protection against rust, but if you're in a coastal area where salt spray is an issue, I recommend applying a marine-grade anti-corrosion spray to the bolt heads after installation. This extra step can add years to your mount's lifespan.
Safety Check: Before moving on, give the mount a firm tug to ensure it's solidly attached to the wall. A loose mount can lead to equipment damage or even personal injury during strong winds.
Step 3: Align and Lock the Starlink Dish Wall Mount
With your mount firmly attached to the wall, it's time to connect your Starlink dish and finish the job.
If your Starlink dish is currently sitting on its temporary stand, remove it by pressing the release tab at the base. Then slide the dish's mounting pole into the receptor on your wall mount. The connection method varies slightly depending on your specific mount model:
For standard Starlink mounts, you'll typically insert and tighten set screws to secure the dish. If you're using a SpaceTek quick-release mount, engage the locking mechanism and double-check that it's secure.
Now for an important step that many DIYers overlook – proper cable management. Route the Starlink cable through the provided channels on your mount, and before the cable enters your home, create what we call a "drip loop" – a downward curve in the cable that prevents water from following the cable inside. Secure the cable with the provided clips, making sure it's not pinched or pulled too tight.
For the entry point into your home, I recommend drilling at a slight downward angle from inside to outside. This natural slope helps water drain away rather than into your home. Use an appropriately sized grommet to protect the cable where it passes through the wall, and apply plenty of waterproof sealant around the entry point. For a truly professional finish, consider a dedicated weatherproof cable entry box.
Once everything is connected and sealed, power up your system and open the Starlink app to check your signal quality. The dish will automatically position itself for optimal reception, and you'll be enjoying your high-speed connection in no time.
Fine-Tuning, Weatherproofing & Ongoing Care
After securing your Starlink dish wall mount, a few finishing touches will ensure your system performs at its best for years to come. Think of this as the difference between a quick setup and a professional installation that stands the test of time.
Once your dish is securely mounted, open the Starlink app and check your connection statistics. You're looking for low latency and minimal outages, which tell you the dish has a clear view of the satellites. The app's 3D view feature is brilliant for confirming there are no obstructions in your dish's field of view. If the app highlights problems, you might need to adjust the mount position or clear some obstacles.
Give all your connections a proper once-over. Those lag bolts should be tight, the dish securely attached to the mount, and the cable neatly routed without any sharp bends that could damage it over time. I recommend watching your setup during the first few rain or wind events – the mount shouldn't shift or vibrate excessively even when the weather turns nasty.
Boosting Performance in 2025
Looking ahead to 2025, there are several ways to future-proof your Starlink setup. Router placement makes a huge difference – position it centrally in your home, away from other electronic devices and metal objects that can interfere with your Wi-Fi signals. For larger homes or properties, Wi-Fi mesh systems can eliminate those frustrating dead zones.
Make sure your Starlink dish and router are set to automatically update firmware. Starlink regularly improves performance through software updates, and staying current ensures you're getting the most from your system.
Keep an eye out for new accessories as well. Starlink continues to release improved mounting and performance options, and at SpaceTek Australia, we stay on top of these developments to offer compatible, upgraded versions specifically designed for our harsh Australian conditions.
For business users or those who simply can't afford downtime, exploring Starlink's enterprise options might be worthwhile. These provide improved performance and priority support when you need it most.
Weatherproofing Tips for Australian Conditions
Australia throws some unique challenges at outdoor equipment. If you're in the tropical north, apply additional waterproofing sealant around all penetrations and consider adding a supplementary rain shield above your cable entry point. The humidity up there is relentless!
For coastal installations, marine-grade anti-corrosion spray on all metal components is absolutely essential. Those sea breezes carry salt that will attack standard finishes, so don't skip this step. Many of our coastal customers also add sacrificial zinc anodes for extended protection – a small investment that can significantly extend the life of your mount.
In bushfire-prone areas, use metal conduit to protect your cables and keep vegetation well clear of your installation. Consider a quick-disconnect system that allows for emergency removal if evacuation becomes necessary.
For those in alpine regions, install snow shields above your mount to prevent snow accumulation, and make sure your dish has sufficient height to avoid being buried during heavy snowfall.
No matter where you are in Australia, these additional protections will serve you well:
- UV-rated cable sleeves to protect the Starlink cable from our harsh sun
- High-wind tethers for additional security during cyclone season or severe storms
- Periodic application of silicone lubricant to any moving parts
- Bird deterrents to prevent nesting and droppings that can quickly corrode components
A simple monthly visual inspection takes just minutes but can catch small issues before they become big problems. Quarterly, give those fasteners a check and tighten anything that's worked loose, clean dust and debris from the dish surface, and inspect your sealants for signs of degradation. Once a year, do a complete inspection of all components, replace any deteriorated sealants, and test your grounding systems if installed.
More info about Secure Your Signal
With proper installation, weatherproofing, and a bit of regular attention, your Starlink dish wall mount will provide years of reliable service, keeping you connected no matter how remote your little patch of Australia might be.
Frequently Asked Questions about Starlink Dish Wall Mounts
Is wall mounting better than roof or pole options?
The best mounting option depends on your specific situation. Wall mounting offers several advantages:
- Easier installation: No need to work on the roof or dig foundations
- Better accessibility: Easier to reach for maintenance or adjustments
- No roof penetrations: Eliminates potential leak points in your roof
- Simpler cable routing: Often provides a more direct path for cables to enter your home
However, wall mounting may not be ideal if:
- You don't have a suitable wall with clear sky visibility
- Your walls aren't structurally sound enough to support the mount
- Local regulations restrict wall-mounted equipment
For many Australian homes, especially in remote areas, wall mounting provides the optimal balance of installation simplicity and performance. Our customers report 96% satisfaction with wall-mounted installations versus 82% for roof mounts, primarily due to easier installation and maintenance.
What clearance do I need under a roof overhang?
The required clearance depends on which Starlink dish wall mount you're using:
- Standard Wall Mount: Accommodates overhangs up to 4 inches (10cm)
- Long Wall Mount: Accommodates overhangs up to 12 inches (30cm)
- SpaceTek Extended Wall Mount: Accommodates overhangs up to 16 inches (40cm)
The key consideration is ensuring the dish has an unobstructed view of the sky. The dish needs to see approximately 100° of open sky above it, so the mount must extend far enough from the wall to clear any overhanging roof, eaves, or gutters.
For Australian homes with wide verandahs or deep eaves (common in Queensland and northern NSW), we recommend our Extended Wall Mount, which provides additional clearance while maintaining stability in high winds.
How do I stop rust in coastal areas?
Coastal environments present significant challenges for outdoor equipment due to salt spray. To prevent rust and corrosion on your Starlink dish wall mount:
Choose the right materials: Our coastal-rated mounts use 316-grade stainless steel fasteners and marine-grade aluminium components specifically designed to withstand salt exposure.
Apply protective coatings: Use marine-grade anti-corrosion sprays on all metal components, including bolt heads and nuts, and reapply according to the manufacturer's recommendations.
Install sacrificial anodes: For extreme coastal environments, zinc anodes can be attached to the mounting system to preferentially corrode instead of your valuable equipment.
Regular maintenance: Rinse the mount and hardware with fresh water monthly to remove salt deposits, and inspect for early signs of corrosion.
Seal all connections: Use marine-grade silicone sealant on all connections and penetrations to prevent moisture intrusion.
Our data shows that coastal installations using standard mounts typically show signs of corrosion within 6-12 months, while our marine-grade systems remain corrosion-free for 5+ years with proper maintenance.
Starlink Accessories Built for Remote Australia
Living in the Australian outback or along our rugged coastlines means dealing with unique challenges when it comes to internet connectivity. At SpaceTek Australia, we've spent years developing Starlink dish wall mount solutions that can handle everything our sunburnt country throws at them – from cyclonic winds up north to salt spray along our shores.
We're not just selling generic mounts with an Aussie sticker slapped on them. Our range has been developed specifically for the conditions we face here, with real-world testing from the Kimberley to Cape York, and from the Nullarbor to Tasmania's wild west coast.
Our standard wall mounts might look similar to others, but look closer and you'll notice the difference. We use hot-dip galvanised steel rather than painted or powder-coated metals, because we know that surface treatments just don't cut it when faced with our harsh UV and coastal environments. Every Starlink dish wall mount we sell is compatible with all Starlink dish versions but features significantly improved corrosion resistance.
For Queenslanders and others with those classic deep verandahs, our Extended Wall Mounts provide up to 16 inches of clearance – perfect for getting your dish out beyond those wide eaves without compromising stability. Living in cyclone territory? Our Cyclone-Rated Mounts are engineered to withstand wind speeds up to 280 kph, giving you peace of mind during the wet season.
For our coastal customers, we've developed Marine-Grade Coastal Kits featuring 316 stainless steel hardware and sacrificial anodes. It might seem like overkill until you've seen what three months of salt spray can do to standard hardware!
We understand that in bushfire-prone areas, you might need to quickly remove your equipment, which is why we've developed Quick-Release Systems that allow for rapid removal during emergencies. And for those living completely off-grid, our integrated solutions combine Starlink dish wall mounts with solar panel mounting systems, minimising the number of penetrations in your roof or walls.
What really sets us apart is our understanding of Australian building materials. Our fasteners are specifically sized for Australian timber species and building materials, ensuring proper grip strength whether you're mounting to hardwood studs in an old Queenslander or blueboard on a modern home.
For remote communities across Australia, reliable internet isn't just convenient—it's essential. Whether you're running a cattle station in the Northern Territory, a tourism business along the Great Ocean Road, or simply trying to stay connected from your remote homestead, our mounting solutions provide the stability, durability, and performance you need.
From the red centre to the coastal fringes, SpaceTek Australia has you covered with Starlink dish wall mount solutions that are built tough for our unique conditions. Because when you're hundreds of kilometres from the nearest technician, you need equipment you can trust.
Leave a comment
This site is protected by hCaptcha and the hCaptcha Privacy Policy and Terms of Service apply.