Expanding Your Starlink Coverage
Starlink WiFi extender setup involves connecting additional mesh nodes or third-party extenders to boost your satellite internet coverage. Here's a quick overview:
-
Official Starlink Mesh Setup:
- Ensure your Starlink kit is online
- Place mesh nodes 1–2 rooms apart from main router
- Connect to Starlink WiFi network and open the app
- Wait for "New Mesh Node(s)" notification (1–2 minutes)
- Tap "Pair" or "Pair All" to connect
-
Third-Party Extender Setup:
- Connect extender to Starlink router via Ethernet or WPS
- Access extender's setup portal
- Select Starlink network to extend
- Enter WiFi password
- Position extender halfway between router and dead zone
Living in remote Australia often means dealing with spotty internet coverage, especially across larger properties with outbuildings or homes with signal-blocking materials. While Starlink brings reliable satellite internet to the outback, a single router often can't cover every corner of your property.
Whether you're trying to get WiFi to your shed 200 metres away or just struggling with dead zones in your weatherboard home with a metal roof, extending your Starlink network is essential for consistent coverage.
Why extend your Starlink WiFi? Metal roofs, thick walls, and vast distances are common challenges in Australian rural properties. A proper WiFi extension system ensures you stay connected for work, entertainment, and smart home devices no matter where you are on your property.
For optimal results, Starlink recommends using their official mesh nodes, which integrate seamlessly with your existing system. However, third-party extenders can also work effectively when configured correctly.
The key to success is proper placement – mesh nodes work best when positioned no more than one to two rooms apart, with no more than three nodes for optimal performance. For longer distances to separate buildings, outdoor-rated point-to-point bridges offer a more reliable solution than standard mesh systems.
WiFi Extension Choices for Starlink
When it comes to extending your Starlink WiFi network across your Australian property, several options exist. The right choice depends on your specific needs, property layout, and the challenges you're facing with your current coverage.
Starlink systems in Australia operate on 2.4GHz and 5GHz frequency bands, but notably do not support the newer 6GHz band. This is important to remember when selecting extension equipment, as any extender using 6GHz for backhaul communication won't be compatible with your Starlink setup.
Building materials common in Australian homes and outbuildings significantly impact WiFi signal. Metal roofs and wall cladding (common in rural sheds and many modern homes), thick bluestone or brick walls in older properties, and even dense foliage around your property can all degrade WiFi signals. These environmental factors should guide your extension strategy.
Why Extend?
There are several clear indicators that your Starlink system needs extension:
Dead Zones Everywhere: If you're constantly losing connection when moving around your property, extension is essential.
Thick Walls and Metal Roofs: Many Australian rural homes feature construction materials that block WiFi signals. Metal roofs, common in rural Australia for their heat reflection and durability in harsh conditions, are particularly problematic for WiFi signals.
Big Properties: The typical Australian rural property is considerably larger than urban homes, often with significant distances between the main house and workshops, sheds, or granny flats.
Smart Device Integration: Modern farms and homes increasingly rely on smart devices for security, monitoring, and automation. These require consistent WiFi throughout the property.
Drastic Speed Drops: If your internet speed plummets when moving just one room away from your router, it's a clear sign you need signal extension.
Extension Toolbox
Here are the primary options for extending your Starlink WiFi coverage:
Official Starlink Mesh Nodes: Purpose-built for Starlink systems, these mesh nodes integrate seamlessly with your existing setup. They're ideal for extending coverage within the same building or to closely positioned structures.
Third-Party WiFi Extenders: Devices from manufacturers like TP-Link or Netgear can extend your Starlink WiFi network. While not specifically designed for Starlink, they can be effective when properly configured.
Mesh WiFi Systems: Complete mesh systems create a network of nodes that communicate with each other, providing seamless coverage throughout larger areas.
Point-to-Point Wireless Bridges: For extending internet to separate buildings over longer distances (50+ metres), these dedicated devices create a wireless bridge between structures.
Wired Backhaul Options: Sometimes the most reliable solution is running Ethernet cable (where practical) to connect access points in different locations.
It's worth noting that for any third-party extension solution, you'll likely need the Starlink Ethernet adapter, as most Starlink routers (particularly Gen 2 and newer) don't have built-in Ethernet ports.
Starlink WiFi Extender Setup Step-by-Step
Setting up your Starlink WiFi extender shouldn't feel like rocket science, even though you're working with space-age technology! Whether you're trying to get internet to your back shed or just eliminate those annoying dead spots in your farmhouse, the process is surprisingly straightforward.
Official Mesh Node Starlink WiFi extender setup
If you've gone with Starlink's official mesh nodes (a smart choice for seamless integration), here's how to get them up and running:
First, make sure your main Starlink kit is online and happy. There's no point extending a network that isn't working! Next, take a good look around your property and choose strategic spots for your mesh nodes. For typical Aussie homes with metal roofs or thick walls, you'll want to keep nodes no more than one to two rooms apart from each other.
Once you've found the perfect spots, simply plug each mesh node into a power outlet. Then, grab your mobile, connect to your existing Starlink WiFi network and open the Starlink app. Within a minute or two, you should see a notification pop up saying "New Mesh Node(s)" – that's your cue to tap "Pair" or "Pair All" and let the magic happen.
The pairing process usually takes another minute or two, and you'll know everything's working when your mesh nodes show a solid white light. Bonza! Your network is now extended.
For those dealing with typical Australian building challenges, keep these placement tips in mind:
- Metal roofs (a staple in rural Australia) can block signals, so position nodes to minimise metal barriers between them
- In multi-level homes, try to align nodes vertically when possible
- Keep nodes away from water tanks, electrical panels, and large metal objects
Starlink recommends no more than three mesh nodes in total. Adding more might seem like a good idea, but it can actually decrease your network performance. Also, for best results, connect all mesh nodes directly to the main router rather than chaining them together.
Third-Party Extender Starlink WiFi extender setup
If you've opted for a third-party extender from TP-Link, Netgear or similar brands, the setup requires a few extra steps but is still quite manageable:
Start by resetting your extender to factory settings if it's not brand new. Just hold down the reset button for about 7 seconds. For the most reliable connection, you'll want to connect an Ethernet cable from your Starlink router to the extender. This typically means purchasing the Starlink Ethernet adapter separately, as most newer Starlink routers don't have built-in Ethernet ports.
Power up your devices in the right order – Starlink router first, then the extender. Next, you'll need to access the extender's setup portal, which varies by brand. For TP-Link, download their Tether App, tap "+" to add a device, and follow the prompts. Netgear users should connect to the extender's default network (usually named "Netgear_ext") and steer to "mywifiext.net" or "192.168.1.250" in a browser.
You'll need to create a new admin password for your extender (keep this separate from your WiFi password for better security). Then select both the 2.4GHz and 5GHz Starlink networks to extend – Starlink doesn't support the newer 6GHz band, so your extender will only use these two frequencies.
Enter your Starlink WiFi password when prompted, verify all settings look correct, and you're almost done! The final step is crucial – relocate your extender to an optimal position, typically halfway between your router and the area needing coverage.
For Australian rural properties with their unique challenges, consider:
- Placing extenders higher up (on shelves or wall-mounted) to improve range
- Using outdoor-rated extenders for verandas or semi-exposed areas
- Taking into account how corrugated iron walls and roofing (common in Australian buildings) affect signal penetration
Quick Setup Checklist
Before starting any Starlink WiFi extender setup, gather these essential bits and bobs:
- Starlink Ethernet adapter (for third-party equipment)
- Mobile device with the Starlink app installed
- Quality Ethernet cable (for wired setups)
- Power outlets near your ideal placement locations
- Small tool for pressing extender reset buttons if needed
Keep these key points in mind during setup:
Always power on your Starlink router first, then the extender. This prevents connection hiccups during the pairing process.
If your third-party extender has a WPS (WiFi Protected Setup) button, this can sometimes provide a simpler connection method than going through the full setup portal.
After everything's up and running, check for firmware updates for your extender. Keeping your equipment updated ensures you have the latest security patches and performance improvements.
Finally, remember to keep your extender's admin password separate from your WiFi password for better security. This simple step can help protect your network from unwanted visitors.
With your Starlink WiFi extender setup complete, you can now enjoy seamless internet coverage throughout your property – whether you're checking cattle prices from the shed or streaming your favourite show in the back bedroom!
Placement & Long-Distance Strategies
Getting your Starlink WiFi extender setup just right is all about smart placement, especially on Australian rural properties where vast distances and challenging building materials can make coverage tricky.
The key to success starts with using the Starlink App's built-in WiFi Scanner. This handy tool helps identify those frustrating weak-signal spots around your property:
- Open your Starlink App and find the WiFi Scanner
- Take a walkabout with your mobile device
- Keep an eye on where the signal indicator shifts to yellow or red
- Use these insights to position your extenders strategically
When it comes to placement, think like a true outback strategist. Position your main Starlink router as centrally as possible within your home – this gives you the best starting point for coverage. Remember the "one-to-two rooms rule" – keep those mesh nodes no more than a couple of rooms apart for reliable communication.
Direct line of sight between devices makes a world of difference, especially in homes with corrugated iron or metal roofing that's so common across rural Australia. Speaking of Aussie homes, if you've got a single-story place with that classic metal roof, try to keep all your nodes at a consistent height for better performance.
And while it might seem obvious, keep your nodes away from large metal objects (like that old Kelvinator in the shed), microwave ovens, and those thick bluestone or brick walls found in many historic Australian homes.
Using a Mesh Network with Starlink – 5 Key Advantages
A proper mesh network offers some brilliant benefits for Starlink users across Australia's diverse landscapes.
Seamless roaming means you can wander from your homestead to the back paddock without constantly disconnecting and reconnecting to different networks. The single SSID management keeps things simple – all your devices connect to one network name, no more juggling multiple WiFi passwords when visitors come over.
Your network becomes self-healing – if one node decides to chuck a sickie, the network simply reroutes through other available nodes. You'll also enjoy better speeds compared to traditional extenders that just repeat a signal, and the easy scaling means you can add more nodes as needed (though remember Starlink recommends no more than three).
For those sprawling rural properties that Australia is famous for, these advantages are gold – ensuring consistent coverage across greater distances and through the unique building materials that make up our homes and outbuildings.
Top Signs You Need a Mesh Network
You might be due for a mesh network upgrade if you're nodding along to these common Starlink struggles:
You've got dead zones everywhere – multiple spots around your property where the WiFi signal seems to vanish into thin air. Or perhaps your speeds drop drastically room to room – one minute you're streaming in 4K, the next you can barely load a webpage.
Australian homes often feature thick walls or weird layouts – those charming stone cottages, Queenslanders on stilts, or converted woolsheds with their unusual floor plans can wreak havoc on WiFi signals. And of course, if you've got a big property or multiple buildings – typical of rural Australian setups with separate sheds, workshops, or granny flats – a single router just won't cut it.
Another telltale sign? Your smart home devices disconnect frequently – those security cameras keeping an eye on the back paddock or automated irrigation systems controlling water usage keep dropping off the network.
Extending to Separate Buildings
For many Aussie rural properties, getting WiFi out to the shed, workshop, or granny flat is essential. When these buildings sit more than 50 metres away from your main house (not uncommon on Australian blocks), standard mesh systems typically struggle to provide reliable coverage.
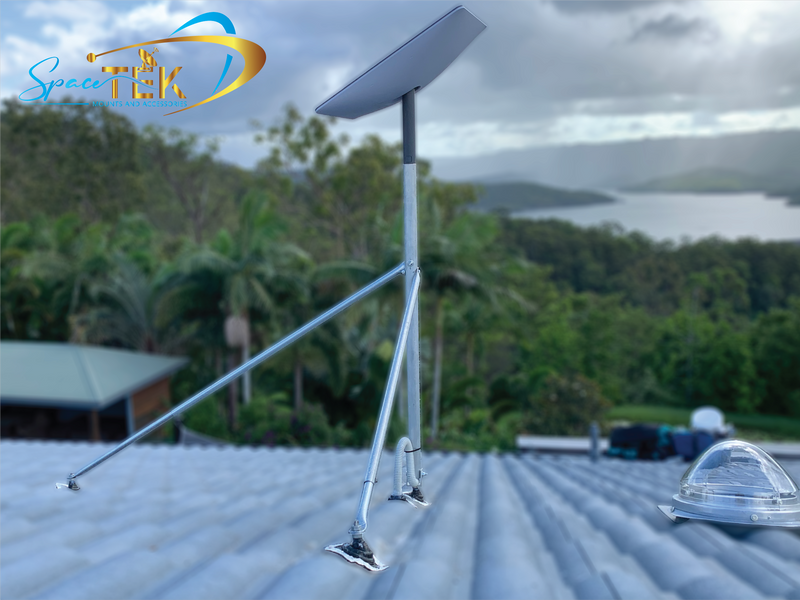
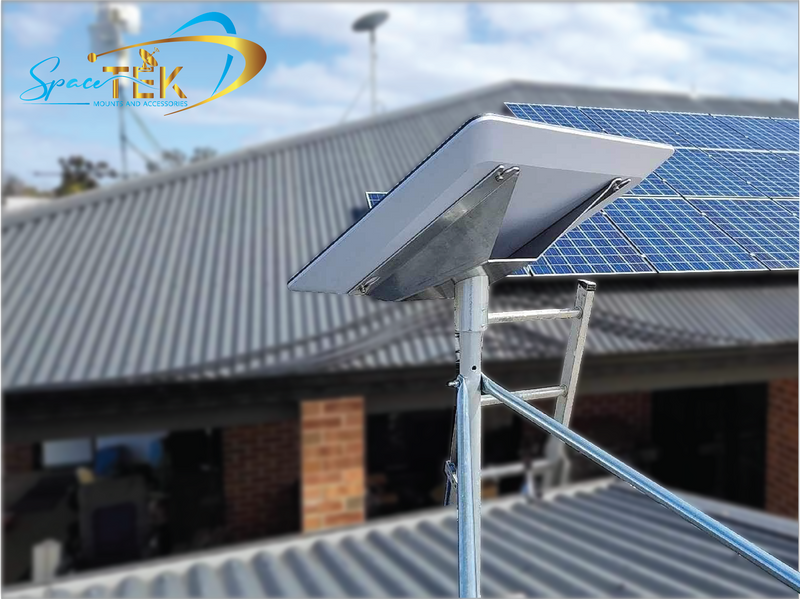
In these scenarios, consider a point-to-point wireless bridge – these dedicated devices create a wireless link between buildings, with one unit connected to your main router and another in the remote building. Given Australia's harsh climate, look for outdoor-rated equipment with high IP ratings to withstand our unique combination of dust, scorching sun, and occasional torrential downpours.
For the ultimate reliable connection, Ethernet over fibre is worth considering – running fibre optic cable between buildings provides immunity to electrical interference and those summer lightning strikes that can wreak havoc on rural properties. Many outdoor wireless bridges can be powered via Power over Ethernet (PoE), simplifying installation in remote structures where power points might be scarce.
A DIY mast installation can work wonders too – mounting your point-to-point equipment on poles or masts helps clear obstacles and improves line-of-sight, particularly important on properties with undulating terrain or those magnificent gum trees that define the Australian landscape.
One SpaceTek customer in the Northern Rivers region successfully extended their Starlink coverage to a workshop 150 metres from their main house using a pair of point-to-point wireless bridges mounted on 3-metre poles. This setup cleared the intervening trees and maintained line-of-sight, providing reliable internet to their pottery studio where they run online classes.
For more detailed guidance on optimal placement distances, check out Starlink Mesh Range: How Far is Too Far? for specific recommendations custom to Australian conditions.
Troubleshooting, FAQs & Optimisation
Let's face it – even with careful planning, Starlink WiFi extender setup doesn't always go as smoothly as we'd hope. If you're scratching your head over connection issues, you're not alone. Here's how to tackle common problems and fine-tune your system for Australian conditions.
Common Pairing Errors and Solutions
When your extender refuses to play nice with your Starlink system, a few culprits are usually to blame. If your extender seems invisible to your network, first check the basics – is it powered on and within reasonable range? Sometimes the simplest solution works: try resetting the extender to factory settings by pressing that tiny reset button for about 7 seconds. For particularly stubborn devices, connecting via Ethernet for the initial setup often cuts through connection headaches.
Connection failures are another common frustration. Double-check you're using the correct WiFi password (we've all made that typo at 11 PM while setting up tech). Also verify your Starlink router is properly online – you should see a reassuring solid white light. If your router is in bypass mode, that's your problem right there – extenders need the router's WiFi functionality active to work properly.
Some users find their extender connects to only one frequency band instead of both. This happens because some extenders default to connecting to either 2.4GHz or 5GHz, not both. Hop into your extender's settings portal and manually configure both bands for complete coverage.
DHCP issues can cause mysterious problems that seem impossible to diagnose. If your extender uses the same IP address range as your Starlink router, conflicts will occur. The solution? Change your extender's IP range through its administration portal to avoid these digital traffic jams.
Australian Environmental Considerations
Our sunburnt country throws unique challenges at networking equipment. During those scorching summer days when temperatures soar, your equipment can overheat faster than a tourist on Bondi Beach. Position your extenders and mesh nodes away from direct sunlight and ensure they have proper ventilation – especially important for those inland properties where 40°C days are the norm.
The red dust of the outback is as iconic as it is problematic for electronics. In dry rural areas, dust accumulation can choke your equipment over time. Schedule a gentle clean with compressed air every few months – more frequently during drought conditions when dust storms are common.
Lightning strikes during our dramatic summer thunderstorms can fry electronics in an instant. Develop the habit of unplugging equipment during severe electrical storms – a small inconvenience compared to replacing your entire system.
And let's not forget our uniquely Australian wildlife challenges. From curious cockatoos to persistent spiders, our creatures have a knack for interfering with outdoor equipment. Using protective enclosures for outdoor components can save you from unwelcome surprises during your morning video conference.
Quick Fixes List
When troubleshooting your Starlink WiFi extender setup, try these steps in order:
- Power cycle everything – Turn off both router and extender, wait 30 seconds (the hardest part!), then power on the router first, followed by the extender.
- Relocate nodes temporarily – Move the extender closer to the router to establish a solid connection, then gradually reposition it to where you need coverage.
- Update all firmware – Check for and install available updates for both your Starlink router and extender.
- Reset if necessary – Use the reset button as a last resort to restore factory settings.
- Inspect all cables – Ensure connections are secure and cables aren't damaged by curious pets or vacuum cleaners.
Maintenance Tips for 2025 and Beyond
Keeping your extended Starlink network running smoothly isn't a set-and-forget affair. Like servicing your ute, regular maintenance prevents bigger problems down the track.
Make a habit of checking the Starlink App monthly to verify all nodes are connected and performing well. This five-minute check can catch issues before they become noticeable problems. While you're at it, consider updating your WiFi password periodically – good digital hygiene is increasingly important as more of our lives move online.
While it's tempting to add more mesh nodes for better coverage, Starlink recommends no more than three. Adding too many can actually degrade your network's performance, creating the opposite effect of what you intended. When it comes to mesh networks, sometimes less truly is more.
For those in dustier rural areas, gently clean your equipment every few months. A soft brush or compressed air can remove dust without damaging sensitive components. This is particularly important during dry spells when dust seems to find its way into everything.
Finally, develop a routine for protecting your equipment during Australia's unpredictable storm season. A surge protector is a wise investment, and knowing when to power down during severe electrical storms can save your equipment from lightning-induced damage.
With these troubleshooting tips and maintenance practices, your Starlink system will provide reliable connectivity across your property, whether you're streaming in the lounge room or checking cattle prices in the shed. And if you need additional mounting solutions or accessories designed specifically for Australian conditions, SpaceTek Australia offers rust-resistant, weather-ready options to complement your setup.
Connectivity Without Compromise
Extending your Starlink WiFi network across your Australian property shouldn't mean settling for patchy coverage or unreliable connections. With thoughtful planning and the right equipment, you can enjoy seamless internet throughout your home and outbuildings—from the main house to the shed at the back of your property.
Living in remote Australia comes with unique challenges for internet connectivity. That's why we at SpaceTek Australia have developed mounting solutions specifically designed for our harsh conditions. Our rust-resistant mounts are built to withstand everything from scorching summer heat to driving coastal rain, ensuring your Starlink equipment remains securely positioned for years of reliable performance.
When setting up your extended Starlink network, remember these essential points:
Match your solution to your needs. For coverage within a single building, mesh nodes work brilliantly. For reaching that workshop 100 metres away, a point-to-point bridge is your best mate. There's no one-size-fits-all approach for Australian properties—what works for a compact weatherboard home won't necessarily suit a sprawling cattle station with multiple outbuildings.
Follow Starlink's placement recommendations. Keep those mesh nodes within one to two rooms of each other, limit your network to three nodes for optimal performance, and ensure direct connections to your main router. A properly positioned network is the difference between frustration and flawless connectivity.
Consider our unique Australian conditions. Our corrugated iron roofs, thick sandstone walls, and vast distances between buildings all affect signal strength. Position your equipment with these factors in mind—what works in a suburban American home might not cut it on your rural Australian property.
Don't set and forget. A bit of regular maintenance goes a long way in our harsh climate. Schedule occasional checks of your equipment, particularly after extreme weather events. A quick dust-off of your mesh nodes or a simple repositioning might be all that's needed to maintain peak performance.
When you're ready to optimise your Starlink setup, consider SpaceTek's range of Australian-designed mounting solutions. Our mounts are specifically engineered for Australian conditions, providing the stability and durability needed for consistent connectivity in remote areas.
From the red centre to coastal communities, we understand the connectivity challenges faced by Australians in remote locations. That's why we've designed our products to be as resilient as the people who use them—because reliable internet isn't a luxury, it's essential for work, education, and staying connected with loved ones.
With the right approach to your Starlink WiFi extender setup and quality accessories designed for our unique conditions, you can transform your Starlink experience from a single-point connection to comprehensive coverage that reaches every corner of your property.
Reliable Internet Starts with the Right Accessories.

Leave a comment
This site is protected by hCaptcha and the hCaptcha Privacy Policy and Terms of Service apply.