
Why the Right Starlink Roof Rack Mobility Mount Changes Everything

A Starlink roof rack mobility mount is a heavy-duty dish mount engineered to secure your Starlink terminal to a vehicle's roof rack for reliable satellite internet on the move. Whether you're crossing remote outback tracks or heading off-grid for weeks, the right mount keeps your dish locked in place at highway speeds, through corrugations, and in wild weather.
Quick answer: What does a Starlink roof rack mobility mount do?
- Secures your Starlink dish to existing roof rack crossbars
- Keeps the dish stable at highway speeds and on rough terrain
- Maintains correct dish orientation for uninterrupted satellite tracking
- Fits common rack systems including T-slot, flat bar, and aero-style crossbars
- Available for Starlink Mini and Gen 3 terminals
For most Australians living or travelling in remote areas, staying connected isn't a luxury — it's essential for work, safety, and daily life. A poorly mounted dish can cause signal drops, physical damage, and costly repairs down the track.
SpaceTek Australia designs and manufactures precision-machined, folded aluminium dish mounts built specifically for harsh Australian conditions. These are not 3D-printed parts. These are engineered solutions built to last.
This guide covers everything you need to know — from choosing the right mount for your dish type, to installation steps, roof rack compatibility, and security features. Do it properly the first time.

Explore more:
What is a Starlink Roof Rack Mobility Mount?
A Starlink Roof Rack Mobility Mount is a heavy-duty, vehicle-specific mounting system designed to permanently or semi-permanently secure your Starlink dish to a roof rack. Unlike standard residential mounts, these mobility mounts are engineered to withstand extreme wind loads, highway speeds, and off-road vibrations while maintaining a low profile.

When you buy a standard Starlink kit, the included kickstand or ground mount is designed for stationary residential setups. Taking those standard options on the road is a recipe for disaster. Residential mounts lack the structural engineering required to handle the constant, multi-directional forces experienced on top of a moving 4WD, caravan, or touring rig.
A dedicated mobility mount solves this by creating a highly secure, weather-resistant physical connection between your vehicle's roof rack and your satellite dish. By positioning the dish flat or at a scientifically calculated fixed angle (such as 9° for advanced phased-array systems), these mounts reduce wind resistance dramatically. They also eliminate motorised movement parts that are prone to failing when exposed to highway winds, ensuring your hardware remains intact over thousands of kilometres of travel.
Learn more about these design elements in our guide on Everything You Need to Know About Starlink Gen 3 Roof Rack Mobility Mounts.
Choosing a Starlink Roof Rack Mobility Mount for Your Setup
Finding the correct mounting solution depends entirely on your specific dish model, your vehicle layout, and how you intend to travel. Starlink offers several hardware generations, and each requires a tailored mounting approach:
- Starlink Mini: The ultra-portable, compact model that is highly popular for quick setups, light touring, and off-grid camping.
- Starlink Gen 3 (V4) Standard: The larger, high-performance model that uses advanced phased-array technology and requires a secure flat or slightly tilted mounting surface.
- Enterprise / Flat High-Performance Terminals: Heavy-duty hardware used for commercial, maritime, or extreme overland applications where permanent high-wind mounting is mandatory.
Choosing a dedicated, model-specific mount ensures that your cable routing remains unpinched, your dish is held at the optimal angle for satellite tracking, and the physical footprint on your roof rack is minimised.
SpaceTek Starlink Mounts and Accessories by Dish Type
SpaceTek designs and manufactures high-quality, weather-resilient Starlink mounts and accessories specifically tailored for harsh Australian conditions. By categorising your hardware by dish type, you ensure a perfect fit and robust performance that prevents signal misalignment during extreme weather.
Whether you are navigating the red dust of the outback or coastal salt spray, your mounting hardware must be built to last. Cheap, 3D-printed mounts degrade rapidly under the harsh Australian sun. SpaceTek components are precision-machined or folded aluminium, NOT 3D printed, ensuring lifetime durability.
For a complete look at vehicle setups, check out our Starlink Mount for Caravan, Van or RV: Complete Installation Guide 2026.
Starlink Mini
The Starlink Mini is highly valued for its compact size, but keeping it secure on a vehicle roof rack requires specialised hardware. We offer robust solutions designed to provide maximum stability while maintaining the portability of the Mini dish.
- Robust Magnetic Roof Mount for Starlink Mini: Built from powder-coated metal and fitted with oversized 87mm earth magnets, this mount offers a safer, more stable alternative to dashboard placement. It features rubber feet to protect your paintwork and an integrated carry handle for rapid deployment and removal when you park up for the night.
- V-Cell Single Roof Rack Wing Supports: Specifically engineered for setups where a rugged V-Cell protective housing is mounted to a single roof rack bar (such as Rhino-Rack, Yakima, or Prorack). These heavy-duty treated steel wings reinforce the mounting point, distribute wind forces, and eliminate the flex that can cause signal drops during travel.
Using these specialised mounts ensures your Mini receives a stable, regulated DC input and remains completely secure, even through severe off-road corrugations. For more on mobile setups for this terminal, read about Stay Connected in Motion: Mounting for Starlink Mini.
Starlink Gen 3
The larger footprint of the Gen 3 (V4) Standard dish requires a heavy-duty mounting solution that can handle substantial wind resistance at highway speeds.
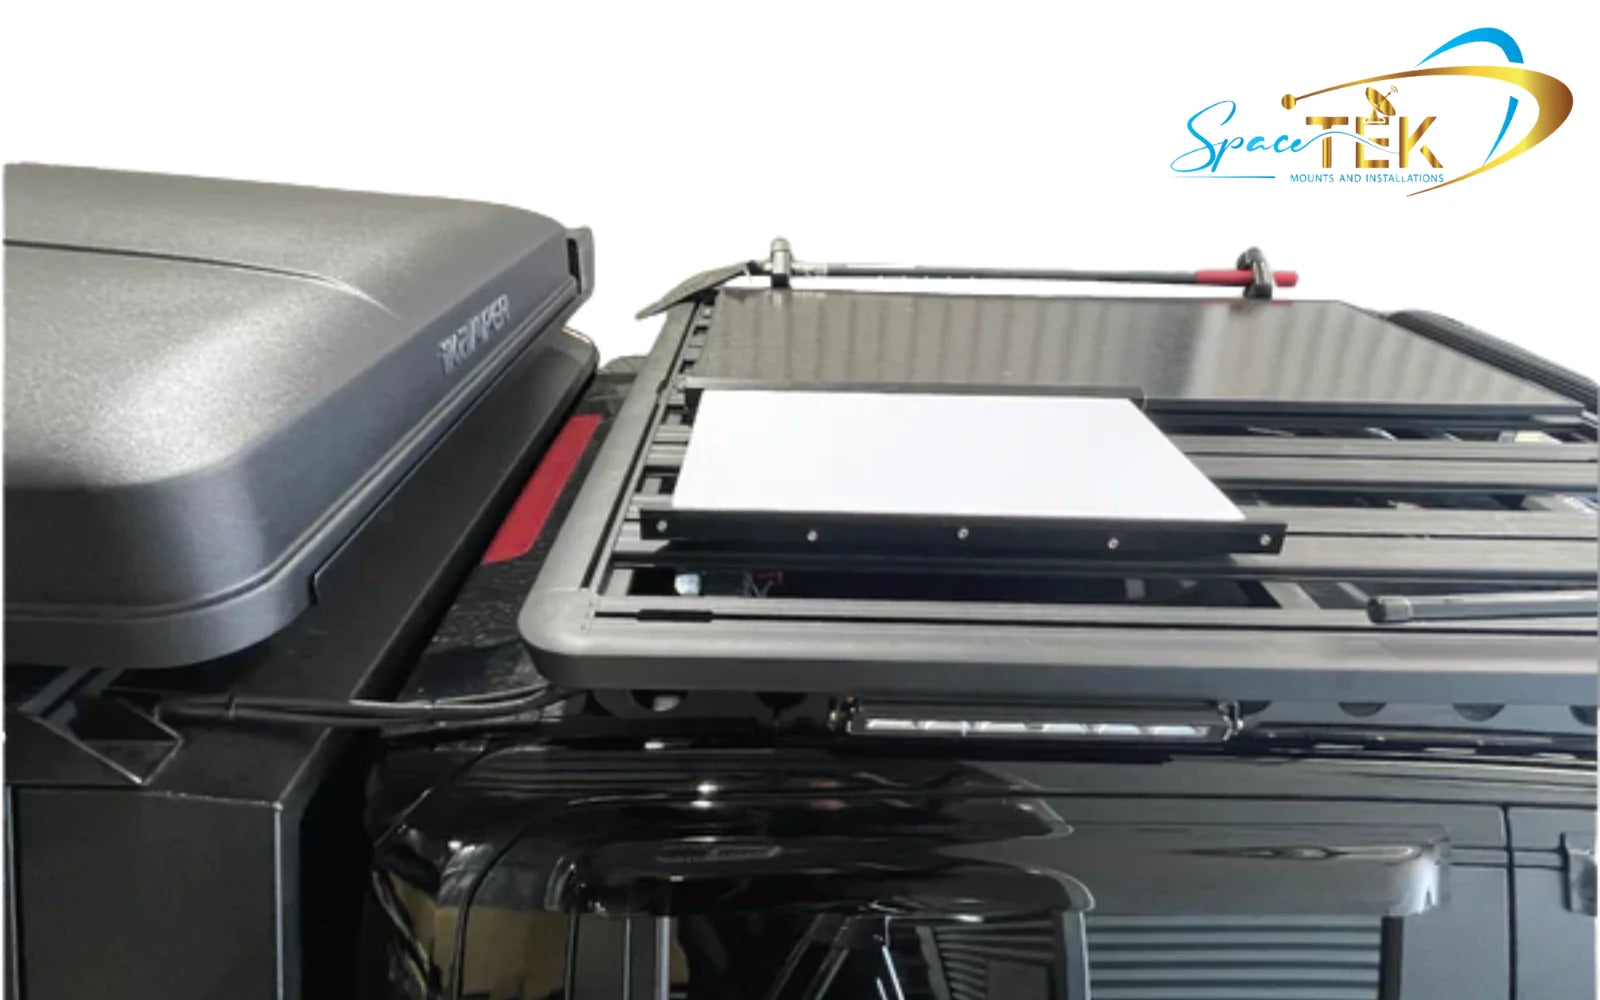
- Starlink Gen 3 In Motion Mount: Crafted in Australia from folded aluminium and engineering-grade plastic, this mount provides a highly secure platform for your Gen 3 terminal. It features pre-aligned bolt holes that match popular roof rack systems like Rhino-Rack, allowing for a seamless, low-profile installation. It can also be paired with optional rubber-coated earth magnets for a non-permanent setup.
This engineered approach ensures your valuable Gen 3 terminal is protected from high-wind loads and heavy vibration, maintaining a reliable connection wherever your vehicle takes you.
General Accessories
Sometimes the key to a perfect installation lies in the hardware that connects your mount to your vehicle's existing roof rack channels.
- Stainless Steel T-Nut Cross Bar Fixing Set: This comprehensive fixing set allows you to secure your in-motion mounts directly into the T-slot channels of your roof rack crossbars. It includes M8 stainless steel bolts, flat washers, spring washers, and T-nuts, offering a high-strength, corrosion-resistant connection without requiring any permanent modifications or drilling into your bars.
How to Install a Starlink Roof Rack Mobility Mount Safely
To install a Starlink roof rack mobility mount safely, you must secure the mounting base to your vehicle's crossbars using rated fasteners, route the heavy-duty cabling without pinching, and position the dish for an unobstructed sky view. Doing it properly the first time prevents physical damage and ensures uninterrupted high-speed internet.

When preparing for installation, make sure you have a clean, flat work surface and the appropriate tools ready. A standard installation typically requires a 13 mm or 14 mm wrench, a screwdriver, and high-quality sealant if you are routing cables through the roof. Always refer to the official Mini Mobility Mount Install Guide for specific structural guidelines.
- Find the Ideal Mounting Location: Use the obstructions tool in the official Starlink App to find a position on your roof rack that offers a completely clear 360-degree view of the sky, away from solar panels, recovery boards, or high-profile gear.
- Prepare the Dish: Remove the temporary kickstand or ground mount from your Starlink terminal.
- Position and Align the Mount: Place your Starlink Gen 3 In Motion Mount or Robust Magnetic Roof Mount for Starlink Mini onto your roof rack crossbars. If using a T-slot system, slide the T-nuts into the channels and align them with the pre-drilled holes in the mount base.
- Route the Cabling: Thread your heavy-duty ethernet or power cable through the designated cable entry point in the mount before securing the dish. This prevents pinching and protects the waterproof seals on the connector.
- Secure the Hardware: Insert your stainless steel bolts, spring washers, and flat washers. Tighten them firmly using a wrench to ensure a rigid, vibration-resistant connection.
- Insert and Lock the Dish: Place your Starlink terminal into the mount housing and secure it using the integrated locking screws or quick-release fasteners until hand-tight. Double-check for any play or movement before setting off.
Frequently Asked Questions about Starlink Roof Rack Mobility Mounts
Find quick, technically accurate answers to the most common questions regarding vehicle-mounted satellite systems.
Can I use a Starlink roof rack mobility mount while my vehicle is in motion?
Yes, in-motion satellite internet is legally permitted on vehicles, but it is always at the user's own risk. To ensure reliable tracking and protect your hardware, you must use a dedicated low-profile, flat-mount system. Standard angled mounts are not designed to withstand highway wind forces and can cause severe signal loss or physical damage if used while driving.
What roof rack types and dimensions are supported by these mounts?
These mounts are designed to integrate with the vast majority of professional modular roof racks on the market, including systems with standard T-slot channels like Rhino-Rack, Yakima, and Prorack. For single-bar setups or unique crossbar dimensions, specialised accessories like the V-Cell Single Roof Rack Wing Supports can be used to distribute dynamic loads safely.
Are there anti-theft or security features included with these mounts?
Physical security is a key consideration for vehicle-mounted satellite hardware. Many mounting solutions feature integrated lockable pathways, security-head screws, or quick-release mechanisms that allow you to rapidly demount the dish and store it safely inside your vehicle. For semi-permanent installations, using high-strength fasteners within the roof rack's T-slots makes unauthorised removal extremely difficult.
Key Takeaway: Choosing the Right Starlink Mount for Your Setup
Investing in a premium Starlink Roof Rack Mobility Mount is the ultimate way to bring reliable, high-speed satellite internet to your vehicle setup. Whether you are running a Starlink Mini for quick weekend getaways or a Gen 3 Standard terminal for long-term off-grid touring, a stable mounting system is critical to protecting your hardware and preventing frustrating signal dropouts.
SpaceTek Australia focuses on durable Starlink mounting hardware built for harsh travel conditions, with folded aluminium and stainless steel components chosen for strength, corrosion resistance, and long-term reliability on the road.
- Explore the Starlink Mini mount range
- Shop the Starlink Gen 3 vehicle mount
- Add the roof rack fixing set for a cleaner installation
Leave a comment
This site is protected by hCaptcha and the hCaptcha Privacy Policy and Terms of Service apply.