
Why Power Your Starlink Directly from DC?
Starpower 12v / 24v - starlink dc power supply is the ultimate solution for powering your Starlink dish directly from any 12V or 24V DC power source. If you're searching for an efficient way to use Starlink in remote areas, RVs, boats, or off-grid cabins without the inefficiency of an inverter, here's what you need to know:
- Input Range: 11-36V DC (configurable for higher ranges)
- Peak Power: ~110W at startup, average 31W during normal operation
- Compatibility: Works with Gen 1, 2, and 3 Standard Starlink terminals
- Energy Savings: Approximately 15 % more efficient than using an AC inverter
The StarPower DC power supply from SpaceTek Australia eliminates the wasteful DC→AC→DC conversion process that occurs when using the standard Starlink router and power brick with an inverter.
For Australians in remote locations where every watt counts, the StarPower solution provides a more efficient way to stay connected. Instead of converting your 12V or 24V battery power to AC and back to DC again, this purpose-built power supply delivers the exact voltage your Starlink dish needs directly.
The beauty of this system is its simplicity. By bypassing the Starlink router and connecting directly to your own router's WAN port, you get a cleaner, more efficient power-delivery system that's perfect for remote Australian conditions.
Meet the StarPower 12V/24V – Starlink DC Power Supply
G'day! Let's talk about the StarPower V2 12V/24V - Starlink DC Power Supply – a game-changer for Aussies who need reliable internet in challenging environments. Whether you're parked in your caravan at the edge of the Nullarbor, managing a remote cattle station, or living off-grid in a bush cabin, this robust power supply is your ticket to staying connected without power headaches.
Designed specifically for the Australian outback and beyond, the StarPower V2 works exclusively with Gen 1, 2, and 3 Standard Starlink terminals (not compatible with High Performance or In-Motion/Maritime terminals). It happily accepts a wide input voltage range from 11-36V DC, making it perfect for virtually any DC power system you might have in your RV, boat, or solar setup.
What makes this unit special is its flexibility – you can choose from several connection options including an Anderson plug (a favourite among Aussie campers), a 2.5mm DC jack, or a DC jack with an AC power pack depending on what suits your particular setup.
How the StarPower 12V/24V – Starlink DC Power Supply Works
At its heart, the StarPower 12V/24V - Starlink DC Power Supply uses clever DC-DC boost converter technology to transform your 12V or 24V power source into exactly what your Starlink dish craves. This direct conversion approach is significantly more efficient than the power-hungry alternative of using an inverter.
The high-quality DC-DC converter inside steps up your input voltage to approximately 48-56V DC, delivering this to your Starlink dish via Power over Ethernet (PoE). This technology ensures your dish receives stable power even during those demanding startup moments or when the heating element kicks in during a frosty morning.
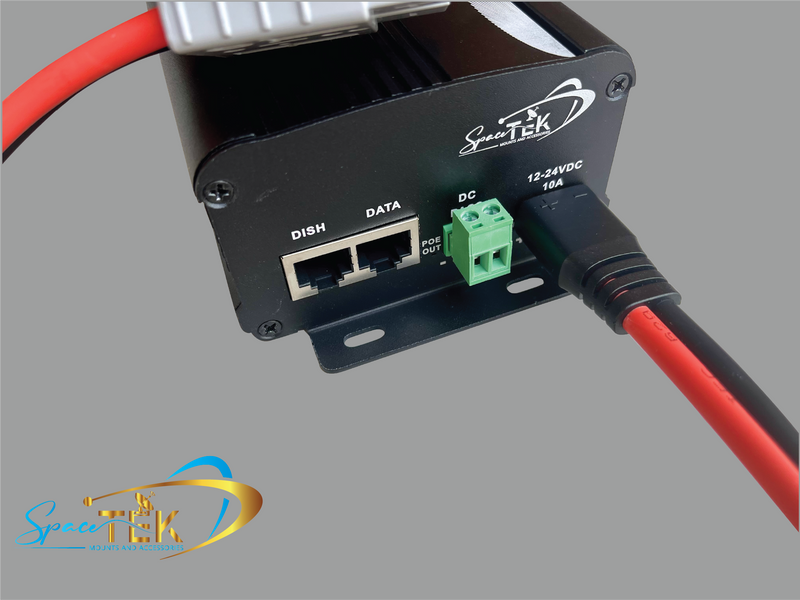
There's a handy PoE LED indicator that lights up when the output fuse is working properly – a simple visual confirmation that power is flowing to your dish as intended. The system also includes an unregulated DC pass-through via a Phoenix connector, which you can use to power your router from the same source, keeping your setup nice and tidy.
During normal operation, your Starlink dish will draw an average of just 31W through the StarPower, though this can briefly jump to about 110W during initial startup or when the dish needs to warm itself up in cold weather.
What's in the StarPower 12V/24V – Starlink DC Power Supply Kit
When you unbox your StarPower 12V/24V - Starlink DC Power Supply, you'll find everything needed to get up and running:
- The StarPower V2 DC power supply unit itself (measuring 160 × 100 × 60mm including mounting tabs)
- Your choice of connector (Anderson plug, 2.5mm DC jack, or DC jack with AC power pack)
- Three spare internal fuses to keep you prepared (two 3A output fuses and one 10A input fuse)
- A comprehensive installation guide that won't leave you scratching your head
- All the mounting hardware you need for a secure installation
The thoughtfully designed compact unit features convenient mounting tabs that make it easy to install almost anywhere – inside your caravan cabinet, on a shed wall, or in a weatherproof enclosure if you're mounting it outdoors.
All ports are clearly labeled for straightforward connection, and the durable housing is built tough to handle the vibrations of rough outback tracks and the temperature swings common in the Australian climate. It's the kind of robust kit you need when you're far from the nearest tech shop.
Why Switch from AC to DC for Your Starlink
If you're using Starlink in remote Australia, switching from AC to DC power could be one of the smartest moves you'll make. Whether you're in a caravan exploring the Outback, living off-grid, or managing a remote property, the StarPower 12V/24V - Starlink DC Power Supply offers substantial benefits that go beyond just convenience.
Eliminating Conversion Losses
Think about what happens in a standard setup: your 12V or 24V battery power goes through an energy-wasting journey. First, your inverter converts DC to 240V AC (losing 10-20% of power in the process), then the Starlink power brick converts that AC back to DC. It's like driving from Sydney to Melbourne via Darwin!
This double conversion isn't just inefficient—it's literally turning your valuable battery power into heat. With the StarPower 12V/24V - Starlink DC Power Supply, you're taking the direct route, converting your battery power to the required voltage in one step. The result? About 15% more power efficiency, which makes a massive difference when you're relying on solar or limited battery capacity.
Extended Battery Life for Off-Grid Systems
For those living off-grid in remote Australia, every watt saved is precious. That 15% efficiency gain translates to real-world benefits that Aussie users are noticing.
A station owner in Western Queensland found they could keep their Starlink running for almost two additional hours each evening on the same battery bank. This extra runtime is a real advantage during cloudy days when solar generation drops.
If you're managing a remote property or station where diesel generators supplement your power, these efficiency gains can also mean less fuel used and fewer generator hours—saving you money and maintenance headaches.
Reduced System Complexity
Let's face it—simpler is better when you're in remote areas. The traditional AC power setup requires multiple components: an inverter, power outlets, the Starlink power brick, and all the associated cabling. Each component adds weight, takes up space, and represents another thing that could potentially fail.
By switching to the StarPower 12V/24V - Starlink DC Power Supply, you're streamlining your entire system. You'll enjoy:
- Less weight (a genuine benefit for caravans and boats)
- Reduced space requirements
- Fewer potential failure points
- Blissfully quiet operation without inverter fan noise
Perfect for Remote Australian Applications
The StarPower 12V/24V - Starlink DC Power Supply shines brightest in those uniquely Australian scenarios where power efficiency matters most:
For grey nomads and caravanners, it means running Starlink directly from your vehicle's 12V system while free camping, without draining your batteries or running a noisy generator.
On remote properties and stations, it integrates seamlessly with existing solar and battery systems, eliminating the need for additional AC infrastructure and maximising the value of your power generation.
For remote Indigenous communities with limited power infrastructure, it enables more efficient internet access, making every watt of generated power go further.
In marine applications along Australia's vast coastline, it provides reliable connectivity from standard 12V or 24V boat electrical systems without power-hungry inverters.
At temporary work sites in the bush, it simplifies power requirements when running from portable power stations or generator systems.
When you're far from the nearest power point, the efficiency gains from direct DC power aren't just convenient—they're essential. The StarPower 12V/24V - Starlink DC Power Supply is purpose-built for the unique challenges of staying connected in remote Australia, where reliable power and internet are precious commodities.
Technical Specs & Compatibility
Getting your head around the technical nitty-gritty of the StarPower 12V/24V - Starlink DC Power Supply is crucial before you dive in. Let me walk you through everything you need to know in plain English.
The StarPower V2 is designed with Australian conditions in mind - from dusty outback stations to coastal caravans. It works beautifully with Gen 1 Standard, Gen 2 Standard Actuated (with a simple cable tweak), and Gen 3 Standard Starlink terminals. Just be aware that it won't play nice with High Performance dishes, In Motion/Maritime terminals, or the Gen 2/3 Starlink routers.
Power-wise, this little beauty accepts anything from 11-36V DC input, making it perfect for both 12V and 24V systems. During startup, it can draw up to 10A at 12V (that initial boot sequence is power-hungry!), but then settles down to a modest 31W during normal operation. To keep everything running smoothly, we've included fuse protection - a 10A input fuse and 3A output fuses.
Size matters when you're fitting equipment into tight spaces. The StarPower measures 160 × 100 × 60mm including the mounting tabs, weighs about 500g, and comes with those handy integrated mounting tabs that make installation a breeze in your caravan, boat, or off-grid cabin.
Input & Output Requirements
The beauty of the StarPower V2 is its flexibility. That wide 11-36V DC input range means it works brilliantly with standard 12V systems (like in most caravans) and 24V setups (common in larger boats and some solar installations). Even when your batteries are running low or charging up, the StarPower keeps delivering stable power to your Starlink.
For the best performance, we recommend:
- Using at least 14 AWG cable for your power connection
- Installing a 10A fuse close to your power source (especially important for 12V systems)
- Making sure your power source can handle that 10A surge during startup
On the output side, it's wonderfully straightforward. You get a standard RJ45 data port that connects directly to your router's WAN port, completely bypassing the need for the Starlink router. There's also that handy unregulated DC pass-through via Phoenix connector, which is perfect for powering your router from the same source – one less power brick to worry about!
Preparing a Gen 2 Cable
If you're using a Gen 2 Starlink terminal, there's a bit of prep work involved. You'll need to modify the main Starlink cable that runs from the Starlink Router to the dish by:
- Cutting it to your preferred length
- Terminating it with a Cat6 plug (shielded is best)
- Using the T-568B wiring standard (the same one Starlink uses)
Not keen on cutting cables? No worries! SpaceTek offers a clever Starlink SPX to RJ45 adapter that lets you connect everything without any cable surgery.
When you're setting up your cable, using a quality shielded RJ45 connector and proper crimping tools will save you headaches down the track. A poor termination can lead to frustrating connection issues, especially in the harsh Australian climate where every connection needs to be rock-solid.
Step-by-Step Installation Guide
Getting your StarPower 12V/24V - Starlink DC Power Supply up and running is straightforward, but like any technical installation, the devil's in the details. I'll walk you through everything you need for a smooth setup that'll have you enjoying efficient Starlink connectivity in no time.
Before you start, gather your tools. You'll need a Phillips screwdriver, wire strippers if you're modifying cables, and an RJ45 crimping tool if you're working with a Gen 2 terminal. Don't forget some 14 AWG (or thicker) power cable, an appropriate fuse holder with a 10A fuse, your own router with WAN port, mounting screws, and cable ties to keep everything neat.
Installation Steps
First, find the perfect home for your StarPower unit. Look for a spot that's protected from the weather but still well-ventilated to prevent overheating. Keeping it close to your power source will minimise voltage drop, and you'll want it accessible for any future maintenance.
Once you've found the ideal location, secure the unit using the built-in mounting tabs. Use appropriate screws for your mounting surface – what works for timber won't necessarily be right for metal or fibreglass.
Next, let's sort out the power connection. Run your 14 AWG (or thicker) wire from your battery or DC power source to the StarPower. Always install a 10A fuse as close as possible to the power source – this is non-negotiable for safety. Connect everything to your chosen input connector, whether that's an Anderson plug or DC jack. Before powering up, double-check your polarity – getting this wrong can damage your equipment!
Now for the Starlink connection. If you have a Gen 1 or Gen 3 terminal, simply connect the Starlink cable directly to the StarPower. Gen 2 owners will either need to modify their cable (as described in the previous section) or use the SpaceTek SPX to RJ45 adapter for a plug-and-play solution.
Time to connect your router. Run an Ethernet cable from the StarPower's data port to your router's WAN port. If your router is compatible with the DC pass-through, you can power it directly from the StarPower as well, simplifying your setup.
When everything's connected, it's time for the moment of truth – power up the system! Apply power to the StarPower unit and check that the PoE LED indicator lights up, confirming proper function. The Starlink dish will need several minutes to boot up and self-orient, so be patient.
While you're waiting, configure your router. Access its administration interface and make sure DHCP is enabled on the WAN port. Some routers may need a static route configuration (192.168.100.1/32) to access the Starlink statistics.
For maximum efficiency, consider a few optional tweaks. In the Starlink app, you can disable the dish heater function when it's not needed, which will reduce power consumption significantly. If your router has power-saving features, now's a good time to enable those too.
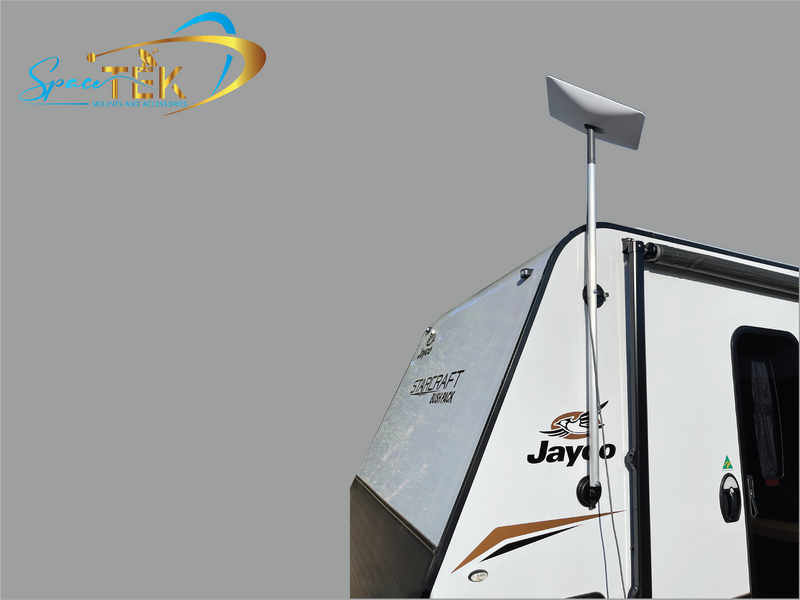
12V RV Setup Example
If you're installing the StarPower in your caravan or RV, here's a real-world example of how to set things up:
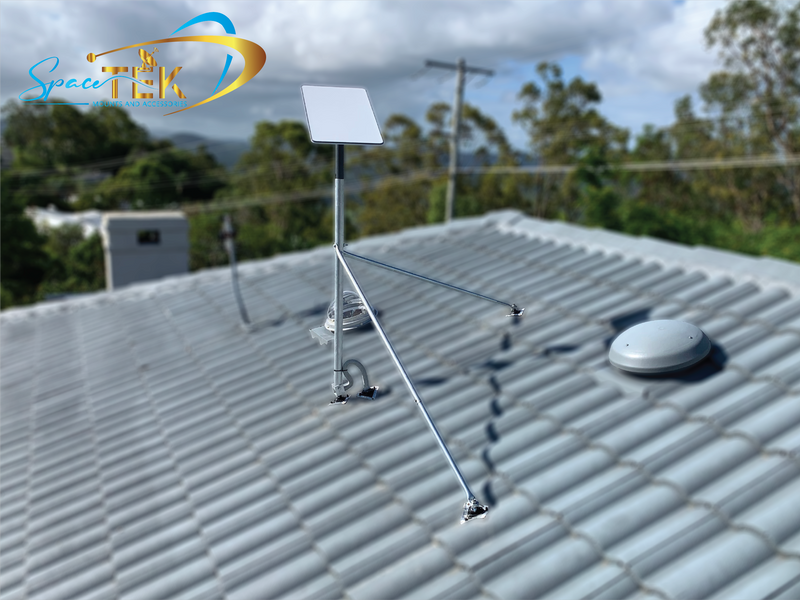
Mount the StarPower in an accessible cabinet near your existing 12V distribution panel. Connect it to your house battery system, ideally through a dedicated fused circuit to keep everything safe and separated. Run the Starlink cable from your roof-mounted dish down to the StarPower, being careful to secure it properly along the way to prevent damage from movement while travelling.
For your router, choose a 12V-compatible model – many travel routers are perfect for this purpose. If you want to keep tabs on your power usage (always a good idea when free camping), consider adding an energy monitor like the EcoFlow to track consumption.
The beauty of this setup is that you can run Starlink entirely on 12V power while free camping, without needing to fire up your inverter or generator. This means significant power savings and much quieter operation – your camping neighbours will thank you!
24V Solar Cabin Example
For those with an off-grid cabin running a 24V solar system, here's how to configure your StarPower:
Connect the unit directly to your battery bank's 24V output, making sure it's after the charge controller. Install a proper earth ground connection to protect against lightning strikes – this is particularly important in remote locations where electrical storms can be severe.
Position your router centrally for the best Wi-Fi coverage throughout your cabin. If you experience occasional power fluctuations (common with solar systems), consider adding a small 12V UPS for the router to maintain connectivity during brief interruptions.
This configuration is ideal for off-grid living because it completely eliminates the need for an inverter just to power your Starlink system. The direct DC connection reduces overall power consumption and extends battery life between charging cycles – crucial for those cloudy days when your solar panels aren't producing at full capacity.
With your StarPower 12V/24V - Starlink DC Power Supply properly installed, you'll enjoy more efficient, reliable internet connectivity that makes the most of your power resources, whether you're travelling across the Outback or living off-grid in a remote corner of Australia.
Troubleshooting & Safety Tips
Let's face it – even the most reliable tech sometimes throws us a curveball. Your StarPower 12V/24V - Starlink DC Power Supply is built tough for Australian conditions, but knowing how to troubleshoot common issues will keep you connected when things go sideways. Here's your guide to smooth sailing:
Common Issues and Solutions
Is your output fuse blowing immediately? This usually points to incorrect wiring or a short circuit somewhere in your Starlink cable. Take a moment to double-check your cable termination and ensure you've got the pinout configuration spot-on. A properly terminated cable makes all the difference.
Finding that 10A input fuse keeps blowing during startup? Your power cables might be too skinny for the job. The Starlink dish pulls a hefty current during startup, and undersized cables create resistance that leads to voltage drop. Swap to thicker power cable (12 AWG or better) and verify your power source can deliver that 10A peak current the system needs.
System working but disconnecting when you least expect it? This classic symptom usually means voltage is dropping during peak demand. Check all your connections for tightness, ensure you're using adequately thick cables, and confirm your battery system maintains at least 11V even under load. Those momentary dips below 11V can cause the system to reset.
Can't access your Starlink statistics through the app? This isn't actually a hardware problem – it's a router configuration issue. You'll need to add a static route in your router pointing 192.168.100.1/32 to the WAN interface. This creates a pathway for the app to communicate with your Starlink dish directly.
Is your StarPower running hot? Proper airflow is crucial. If the unit is tucked away without adequate ventilation or exposed to direct heat sources, it can exceed its 50°C ambient temperature limit. Relocate it to a cooler, better-ventilated spot, and you'll be back in business.
Safety Considerations
Safety first, mates! Always fuse your power connection close to the power source. This simple step prevents fire hazards if there's ever a short circuit in your wiring – think of it as cheap insurance for your caravan or cabin.
Double-check polarity before connecting power. Reverse polarity can damage the unit instantly, and that's a mistake you only want to make once. The positive and negative terminals are clearly marked on the StarPower – take that extra moment to verify.
Keep an eye on operating temperature. The StarPower is designed to work in the Australian heat, but even it has limits. Don't exceed 50°C ambient temperature – make sure it's installed somewhere with decent airflow.
While the StarPower is built tough, it's not waterproof. Protect it from water and moisture by installing it in a sheltered location. This is especially important for marine installations where salt spray can be an issue.
Good cable management isn't just about looking tidy – it's about safety too. Secure all cables to prevent strain on connectors and eliminate trip hazards. A bit of time spent with cable ties now saves headaches later.
For those in storm-prone areas of Australia, consider lightning protection. Proper grounding and surge protection are recommended, particularly for permanent installations in remote locations where lightning strikes are common.
Maintenance Tips
A little preventative maintenance goes a long way in keeping your system running smoothly:
- Periodically check all connections for tightness and signs of corrosion, especially in coastal areas where salt air accelerates corrosion
- Keep spare fuses on hand for quick replacement if needed – nothing worse than being without internet while waiting for spares to arrive
- Monitor your system's performance and power consumption to detect potential issues early
- In dusty environments (we're looking at you, Outback), occasionally check for dust buildup and clean with compressed air if necessary
With these troubleshooting tips and safety precautions, you'll be well-equipped to handle any hiccups that come your way, ensuring your StarPower 12V/24V - Starlink DC Power Supply keeps you connected no matter how remote your Australian trip takes you.
For more information about potential issues with Starlink power supplies and how to stay connected without official support, check out our detailed guide: Starlink Gen 2 Router Power Supply Failures: What You Need to Know and How to Stay Connected Without Official Support.
Frequently Asked Questions about StarPower 12V/24V – Starlink DC Power Supply
Does it work with the original Starlink router?
No, the StarPower 12V/24V - Starlink DC Power Supply is designed specifically to bypass the original Starlink router completely. Instead, it connects directly to your own router's WAN port, giving you the freedom to choose any router that suits your specific needs.
This bypass approach isn't just about simplifying power – it opens up a world of networking possibilities. You'll enjoy better Wi-Fi coverage with a router designed for your specific space, access to advanced features like guest networks for visitors, and the ability to integrate with other devices in your network ecosystem. For those going fully off-grid, you can pair it with a 12V DC-powered router for a complete DC solution that maximizes efficiency.
Many of our customers find this router flexibility particularly valuable in remote Australian settings where customized network setups can make a significant difference in connectivity quality.
Will using StarPower void my Starlink warranty?
Let's be straightforward about this – using the StarPower DC power supply may affect certain aspects of your Starlink warranty, particularly those related to the power supply and router components. However, the Starlink dish itself should remain covered for manufacturing defects not related to power modifications.
We recommend keeping your original Starlink power supply and router tucked away safely for warranty service if needed. If you're using a Gen 2 system that requires cable modification, consider our SPX to RJ45 adapter which doesn't require permanent cable changes, giving you the best of both worlds.
Many of our customers across the Australian Outback and remote communities have decided the significant power efficiency benefits outweigh the potential warranty considerations, especially when running off limited solar and battery systems where every watt saved extends their connectivity time.
How much power will I actually save on a 12V system?
This is where the rubber meets the road for most off-grid users. Our real-world testing across various Australian conditions shows approximately 15% power savings when using the StarPower compared to powering Starlink through an inverter.
During normal operation, expect an average consumption of around 31W (about 2.6A at 12V), with peaks of about 110W (9.2A at 12V) during startup or when the dish heater activates in cold weather. Compared to an inverter-based setup, you'll typically save 5-7W per hour – which might not sound like much until you calculate it over days or weeks of continuous operation.
These savings become particularly significant for solar-powered systems in remote Australian locations. One customer in the Northern Territory reported extending their daily internet availability by nearly two hours using the same battery capacity after switching to the StarPower. For off-grid cabins, remote properties, and mobile setups, these efficiency gains directly translate to longer operation between charges and reduced generator runtime – a proper win-win for both your wallet and your peace of mind.
Why Choose SpaceTek for Your Starlink Upgrades
G'day from SpaceTek Australia! We've built our reputation as the go-to provider for Starlink accessories that are genuinely designed for our unique Australian conditions. When you're setting up your StarPower 12V/24V - Starlink DC Power Supply in the middle of nowhere, you want gear that won't let you down – and that's exactly what we deliver.
Australian-Focused Design and Support
We're Aussies designing for Aussies, it's that simple. Every product we create, including the StarPower V2, is built specifically to handle what our sunburnt country throws at it:
The scorching heat of a summer day in the Outback? No worries. The humid tropics of Far North Queensland? She'll be right. The salt spray along our gorgeous coastline? We've got you covered.
Our support team isn't based overseas – we're right here in Australia, and we understand the unique challenges faced by users in remote stations, coastal communities, and those travelling our vast country. When you call us with a question about using your StarPower in Kakadu during the wet season, we know exactly what you're talking about.
Quality and Reliability
Let's face it – Australian conditions can be brutal on equipment. That's why we've gone the extra mile with our build quality:
All our metal components use rust-resistant materials that stand up to our harsh environment. We've selected electrical components that won't give up when the mercury rises, and everything undergoes rigorous testing before it leaves our facility.
We've seen too many imported products fail after just one Australian summer. Our gear is built differently – designed to last for years, not months, even when mounted on a caravan touring the Nullarbor or a remote homestead in the Territory.
Comprehensive Starlink Ecosystem
The StarPower 12V/24V - Starlink DC Power Supply is just one part of our complete range of Starlink accessories. We've developed an entire ecosystem of products that work seamlessly together:
Our custom mounting solutions are designed specifically for Australian roofing types and conditions. Our cable management systems keep everything neat and protected from our harsh UV. And our security solutions ensure your valuable Starlink equipment stays where it belongs.
Whether you're mounting your dish on a tin roof in the bush or on your boat cruising the Whitsundays, we've got purpose-built solutions that just work.
Supporting Remote Australian Communities
We're passionate about helping bridge the digital divide across Australia. Our products are enabling reliable internet access in places where connectivity has always been a challenge – from cattle stations in the NT to fishing communities along remote coastlines.
The StarPower 12V/24V - Starlink DC Power Supply has been a game-changer for many remote communities, allowing them to run Starlink efficiently from solar and battery systems without power-hungry inverters.
By choosing SpaceTek, you're supporting an Australian company that understands the unique connectivity challenges of our remote regions. We're not just selling products – we're helping connect Australians no matter where they live.
When you're hundreds of kilometres from the nearest service centre, you need equipment you can trust. That's the promise we make with every SpaceTek product – reliable connectivity for all Australians, no matter how remote.
Connectivity Without Compromise
The StarPower 12V/24V - Starlink DC Power Supply isn't just another accessory—it's a game-changer for Australians who need reliable internet in remote locations without sacrificing power efficiency. By eliminating the wasteful AC conversion process, you get a cleaner, more neat solution that makes perfect sense for off-grid living.
As we look ahead to 2025, staying connected has become essential for every aspect of our lives—whether you're working remotely from your property in the Kimberley, accessing telehealth services from a station in the Channel Country, or simply wanting to video call the grandkids while exploring remote coastlines in your caravan.
The beauty of the StarPower system is how it bridges the gap between Starlink's internet service and the practical power constraints that come with remote Australian living. It's the missing link that many outback users have been searching for.
Think about who's already benefiting from this technology:
Grey nomads finally free to explore those hidden gems on the map without losing touch with family. Property owners in the outback running businesses and managing operations without worrying about draining their battery banks. Boaties cruising along our magnificent coastline while maintaining reliable connectivity. Remote communities accessing education, healthcare and services that were previously out of reach.
What makes the StarPower special is how it addresses the unique challenges of the Australian environment. Our harsh sun, extreme temperatures, and vast distances create connectivity problems that generic solutions simply aren't designed to handle. With SpaceTek's purpose-built Australian accessories, you're investing in equipment that understands these challenges.
The upcoming 2025 Starlink upgrades will only improve what's already possible with your system. With more satellites being deployed and service improvements on the horizon, having the right power setup now means you'll be perfectly positioned to take advantage of these improvements without needing to overhaul your system later.
For those exploring remote areas of our beautiful country, the StarPower represents true connectivity without compromise—efficient, reliable internet access that works with your existing power setup rather than against it. It's about having the freedom to roam without losing touch with what matters.
Ready to upgrade your Starlink setup with a solution designed specifically for Australian conditions? Visit spacetek.com.au to explore the complete range of SpaceTek Starlink accessories and find the perfect match for your needs.
Leave a comment
This site is protected by hCaptcha and the hCaptcha Privacy Policy and Terms of Service apply.