Looking for a reliable Starlink Pole Mount installation to boost your satellite internet connection? Here's a quick guide to help you get started:
- Select the Right Location: Ensure your dish has a clear line of sight to the sky with minimal obstructions.
- Assemble the Pole Mount: Follow assembly instructions carefully.
- Secure the Pole Mount: Check for stability and weatherproofing.
- Attach the Starlink Dish: Align and secure your dish properly.
- Make Final Adjustments and Test: Optimize signal and test performance.
In recent years, Starlink has transformed internet connectivity in remote regions by offering a dependable satellite internet service. As the demand grows, users are exploring how to maximise their internet performance with effective installation techniques.
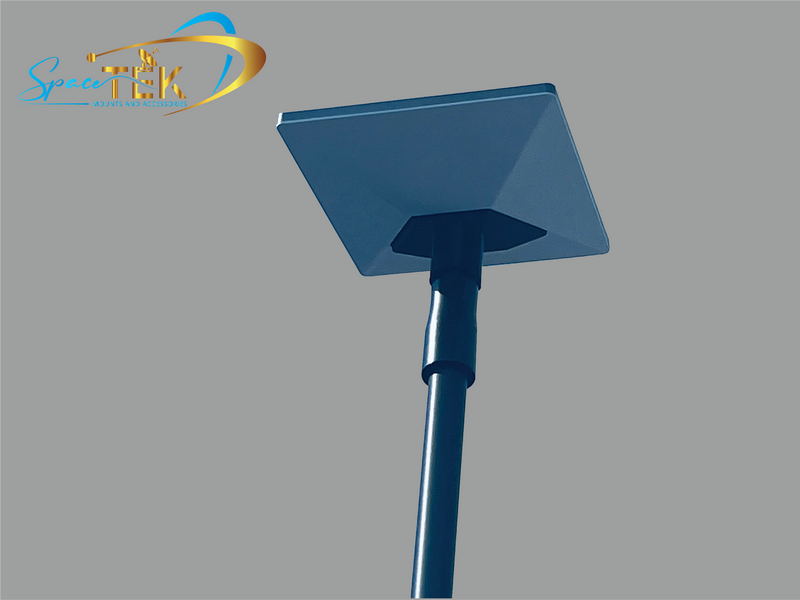
A crucial step is installing a Starlink Pole Mount, which provides the essential elevation and stability needed for optimal satellite signal reception. Whether you're living in rural Australia like Remote Resident Rob or venturing into off-grid territories, mastering this installation process will ensure your Starlink setup meets your connectivity needs.
When done right, a pole mount can drastically improve signal strength and internet speeds, bringing high-speed connectivity to even the most isolated spots. Ready to lift your Starlink experience? Dive into our guide to learn how easy it is to set up your Starlink Pole Mount for the best possible connection.

Understanding Starlink Pole Mounts
When it comes to setting up your Starlink Pole Mount, understanding the different types and their installation options is key to ensuring a solid and reliable connection. Here's a breakdown to help you make the right choice:
Pole Mount Types
Standard Pole Mounts: These are ideal for most residential setups. They offer a straightforward installation process, providing the necessary height to clear obstructions like trees or buildings.
Roof Mounts: Perfect for those needing extra elevation. Roof mounts help you position the dish above rooflines for an unobstructed view of the sky.
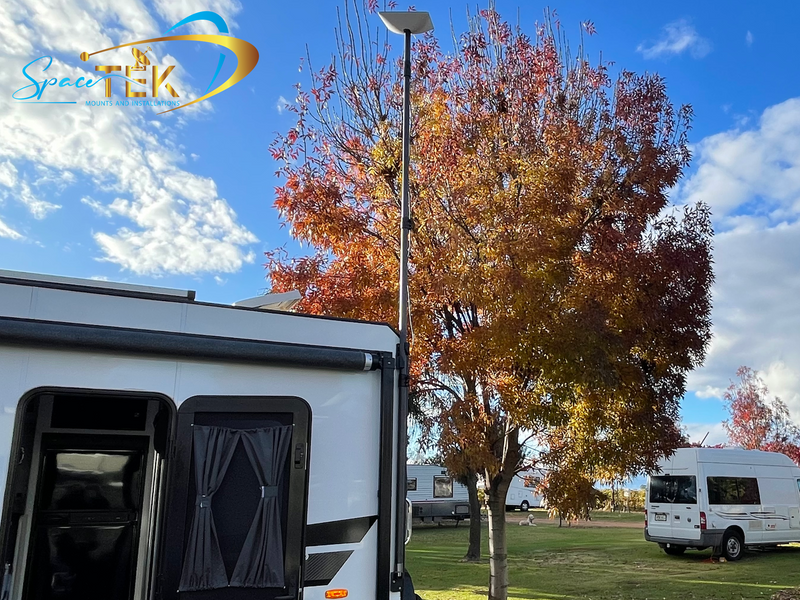
Portable Mounts: Great for RVs or temporary setups. These mounts are designed for easy assembly and disassembly, making them perfect for travelers who need a quick internet solution on the go.
Customised Mounts: For unique locations, customised mounts can be custom to fit specific structures or environments, ensuring your dish is perfectly positioned.
Installation Options
Fixed Installation: Ideal for permanent setups. These installations ensure your dish remains stable and secure, even in harsh weather conditions.
Adjustable Installation: Offers flexibility for users who may need to change the dish's position. This option is beneficial for those who anticipate moving or adjusting their setup frequently.
Portable Installation: Quick and easy to set up and take down, making it perfect for travelers or temporary setups.
Starlink Compatibility
Starlink pole mounts are designed to be compatible with various Starlink dishes, including:
Gen 2 and Gen 3 Dishes: These mounts are specifically crafted to support the latest Starlink technology, ensuring optimal performance.
Starlink Mini: Compact and efficient, these mounts are suitable for the smaller Starlink Mini dishes, providing the necessary support without taking up too much space.
RV and Portable Setups: Designed for mobility, these mounts cater to the needs of users on the move, ensuring that even when traveling, you can maintain a strong and steady connection.
Understanding these options will help you choose the right Starlink Pole Mount to suit your needs. Whether you're setting up in a rural area or need a portable solution for travel, there’s a mount designed to ensure you get the best possible internet experience.
Step-by-Step Installation Guide
Step 1: Selecting the Right Location
The first step in setting up your Starlink Pole Mount is choosing the perfect spot. Your dish needs a clear line of sight to the sky to function at its best. Avoid placing it near obstructions like trees, buildings, or power lines. Use the Starlink app to help find the best location with minimal obstructions. This ensures a strong and stable connection, which is crucial for optimal internet performance.
Step 2: Assembling the Pole Mount
Once you've selected the location, it's time to assemble your pole mount. Begin by laying out all the components. Most Starlink Pole Mounts come with a base, extension pole, and necessary hardware. Follow the included instructions carefully:
- Attach the Base: Secure the base to your chosen surface, ensuring it's level.
- Connect the Extension Pole: Insert the extension pole into the base and tighten the screws. Make sure the pole is vertical.
- Add Weatherproofing: Consider adding a weatherproof seal around the joints to prevent water ingress.
Step 3: Securing the Pole Mount
Stability is key to a reliable setup. Ensure your pole mount is securely fastened. Durability is important, especially in areas prone to harsh weather. Use heavy-duty screws and anchors to keep the mount stable. Check that all connections are tight. Your mount should withstand wind and rain without shifting.
Step 4: Attaching the Starlink Dish
Now, it's time to attach your Starlink dish to the pole mount. Proper dish alignment is crucial for optimal performance:
- Position the Dish: Place the dish on top of the pole and secure it with the provided brackets.
- Align for Best Signal: Use the Starlink app to adjust the dish's angle until you achieve the strongest signal. This may take some fine-tuning.
- Tighten All Fasteners: Ensure all screws and brackets are tight to prevent the dish from moving.
Step 5: Final Adjustments and Testing
With the dish in place, perform final adjustments and test the setup:
- Check Signal Strength: Use the Starlink app to test the signal strength. Make any necessary adjustments to improve performance.
- Inspect Stability: Ensure the entire assembly is stable and secure. Double-check all fasteners.
- Weatherproofing: Confirm that all cables and connections are protected from the elements.
By following these steps, you'll ensure your Starlink setup is ready for reliable, high-speed internet. Next, we'll explore tips to further optimise your Starlink system for the best possible performance.
Tips for Optimising Your Starlink Setup
Enhancing your Starlink setup can significantly boost your internet performance, especially in remote or challenging environments. Here are some practical tips to optimise your Starlink Pole Mount and dish configuration.
Maximise Signal Strength
Positioning is Key: The effectiveness of your Starlink system heavily relies on its positioning. Ensure your dish has a clear line of sight to the sky. This means avoiding obstructions such as trees, buildings, and large metal structures. Use the Starlink app to verify there are no signal blockages.
Elevation Matters: If ground-level placement is not feasible, consider elevating your dish using Spacetek’s adjustable mounts. These mounts allow for precise positioning, ensuring your dish captures the strongest possible signal.
Reduce Interference
Manage Environmental Factors: Weather conditions can affect signal quality. While Starlink is resilient, heavy rain or snow can still cause interruptions. Regularly check and clear any snow or debris from your dish to maintain optimal performance.
Cable Management: Disorganised cables can lead to signal interference. Use Spacetek’s cable management solutions to keep cables tidy and secure. This not only reduces potential interference but also extends the lifespan of your equipment by protecting against environmental damage.
Upgrade with Spacetek Mounts
Invest in Quality: Spacetek offers a range of mounts specifically designed for Starlink systems. These mounts are built for stability and durability, ensuring your dish remains secure even in adverse weather. Unlike cheaper alternatives, Spacetek mounts use rust-resistant materials, providing long-term reliability.
Versatile Options: Whether you need a roof mount, ridge cap mount, or portable solution, Spacetek has a variety of options to suit your needs. Their adjustable mounts allow for easy repositioning, which is crucial for finding the best signal in challenging topographies.
By following these tips and investing in high-quality accessories, you can ensure your Starlink setup is optimised for the best internet performance possible. Next, we'll address some frequently asked questions about Starlink Pole Mounts.
Frequently Asked Questions about Starlink Pole Mounts
What is the ideal height for a Starlink pole mount?
The ideal height for a Starlink Pole Mount is one that ensures a clear line of sight to the sky, free from obstructions like trees, buildings, or other structures. This height can vary depending on your specific location and surroundings. For many users, elevating the dish above rooflines or other nearby structures is necessary to avoid interference. Spacetek’s adjustable mounts can help achieve this optimal height, allowing for precise positioning and improved signal strength.
Can I install a Starlink pole mount myself?
Yes, you can install a Starlink pole mount yourself. The process is straightforward and designed for ease, especially if you follow a step-by-step guide. Spacetek provides comprehensive instructions with their mounts, ensuring a smooth installation process. However, if you're uncomfortable with DIY projects or need to install the mount at a significant height, it might be wise to consult a professional to ensure safety and optimal setup.
How do I maintain my Starlink pole mount?
Maintaining your Starlink pole mount involves a few simple steps to ensure long-term functionality:
Regular Inspections: Periodically check the mount for any signs of wear, rust, or damage. Spacetek’s mounts are made from rust-resistant materials, but it's still good practice to inspect them regularly.
Clear Obstructions: Make sure the dish remains free from obstructions like snow, leaves, or debris. This is crucial for maintaining a strong signal.
Tighten Fastenings: Over time, vibrations or weather conditions might loosen the mount’s fastenings. Ensure all bolts and screws remain tight to keep the dish stable.
By following these maintenance tips, you can ensure your Starlink pole mount remains secure and effective, providing a reliable internet connection.
Rugged Accessories for Tough Australian Conditions
Navigating the challenges of Australia's diverse landscapes requires more than just a reliable internet connection; it demands equipment that can withstand the harshest conditions. At SpaceTek Australia, we understand the unique needs of our customers and offer high-quality, rust-resistant mounts and accessories designed specifically for Starlink systems.
Our products are built to endure Australia's unpredictable weather, from scorching heat to torrential rain. SpaceTek's Starlink mounts are crafted from durable materials that resist corrosion, ensuring your setup remains stable and effective year-round. This dedication to quality means you can rely on your internet connection, whether you're in the heart of the city or the remotest outback.
By choosing SpaceTek Australia, you're not just investing in a product; you're securing a robust and reliable internet connection that supports your lifestyle, no matter where your trips take you. Our commitment to quality and performance ensures that even in the most challenging environments, you stay connected with ease.
Explore our range of Starlink-compatible accessories today and experience the difference that rugged, reliable equipment can make. With SpaceTek, you're equipped for connectivity without compromise, providing fast, reliable internet wherever you need it.


Leave a comment
This site is protected by hCaptcha and the hCaptcha Privacy Policy and Terms of Service apply.