If you're interested in setting up your own *starlink diy pole mount, here's a quick overview to guide you:*
- Choose a Site: Ensure a clear view of the sky to optimize satellite signal.
- Select a Mount: Opt for a fiberglass, non-conductive mast to avoid lightning and improve longevity.
- Assemble Equipment: Include the Starlink dish, data cable, and adapter kit.
- Install Accessories: Use Spacetek mounts and cable management solutions.
- Evaluate Performance: Regularly check for obstructions and update your setup as needed.
In an ever-connected world, reliable internet is a necessity, but for many remote areas in Australia, connectivity can be a challenge. Enter Starlink, a game-changer in satellite internet technology, revolutionising how rural and isolated communities access online services.
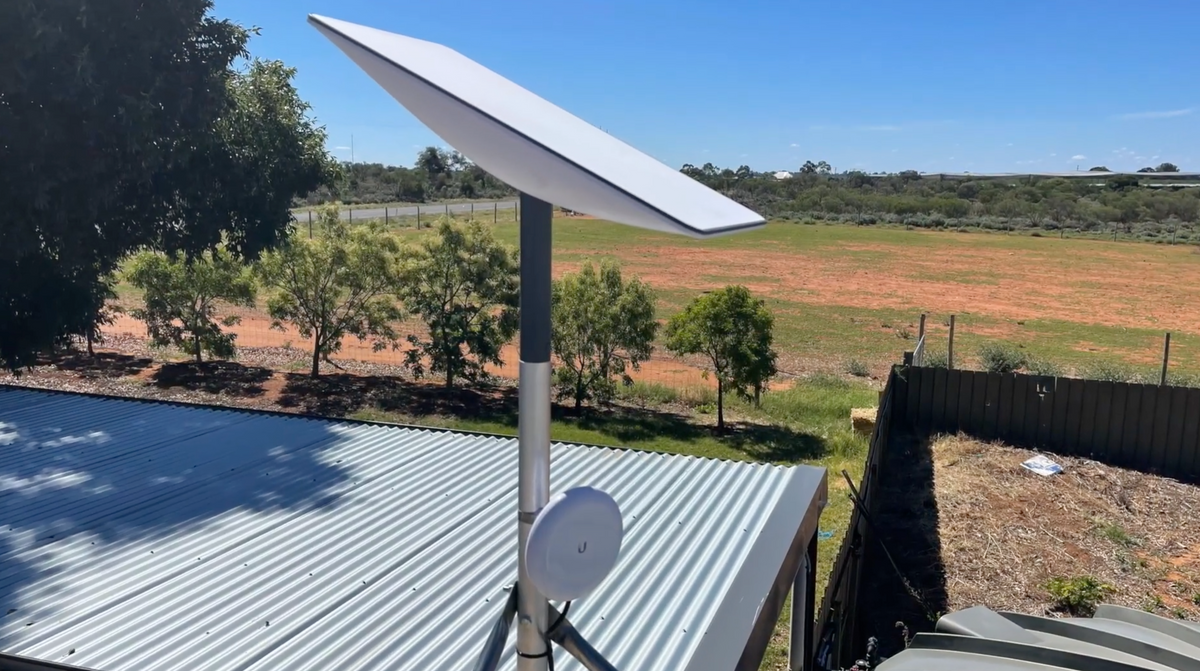
Starlink provides high-speed internet even in the most off-the-beaten-track places, thanks to a constellation of low Earth orbit (LEO) satellites. However, to achieve optimal performance, a well-executed installation is essential. For individuals aiming to set up their own system, starlink diy pole mount offers a practical solution, elevating the dish for an uninterrupted view of the sky.
Whether you reside in the Outback or simply need a stable connection in the bush, understanding how to properly mount your Starlink dish is crucial. SpaceTek ensures you're equipped with top-of-the-line mounts custom for Australia's rugged conditions. This small yet impactful step can significantly improve both speed and reliability, keeping you seamlessly connected no matter where your trips take you.

Understanding Starlink and Its Requirements
In an ever-connected world, reliable internet is a necessity, but for many remote areas in Australia, connectivity can be a challenge. Enter Starlink, a game-changer in satellite internet technology, revolutionising how rural and isolated communities access online services.
Starlink provides high-speed internet even in the most off-the-beaten-track places, thanks to a constellation of low Earth orbit (LEO) satellites. However, to achieve optimal performance, a well-executed installation is essential. For individuals aiming to set up their own system, starlink diy pole mount offers a practical solution, elevating the dish for an uninterrupted view of the sky.
Whether you reside in the Outback or simply need a stable connection in the bush, understanding how to properly mount your Starlink dish is crucial. SpaceTek ensures you're equipped with top-of-the-line mounts custom for Australia's rugged conditions. This small yet impactful step can significantly improve both speed and reliability, keeping you seamlessly connected no matter where your trips take you.
Clear View of the Sky: Essential for Starlink Performance
For Starlink to deliver its promised speeds and reliability, the dish must have a clear view of the sky. This means no trees, buildings, or other obstructions should block the line of sight between the dish and the satellites. The clearer the view, the stronger and more consistent your connection will be.
Satellite Signal: The Backbone of Starlink
Starlink operates using a network of satellites that orbit the Earth, providing internet coverage to remote and underserved areas. The satellite signal is crucial for maintaining high-speed internet. Any interference, such as tall structures or dense foliage, can disrupt this signal, leading to slower speeds or even connection drops.
Unobstructed Sky: The Key to Consistent Internet
An unobstructed sky is not just a recommendation—it's a requirement for Starlink's optimal performance. By ensuring the dish is placed in an open area, you maximise the chances of a stable connection. This is particularly important in remote Australia, where reliable internet can significantly impact daily life and work.
SpaceTek's Role in Optimising Your Starlink Setup
SpaceTek offers a range of mounts and accessories designed to help you achieve the best possible Starlink performance. Our products are custom for the unique challenges of Australia's diverse landscapes, ensuring your dish remains stable and secure, no matter the weather or location.
By understanding these key requirements and using SpaceTek's high-quality products, you can enjoy fast, reliable internet in even the most remote corners of Australia. Whether you're setting up a home office in the bush or simply want to stay connected during your travels, a well-installed Starlink system is your gateway to the digital world.
Choosing the Right Pole Mount for Starlink
When it comes to setting up your Starlink DIY pole mount, choosing the right materials and equipment is key to ensuring a reliable and long-lasting internet connection. One of the best options available is a fiberglass mast. Here's why:
Fiberglass Mast: The Ideal Choice
Non-Conductive and Safe
Fiberglass masts are non-conductive, meaning they do not conduct electricity. This is a significant advantage when it comes to safety, especially in regions prone to lightning. Unlike metal poles, a fiberglass mast reduces the risk of electrical hazards, making it a safer choice for mounting your Starlink dish.
Durability and Longevity
Fiberglass is also known for its durability. It can withstand harsh weather conditions, which is crucial for maintaining a stable connection in remote areas of Australia. With a fiberglass mast, you can be confident that your setup will stand the test of time, ensuring consistent performance regardless of the elements.
Starlink Gen2 vs. Gen3: Understanding Your Dish
When installing your Starlink system, it's important to know which generation of the dish you have. The Starlink Gen2 dish features a 1.5-inch OD round shaft, which is compatible with many standard mounting solutions. SpaceTek offers a range of mounts specifically designed for Gen2 dishes, ensuring a secure fit and optimal performance.
For those using the Starlink Gen3 dish, SpaceTek provides custom solutions to accommodate the unique specifications of this newer model. Our Gen3 mounts are crafted to offer the same level of stability and weather resistance as our Gen2 options, ensuring that all users can achieve the best possible connection.
Why SpaceTek's Mounts Stand Out
SpaceTek's mounts are engineered to meet the specific needs of Starlink users in Australia. Our products are designed to provide:
- Stability in Extreme Conditions: Our mounts hold strong even in high winds and adverse weather, keeping your dish securely in place.
- Ease of Installation: With user-friendly designs, our mounts make the setup process straightforward, even for those new to DIY installations.
- Customisation Options: Our range of accessories allows you to tailor your setup to your unique environment, ensuring the best possible performance.
By choosing the right pole mount, such as a durable fiberglass mast, and ensuring compatibility with your Starlink dish generation, you can optimise your internet setup for reliable service. SpaceTek's high-quality mounts are designed to help you achieve this, providing a seamless connection in even the most challenging Australian landscapes.
Whether you're in a busy city or the remote Outback, having the right equipment is essential for staying connected. Continue reading to find how to assemble and install your Starlink pole mount for maximum efficiency.
Step-by-Step Guide to Installing a Starlink Pole Mount
Preparing Your Equipment
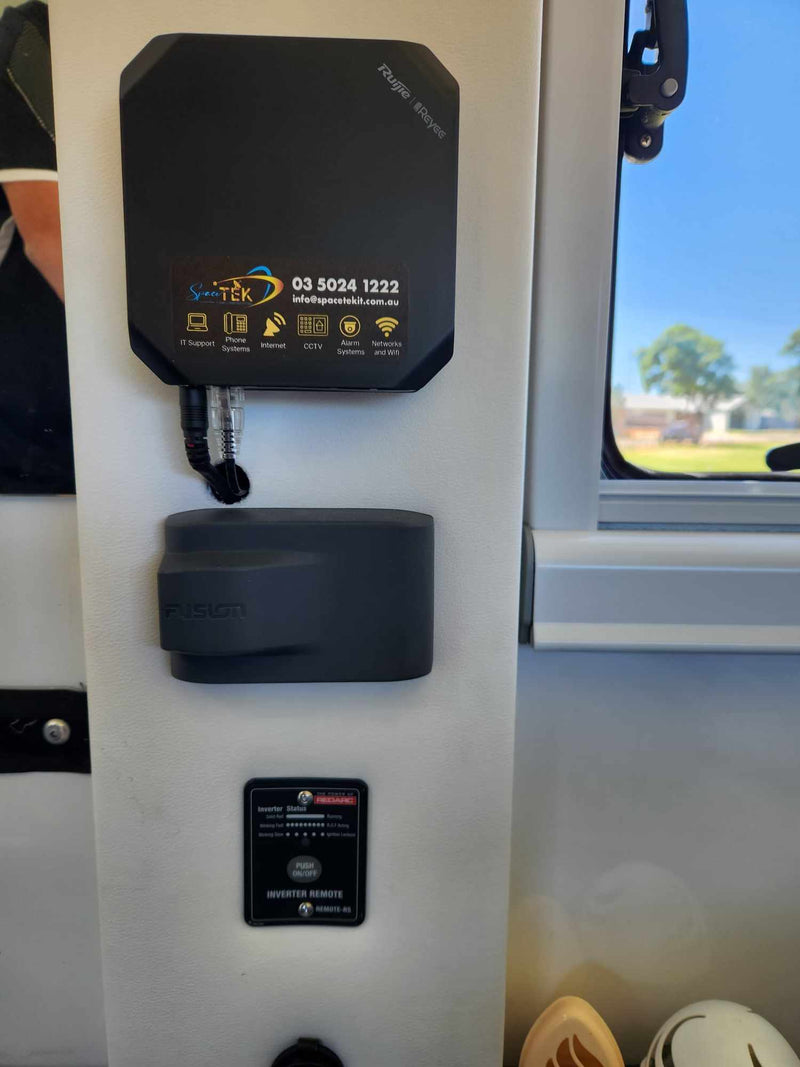
Before diving into the installation, gather all necessary components to ensure a smooth setup. You'll need your Starlink dish, a data cable, and a Starlink adapter kit. These are essential for connecting your dish to the internet and ensuring a stable signal.
The Starlink adapter kit is crucial as it allows you to securely attach the dish to your chosen pole mount. Make sure you have all the components from the kit ready, including any screws or brackets needed for assembly.
Assembling the Mast and Mount
For this setup, we'll be using a fiberglass push-up mast. This type of mast is ideal due to its non-conductive properties, which help reduce the risk of electrical hazards. It’s also durable, making it perfect for Australia's variable climate.
Begin with the Mast: Start by assembling the fiberglass push-up mast. Follow the instructions provided in the assembly guide. Make sure each section is securely locked into place.
Attach the Guying Kit: Stability is key, especially in windy conditions. Use a guying kit to secure the mast. This involves attaching guy lines to the mast and anchoring them to the ground. Ensure the guy lines are taut to keep the mast stable.
Install the Ground Mount Base: If you're setting up on the ground, a ground mount base is recommended. It provides a stable platform for your mast and has a port for the data cable to pass through, which helps in managing cables neatly.
Installing the Starlink Dish
Now that the mast is ready, it's time to mount the Starlink dish.
Attach the Starlink Adapter: Slide the Starlink adapter onto the shaft of your dish, stopping at the marked line to ensure it doesn’t interfere with dish movement. Secure it tightly to prevent any wobbling.
Data Cable Management: Feed the data cable through the mast. This protects it from environmental damage and keeps your setup tidy. Use cable ties or clips to secure the cable along the mast, preventing any slack that could catch the wind.
Securing the Dish: With the adapter in place, attach the dish to the top of the mast. Make sure it’s oriented correctly and securely fastened. A stable dish means a stable connection, so double-check all fasteners.
By following these steps, you’ll have a robust Starlink DIY pole mount setup that is ready to deliver consistent, high-speed internet. With SpaceTek's quality mounts and accessories, you can ensure your installation withstands the elements and provides reliable service, even in remote Australian locations.

Next, we'll explore how to optimise your Starlink setup in Australia, focusing on proper dish placement and cable management.
Optimising Your Starlink Setup in Australia
Proper Dish Placement
For the best performance, your Starlink dish needs a clear line of sight to the sky. This means no trees, buildings, or other obstructions blocking its view. In Australia, where terrain can vary widely, it's crucial to find the right spot for your dish to avoid these issues.
Spacetek mounts are perfect for this task. They help lift your dish above common obstacles, ensuring a direct path to the satellites. These mounts are designed for stability and adjustability, so you can fine-tune the dish's angle for the best possible signal.
- Stability in High Winds: Keeps your dish steady, even during stormy weather.
- Adjustability: Allows you to change the angle easily, optimizing signal reception.
- Durability: Made to withstand harsh Australian conditions, including rust and weatherproofing.
Cable Management
Managing your data cables is essential for a neat and efficient setup. Exposed cables can suffer from wear and tear, leading to signal interference or failure. Spacetek’s cable management solutions offer a simple way to protect and organize your cables.
Use weatherproof cable sleeves to shield your cables from the elements, and secure them with heavy-duty cable ties and cable clips. This keeps them in place and prevents tangling or damage.
- Reduced Wear and Tear: Protects cables from environmental damage.
- Improved Durability: Weatherproof materials ensure cables last longer.
- Cleaner Setup: Tidy cables reduce the risk of tangles and damage.
Dish Covers for Protection
Australia's climate can be harsh, with heavy rain, snow, and extreme temperatures. Protecting your dish from these elements is vital for maintaining a strong connection. Dish covers are a simple but effective solution.
Made from weather-resistant materials, these covers shield your dish from snow, debris, and rain. This not only keeps your dish clean but also improves its performance by preventing physical obstructions.
- Protection from Snow and Ice: Prevents accumulation that can block signals.
- Cleaner Dish: Reduces the need for frequent maintenance.
- Improved Signal: Ensures consistent communication with satellites.
With these strategies, you can ensure that your Starlink DIY pole mount setup is optimized for the best performance possible, even in remote Australian locations. Proper placement, effective cable management, and protective covers will keep your internet fast and reliable, no matter the weather.
Next, we'll address some frequently asked questions about setting up a Starlink pole mount.
Frequently Asked Questions about Starlink DIY Pole Mount
Can I mount Starlink on a pole?
Yes, you can mount Starlink on a pole, and it can be particularly beneficial in areas with obstructions. A pole mount lifts the dish, giving it a clear line of sight to the sky, which is essential for optimal performance. This setup is ideal for locations where trees, buildings, or other structures might block the signal.
Using a fiberglass pole is recommended because it is non-conductive, reducing the risk of lightning strikes and prolonging the life of your Starlink equipment. This makes it a safer choice for mounting your dish.
Does Starlink work better on a pole?
Mounting your Starlink dish on a pole can significantly improve its performance. The key advantage is signal strength. By lifting the dish above obstructions, you ensure a direct path to the satellites, which can improve your internet speed and reliability.
Spacetek mounts offer adjustable options that allow you to fine-tune the dish's position. This adjustability is crucial for adapting to changes in the environment, such as the growth of nearby trees or new constructions. With a stable and liftd position, your Starlink dish can maintain a more consistent connection.
Can you drill through the Starlink pole?
Drilling through the Starlink pole is generally not recommended due to safety precautions. The poles are designed to maintain structural integrity and stability. Drilling could weaken the pole, making it susceptible to damage from environmental factors like wind or rain.
If you need to run an Ethernet cable or other wiring, consider using a ground mount base kit with built-in ports for cable management. This allows you to route cables neatly without compromising the pole's structure. Proper cable management not only protects the cables but also ensures a tidy and efficient setup.
By following these guidelines, you can ensure your Starlink setup is both effective and safe, providing reliable internet connectivity even in challenging environments.
Improve Your Starlink Experience with SpaceTek Australia
When it comes to enhancing your Starlink experience, choosing the right mounting solutions is crucial. At SpaceTek Australia, we specialise in providing high-quality, rust-resistant mounts that ensure your Starlink dish operates at its best. Our mounts are designed to withstand Australia's harsh climate, offering stability and durability even in extreme weather conditions.
Why Choose SpaceTek?
SpaceTek's mounts are crafted from premium materials, ensuring they are both lightweight and robust. Our products are custom to meet the unique demands of Starlink users, providing secure and stable installations that guarantee optimal dish performance. By elevating your dish with our custom mounts, you can achieve a clearer line of sight to the sky, reducing interference and enhancing signal strength.
Optimal Dish Performance
A well-placed and securely mounted Starlink dish is key to maintaining a reliable internet connection. Our mounts not only lift your dish to avoid obstructions but also allow for precise adjustments to maximise signal reception. This adaptability is especially important in dynamic environments where changes such as growing foliage or new constructions may occur.
Investing in SpaceTek's mounting solutions means investing in long-term performance. With our mounts, you can enjoy consistent high-speed internet, whether you're in a busy city or a remote corner of Australia.
Find More About Our Starlink Mounting Solutions and ensure your internet connection is always at its peak performance.
With SpaceTek Australia, you're not just buying a product; you're securing reliable connectivity wherever you are.
Leave a comment
This site is protected by hCaptcha and the hCaptcha Privacy Policy and Terms of Service apply.