Why Proper Starlink Placement Makes All the Difference
Getting your Starlink Dishy in the right spot isn't just about getting internet—it's about getting reliable internet. The difference between a well-placed dish and a poorly positioned one is the difference between seamless streaming and constant, frustrating dropouts.
Your Dishy needs an unobstructed 110° view of the sky to maintain a strong connection with Starlink's satellites. Common obstacles like trees, buildings, or even an old TV antenna can cause service interruptions. With the right mounting solution and placement, you can avoid these headaches entirely.
Starlink roof mounting options are designed for different needs:
- Roof Mounts: Ideal for slanted, shingled roofs.
- Ridge Mounts: A no-drill option for roof peaks.
- Wall Mounts: For exterior walls with overhangs.
- Pole Mounts: Attaches to existing poles or masts.
- Non-Penetrating Clamps: Perfect for metal roofs without voiding warranties.
At SpaceTek Australia, we've seen how the right mount transforms the user experience, especially with our solutions designed for harsh Australian conditions.
Understanding Your Dishy and Starlink Signal
Your Starlink Dishy is a sophisticated antenna that communicates with thousands of low-Earth orbit (LEO) satellites. Unlike traditional satellite internet that uses distant satellites, Starlink's are much closer, resulting in faster speeds and lower latency (less lag).
However, this technology requires a clear line of sight to the sky. Imagine an invisible 110° cone extending upwards from your dish; anything that enters this cone, like trees, buildings, or other structures, will obstruct the Starlink signal and cause dropouts.
Even weather can have an impact. While Dishy is built for Australian conditions, very heavy rain or snow might cause temporary slowdowns.
This is why Starlink placement is so critical. A dish mounted high on a roof with a clear view will always outperform one on the ground near obstacles. Getting the placement right is the key to open uping reliable, high-speed Starlink connectivity.
Best Locations for Your Dishy
To get the best performance, your Dishy needs the most unobstructed view of the sky possible.
Outdoors: The Gold Standard
For optimal Starlink placement, outdoor mounting is always the best choice.
- Roofs: This is the ideal location. Using Starlink roof mounting options gets your Dishy high above common obstructions like sheds, fences, and trees.
- Open Yards or Poles: If your roof isn't an option, a pole mount in a clear, open area can also provide an excellent line of sight.
- Balconies: A good choice for apartments, but be mindful of surrounding buildings or trees that could block the signal.
TIP: Before you install anything, use the Starlink app's obstruction checker. Walk around your property and point your phone's camera at the sky from potential mounting spots. The app will show you exactly what might block your signal, saving you hours of guesswork.
Indoors: A Compromise Solution
If outdoor mounting isn't possible, you can place Dishy indoors, but expect a drop in performance.
- Best Spot: Near a large, clear window facing the most open part of the sky.
- What to Avoid: Thick walls, metal window screens, and tinted glass will significantly weaken the signal.
Indoor placement can provide a connection, but it will likely be slower and less stable than a proper outdoor installation.
Avoiding Common Placement Mistakes
Many common Starlink issues stem from a few avoidable placement errors. Here’s what to watch out for:
- Trees: This is the number one signal killer. Even a small tree can grow and become a major obstruction. Ensure your Dishy has a clear view, well away from any foliage.
- Walls and Metal Objects: Your own house, a neighbour's shed, or an old TV antenna can create "shadows" where the dish can't see the satellites. Metal is especially bad as it can block and reflect signals.
- Other Electronics: Mounting Dishy too close to other equipment, like air conditioning units, can cause electronic interference and an unreliable connection.
- Ground-Level Placement: Leaving Dishy on its basic stand on the lawn or tucked behind a chimney severely limits its performance. You won't get the speeds you're paying for.
The solution is simple: use the Starlink app's obstruction tool before you decide on a final spot. Lift your dish using a proper mount, and pay attention to the app's warnings—even small red areas can cause dropouts.
For more detailed guidance, check out our Mounting Starlink Dish Outdoors: A Beginner's Guide.
Pro Tips for Optimising Starlink Placement
To get the absolute best performance, fine-tune your setup with these pro tips for the long haul.
- Lift Your Dish: This is the golden rule. The higher your dish, the clearer its view. Using Starlink roof mounting options is the most effective way to lift your dish above potential obstacles and ensure a reliable connection.
- Use the App's Obstruction Checker: Don't just glance at it once. Use the app to test multiple spots and aim for zero obstructions. This is the single best tool for preventing placement headaches.
- Consider Seasonal Changes: A tree that's bare in winter can become a dense, signal-blocking obstacle in summer. Plan for year-round clearance.
- Plan for the Future: Are you or your neighbours planning any new construction or landscaping? Think five years ahead to avoid having to move your dish later.
- Check for New Obstructions Regularly: Tree growth, new structures, or even climbing vines can create problems over time. A quick monthly check with the app can catch issues before they impact your service.
TIP: For Australia's harsh conditions, from coastal salt spray to outback sun, choosing durable hardware is crucial. Our mounts are engineered to last. For more on this, see our guide on How to Find Durable Starlink Mounts for Harsh Aussie Conditions.
Mounting and Safety Considerations
Once you've found the perfect spot, it's time to secure your Dishy safely. Using the right Starlink roof mounting options is key to a stable, long-lasting installation.
Choosing the Right Mount
- For Shingle Roofs: A versatile roof mount combined with a flashing kit offers superior, watertight protection.
- For Metal Roofs: Use non-penetrating clamps to attach to the seams without drilling holes, which can void your roof's warranty. Ensure they are made of corrosion-resistant materials like stainless steel.
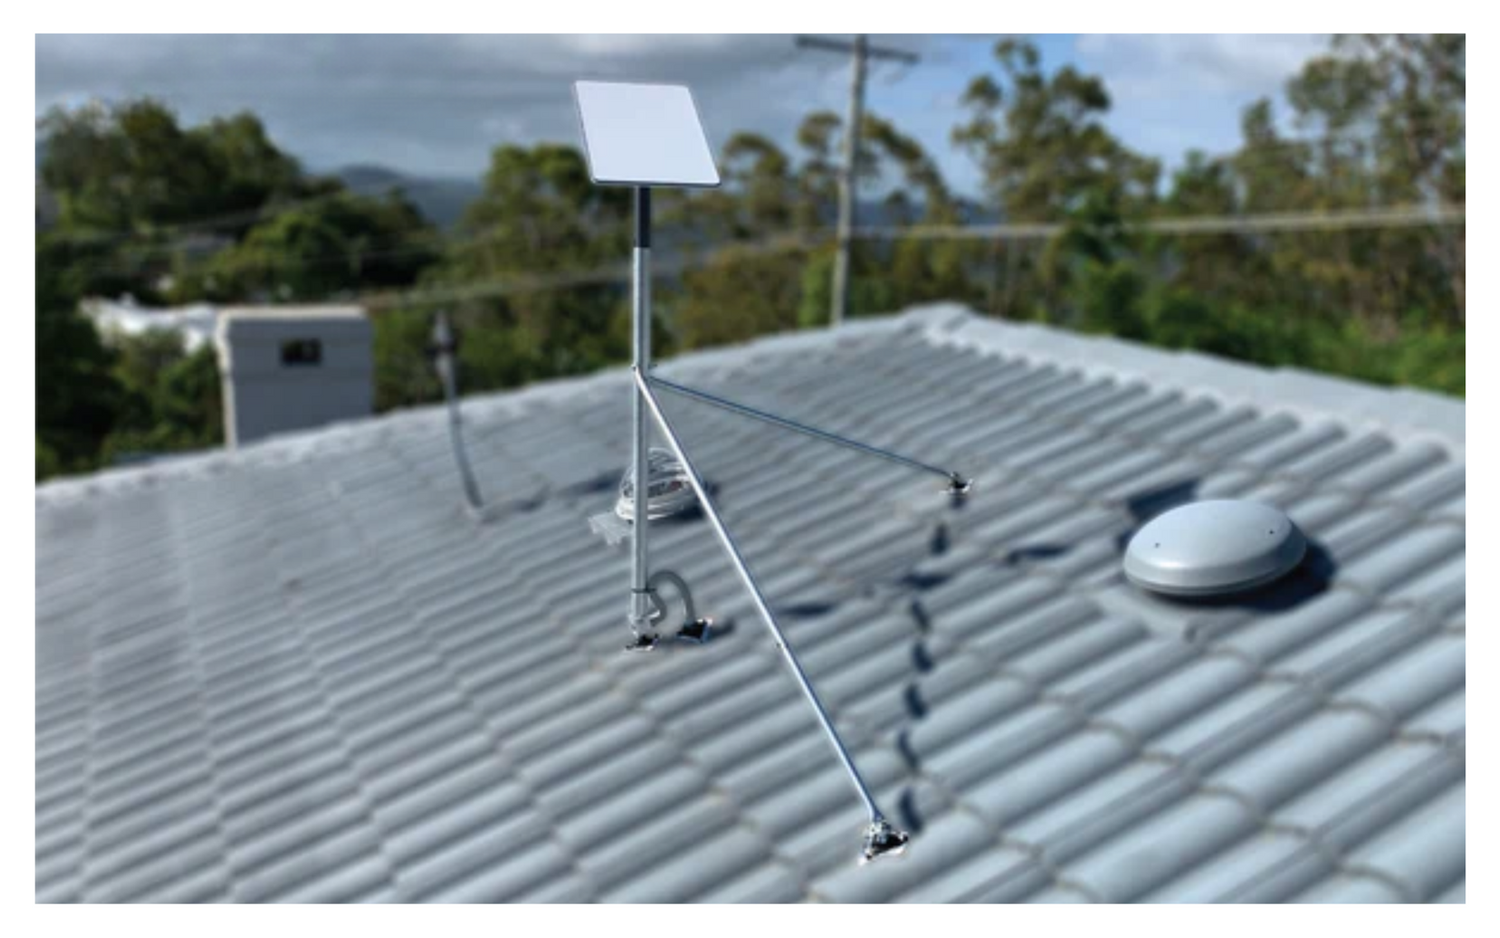
- For Tile and Flat Roofs: A non-penetrating ridge mount is often best, as it sits on the roof's peak using ballast weights, requiring no drilling.
- For Existing Poles: A dedicated pole mount or adapter is a versatile option for mounting Dishy on an existing pole or mast.
Safety First, Always
Working on a roof is dangerous. If you are not 100% comfortable with heights and the work involved, hire a professional installer. Your safety is paramount.
If you proceed with a DIY installation:
- Never work in wet or windy conditions.
- Use a sturdy ladder and wear non-slip boots.
- A safety harness is essential. When working at heights, always follow official safety guidelines, such as those provided by Safe Work Australia.
- Use high-quality sealant for any holes you drill and create a "drip loop" with the cable to prevent water from entering your home.
Other Considerations
- Warranty: Drilling into your roof can void its warranty. Non-penetrating mounts are an excellent way to avoid this.
- Compatibility: Ensure your mount is compatible with your Starlink generation (e.g., Gen 2 vs. Gen 3). We stock mounts for all versions.
- Professional Help: A professional installation provides peace of mind, ensuring the job is done safely and correctly with the right tools and weatherproofing.
Conclusion: Get the Best from Your Starlink
Getting the best performance from your Starlink comes down to three key principles: achieving a clear line of sight, elevating your Dishy, and avoiding obstructions.
You've invested in powerful technology; the right placement ensures you get the speed and reliability you paid for. The Starlink roof mounting options we've discussed are the foundation of a great internet experience, providing a stable and secure base for your Dishy.
Always use the Starlink app's obstruction checker to find the perfect spot, and don't hesitate to re-check it periodically as your environment changes. Most importantly, prioritise safety. If you have any doubts about installing a roof mount yourself, hire a professional.
With the right placement and a quality mount designed for Australian conditions, you're ready to enjoy the freedom of high-speed satellite internet.
Ready to secure your Starlink Dishy for optimal performance? Explore our full range of Starlink mounts and accessories designed to withstand the unique challenges of the Australian environment.


Leave a comment
This site is protected by hCaptcha and the hCaptcha Privacy Policy and Terms of Service apply.