
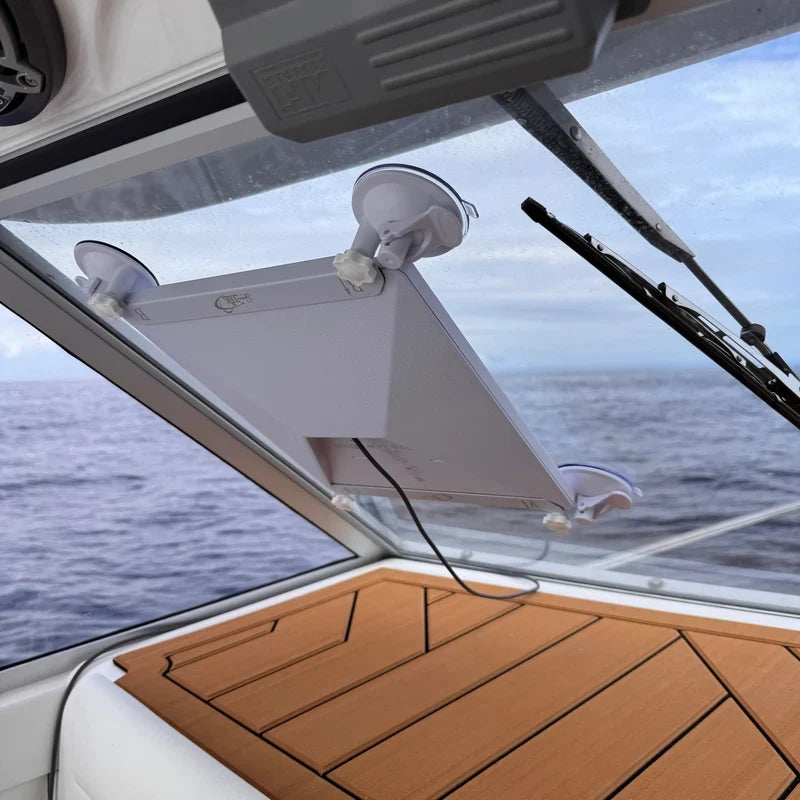
What Should You Check Before Choosing a Starlink Mini Suction Mount?
A Starlink Mini suction mount can provide a neat, removable way to position a Starlink Mini on suitable vehicle glass while parked. Choose a smooth, clean, non-porous surface with enough flat contact area, keep the setup clear of the driver’s view, airbags, mirrors, sensors, vents and controls, and test the hold before use.
Suction mounting can suit caravans, 4WDs, vans, boats and temporary camp setups because it avoids permanent drilling. It is not suitable for every windscreen or glass sunroof: curvature, coatings, accessible mounting space and obstructions can affect both adhesion and satellite reception. Clean and dry the glass and cup faces, engage any locking mechanism fully, then recheck the contact during an extended stop, particularly in hot conditions.
For Starlink’s own service guidance, see Starlink’s official guidance.
The number of cups is only one part of the decision. A four-cup arrangement spreads contact across a larger area, while a dual-cup design may better suit a simpler dashboard-supported position. In either case, follow the intended use for the specific product and remove a temporary glass-mounted setup before driving.
Before choosing a position, consider the whole setup rather than the cups alone. The best location gives the mount a broad, reachable area of glass, keeps the Mini stable while the vehicle is parked and leaves enough room to connect the cable without placing strain on the mount. For example, a large, flat windscreen area may be more practical than a smaller sunroof panel with limited access. However, the chosen position still needs a clear view of the sky and must not interfere with the vehicle’s safety systems or normal controls.
Hi, I'm Andrew Ziogas, managing director at SpaceTek Australia, and I work with vehicle owners who need practical Starlink mounting options for touring, camping and remote work. The right choice starts with the vehicle’s available mounting surface and how the setup will be used.
How Do SpaceTek’s Starlink Mini Suction Mounts Compare?
SpaceTek lists two Starlink Mini glass-mounting designs for temporary stationary setups: a four-cup High-Adhesion Suction Cup Windscreen Mount and a dual-cup Starlink Mini Windscreen Suction Mount. Both require smooth, clean, non-porous glass, but their mounting arrangements suit different vehicle layouts and preferences.
What Does the High-Adhesion Suction Cup Windscreen Mount Offer?
The High-Adhesion Suction Cup Windscreen Mount, Powder-Coated, for Starlink Mini uses four high-adhesion suction cups with a rigid powder-coated steel frame. It holds the Mini in a cradle rather than relying on the built-in kickstand, making it a practical option for a temporary stationary glass setup.
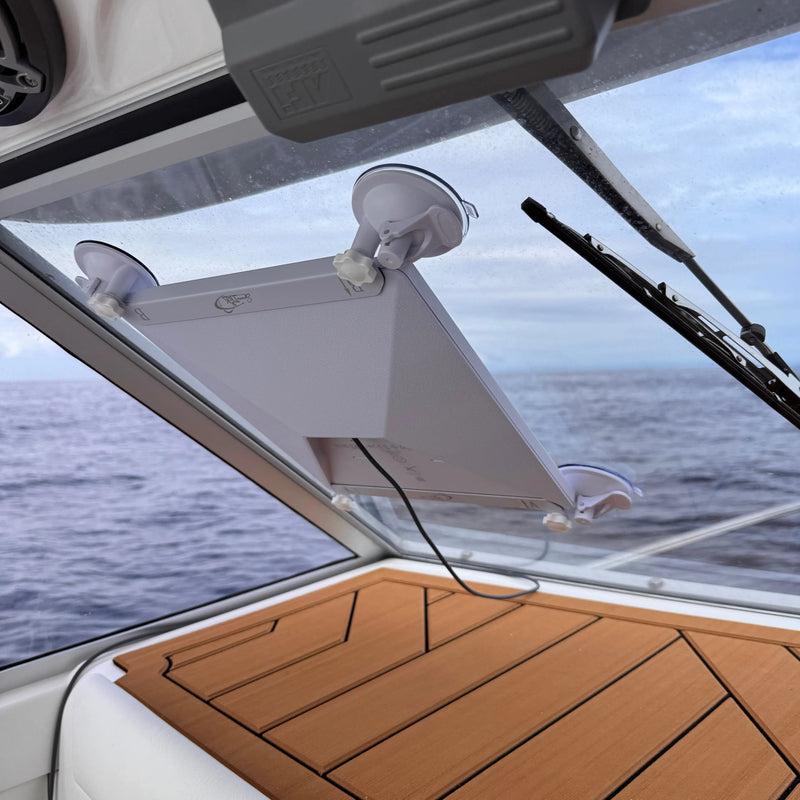
The white mount is designed for tool-free placement on suitable glass. Surface preparation still matters: dust, oils and high cabin heat can reduce suction adhesion. It is for stationary use only, so it should be removed and stored before the vehicle moves.
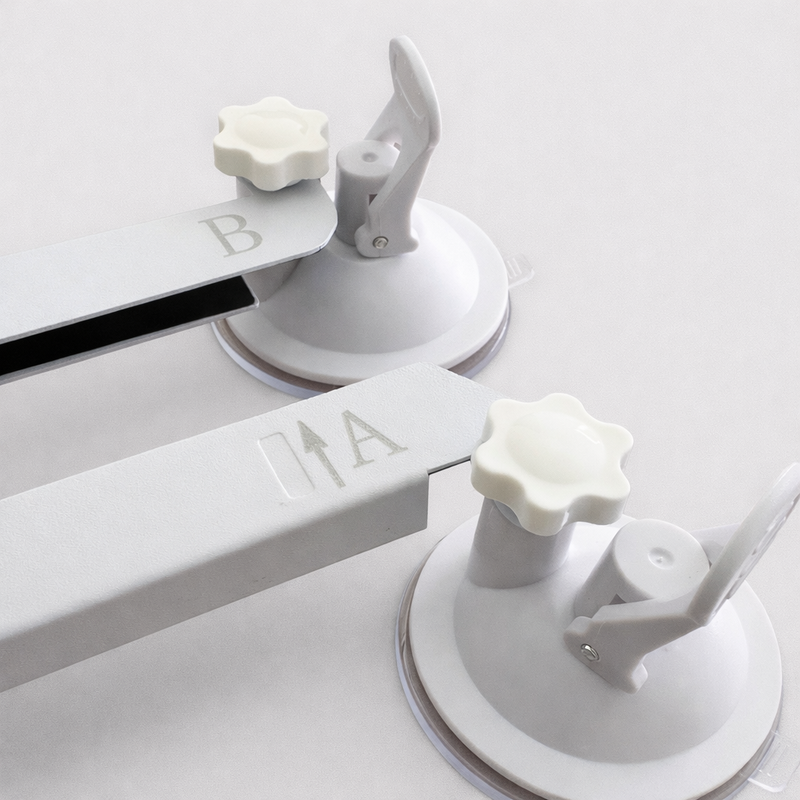
When Is the Starlink Mini Windscreen Suction Mount a Better Fit?
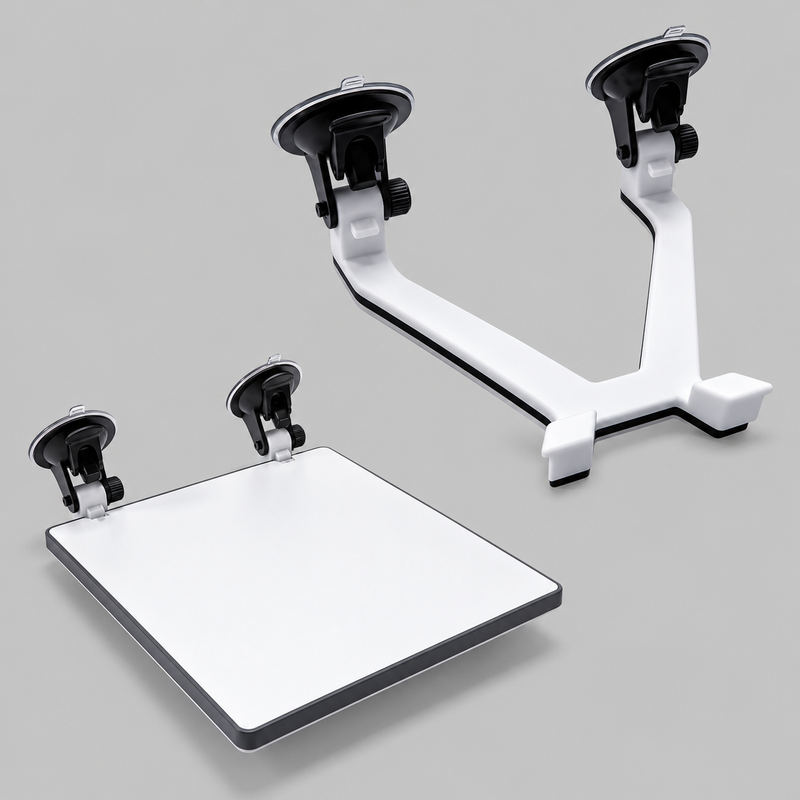
The Starlink Mini Windscreen Suction Mount uses two locking suction cups and a shaped support frame, with white and black colour options. It is intended for a parked vehicle, where the dashboard supports the base and the glass-mounted position remains clear of safety equipment and controls.
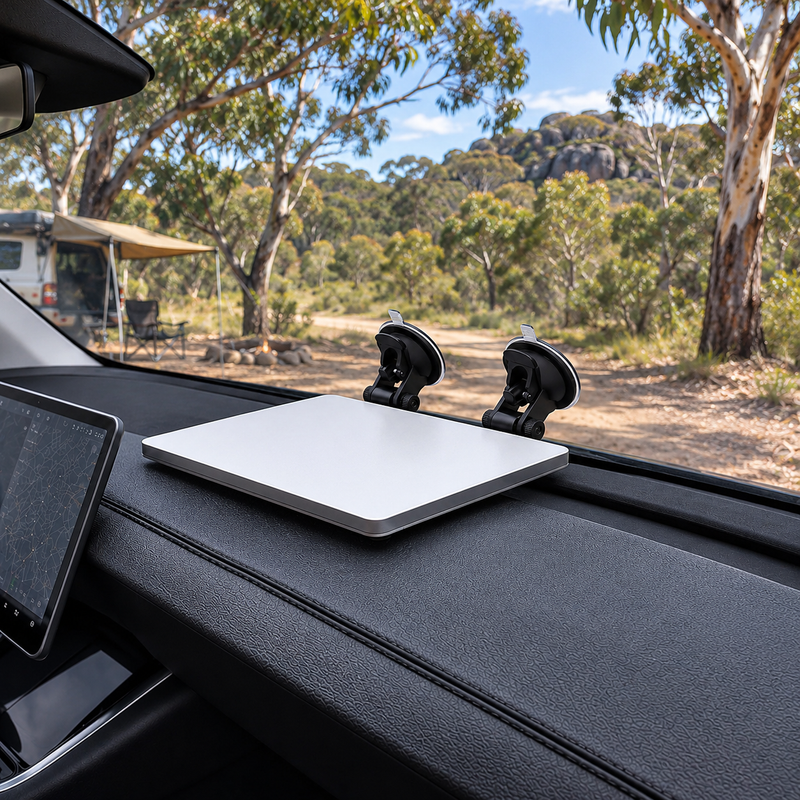
This Starlink Mini windscreen mount can suit owners who prefer a simpler temporary placement and are prepared to check the contact points regularly. Fit the cups flat against clean glass, engage the locks, route the cable with enough slack that it cannot pull on the mount, and remove the assembly before driving.
How Should You Compare the Two Suction Mount Designs?
Why Does Surface Preparation Matter?
The main difference is the style of support each design provides. The four-cup High-Adhesion Suction Cup Windscreen Mount distributes its contact across a wider glass area and holds the Mini in a dedicated cradle. Therefore, it may suit owners who have adequate flat glass space and want a more substantial removable setup. The dual-cup Starlink Mini Windscreen Suction Mount uses a shaped support frame and dashboard-supported positioning, which can be a better fit where a simpler arrangement is easier to place and remove.
Neither design should be selected solely because it has more or fewer cups. Glass shape, access to the mounting position, cable routing and the way the vehicle is used while parked are equally important. A mount that sits flat on clean glass and can be checked easily is more useful than a larger arrangement forced onto a curved or obstructed surface.
A good suction contact starts with clean, dry glass and clean cup faces. Check the mount before connecting cables and inspect it again if the cabin temperature changes. If the position becomes unstable, remove the setup rather than trying to compensate with extra force or an unsuitable mounting surface.
What Should You Check Before Buying a Starlink Mini Glass Mount?
Use this quick checklist to compare the vehicle and the mount before purchase:
- Glass surface: Confirm there is a smooth, clean, non-porous area large enough for the cup arrangement to sit flat.
- Mounting access: Make sure the cups can be applied, locked and released without stretching across a difficult-to-reach area.
- Cable path: Plan a route that avoids sharp bends, doors, moving sunroof parts and tension on the mount.
- Vehicle safety: Keep the setup clear of the driver’s line of sight, airbags, sensors, mirrors, vents and controls.
- Stationary use: Choose a suction setup only when it will be removed and stored before the vehicle moves.
This comparison helps narrow the choice before installation. It does not replace the product instructions or a final check of the current product listing for Starlink Mini compatibility.
When Should You Choose an In-Motion Mount Instead?
A suction mount is best for a temporary stationary setup on suitable glass. If the Starlink Mini needs to stay secured to a vehicle for travel, use a dedicated vehicle mounting solution rather than a glass-mounted suction setup.
How Does the Starlink Mini In-Motion Mount Differ?
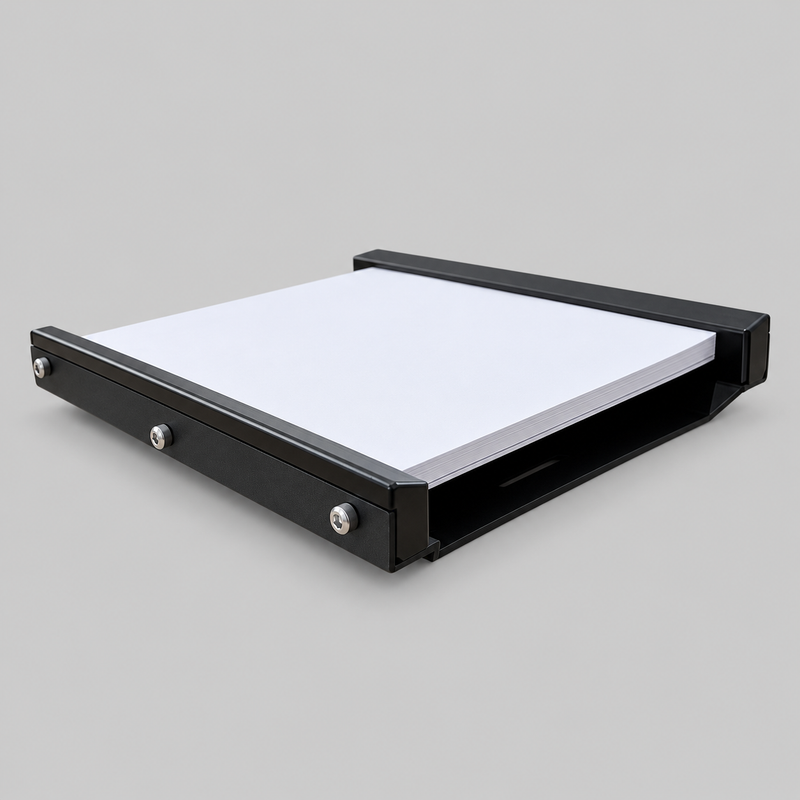
The Starlink Mini In-Motion Mount – Premium Aluminium Construction is the alternative for a properly secured vehicle installation. It uses precision-formed, powder-coated aluminium and CNC-machined engineering-grade polymer rails, with a low-profile design intended to help manage vibration in demanding vehicle conditions.
Which Mounting Method Suits Your Vehicle?
- Windscreen or glass sunroof: Use a suction mount only for a temporary stationary setup on suitable, clean glass.
- Roof rack, tray or structural platform: Consider the In-Motion Mount with an appropriate mechanical fastening method.
- Suitable steel surface: Check whether the listed magnetic mounting accessories are compatible with the intended setup.
- Sports bars or tubular structures: Confirm compatibility before choosing a tube-mounting accessory.
A fixed vehicle installation needs a different level of planning from a temporary glass-mounted setup. Consider the mounting surface, the method used to secure the Starlink mount and how the cable will be protected from movement and weather exposure. In contrast, a suction mount is intended to be installed for a stop and then removed before travel. Keeping those roles separate helps avoid choosing a temporary solution for a job that needs a permanently secured vehicle mount.
For another overview of temporary glass mounting, read SpaceTek’s guide to suction cup mount uses and benefits.
Which Starlink Mini Suction Mount Should You Choose?
Choose the four-cup option when the vehicle has suitable glass space and a more substantial removable mounting arrangement is preferred. Choose the dual-cup windscreen mount when a dashboard-supported, temporary placement better fits the vehicle. Both are intended for stationary use only.
| Consideration | High-Adhesion Suction Cup Windscreen Mount | Starlink Mini Windscreen Suction Mount |
|---|---|---|
| Suction system | Four high-adhesion cups | Two locking cups |
| Frame | Powder-coated steel frame | Shaped support frame |
| Kickstand | Not required | Follow product fitment instructions |
| Colour | White | White or black |
| Best suited to | A larger, four-cup glass-mounting arrangement | A simpler removable windscreen setup |
| Intended use | Stationary | Stationary |
What Should You Check Before Installing Either Mount?
Confirm that the glass is smooth, clean and non-porous, and that the position does not block the driver’s view or any vehicle safety equipment. Check the surface shape, the available contact area and cable routing before installation. Vehicle glass, coatings and nearby structures can affect Starlink reception, so test performance in the chosen position rather than assuming it will be the same in every vehicle.
It is also worth checking how the chosen location will work in everyday use. A position that looks suitable while the vehicle is empty may become awkward once blinds, roof consoles, storage gear or passengers are in place. Therefore, test the reach needed to fit and remove the mount, confirm the cable can be connected without pulling sideways on the cups and make sure the Starlink Mini can be taken down promptly before driving. This practical check can prevent a neat-looking setup from becoming inconvenient on a trip.
For sunroof mounting, consider the movement of the glass and any nearby seals or controls. Do not place the mount where opening, closing or tilting the sunroof could contact the Mini, cable or cups. If the glass is heavily curved, coated or difficult to access safely, a different Starlink mounting approach is usually the more sensible choice.
The Starlink Mini collection can help you review the current range. The right choice depends on the available glass surface, desired cup arrangement and how often the setup will be installed and removed.
Before buying, review the current product page for the exact Starlink Mini compatibility, what is included and the mounting conditions. The four-cup and dual-cup designs are removable glass-mounting options, not interchangeable solutions for every vehicle. If the available surface is curved, coated, obstructed or difficult to reach safely, choose a different mounting approach rather than forcing a suction setup to fit.
Frequently Asked Questions About Starlink Mini Suction Mounts
Can You Mount a Starlink Mini on a Car Windscreen?
Yes, a compatible suction mount can attach to suitable smooth glass for a temporary stationary setup. Choose a low, stable position that leaves the driver’s view, airbags, mirrors, sensors, vents and controls clear. Clean and dry the glass, test the hold and remove the mount before driving.
Can a Starlink Mini Suction Mount Attach to a Glass Sunroof?
It may, provided the sunroof is smooth, non-porous and offers enough accessible contact area for the chosen mount. Check the glass curvature, the location of seals and controls, and the dish’s view of the sky. The actual sunroof design determines whether the surface is suitable.
Can You Use a Starlink Mini Suction Mount While Driving?
No. The High-Adhesion Suction Cup Windscreen Mount and the Starlink Mini Windscreen Suction Mount are intended for stationary use. Remove and store either setup before driving. For a vehicle installation designed for travel, consider the dedicated Starlink Mini In-Motion Mount with a suitable mechanical fastening method.
How Do You Stop a Starlink Mini Suction Cup Mount From Falling Off?
Clean and dry both the glass and suction-cup contact surfaces, position the cups flat, and engage the locks or tabs as directed for the product. Check the hold before connecting cables and inspect it during longer stops. Heat, dust, oils and an unsuitable surface can reduce adhesion.
Will Mounting a Starlink Mini Behind Vehicle Glass Affect Its Signal?
It can. Glass coatings, structural obstructions, the dish angle and the surrounding environment may affect reception. Test Starlink performance in the chosen position and adjust the placement if necessary, rather than relying on a particular vehicle-glass setup to perform identically in every location.
Does a Starlink Mini Suction Mount Require Drilling?
No. The featured suction mounts use removable glass mounting and do not require permanent drilling. That convenience is why they can work well for temporary stationary use, provided the surface is suitable and the setup is removed before the vehicle moves.
What Should You Do Before Removing a Suction Mount?
Disconnect or support the cable first so it cannot tug on the Starlink Mini as the cups are released. Then release each cup according to the product’s locking mechanism rather than pulling the mount away from the glass. Wipe the cup faces and store the mount where dust, oils and sharp objects will not affect the next installation. As a result, the cups are easier to inspect and prepare before the next stationary setup.
How Do You Choose the Right Starlink Mini Vehicle Mount?
A Starlink Mini suction mount offers a clean, removable option for temporary stationary use on suitable vehicle glass. The four-cup High-Adhesion Suction Cup Windscreen Mount suits buyers who prefer a broader glass-mounting arrangement, while the dual-cup Starlink Mini Windscreen Suction Mount provides a simpler dashboard-supported option.
The decision is easier when it starts with the vehicle rather than the product. First, identify whether there is enough smooth, accessible glass for a temporary stationary setup. Next, decide whether a four-cup arrangement or a simpler dual-cup, dashboard-supported position better suits that space. Finally, if the Mini must remain secured while the vehicle travels, move away from a suction solution and consider a dedicated in-motion Starlink mount instead.
Last reviewed: 16 November 2026. Product availability, Starlink Mini compatibility and vehicle fitment can change. Check the current product listing and applicable Starlink guidance before purchasing or installing a mount.
For a secured travel installation, explore the Starlink Mini In-Motion Mount, or contact the SpaceTek team for help choosing a suitable vehicle setup:
- High-Adhesion Starlink Mini Suction Cup Windscreen Mount for a removable four-cup glass-mounting setup.
- SpaceTek 4WD mounting products for vehicle-ready Starlink mounting options.
- Contact the SpaceTek team for help choosing a suitable Starlink Mini mount.

Leave a comment
This site is protected by hCaptcha and the hCaptcha Privacy Policy and Terms of Service apply.