Why Your Starlink Needs a Proper Tile Roof Mount
A Starlink tile roof mount is a specialised mounting system designed to securely attach your Starlink dish to tile roofing while maintaining optimal performance and protecting your roof's integrity. Unlike standard mounts, these systems account for the unique challenges of tile roofs, including heat management, waterproofing, and the need to drill through brittle ceramic materials.
Key benefits of a Starlink tile roof mount:
- Thermal management - Keeps dish away from radiating roof heat to prevent 50°C shut-off
- Warranty protection - No modifications to dish required, maintaining manufacturer warranty
- Weather resistance - Built to withstand Australian conditions including high winds and UV exposure
- Tile-specific design - Prevents cracking during installation with proper drilling techniques
- Complete hardware - Includes all necessary components for secure, watertight installation
Installation requirements:
- Ceramic drill bits for 12mm holes
- Stainless steel fasteners
- Silicone sealing compound
- Basic DIY skills and safety equipment
Installing a Starlink dish on a tile roof presents unique challenges that standard mounting solutions simply can't handle. The combination of Australia's harsh sun, extreme temperatures, and the fragile nature of roof tiles means you need a mounting system that's been specifically engineered for these conditions.
I'm Aaron Wroblewski, founder of SpaceTek Australia, and I've spent over 25 years developing satellite mounting solutions for Australian conditions. Through my experience with Starlink tile roof mount installations across rural and remote Australia, I've seen how the right mounting system can mean the difference between reliable connectivity and constant frustration.
Why Install a Dedicated Starlink Tile Roof Mount?
When you're setting up Starlink in Australia, especially for remote communities and rural properties, the mounting solution becomes absolutely critical for long-term success. The standard Starlink mount that comes in the box is designed for temporary ground-level installations, not the permanent, liftd installations that most Australian properties require to achieve optimal performance.
Here's something that catches many people off guard: Starlink dishes automatically shut off at 50°C to protect their internal components. During our scorching Australian summers, tile roofs can radiate enormous amounts of heat, easily pushing your dish beyond this thermal threshold. I've seen countless installations fail because the dish was mounted too close to the roof surface without proper airflow considerations.
The science backs this up too. Research on roof thermal loads shows just how much heat these surfaces can generate, making proper spacing absolutely essential for reliable operation.
Starlink Tile Roof Mount Benefits
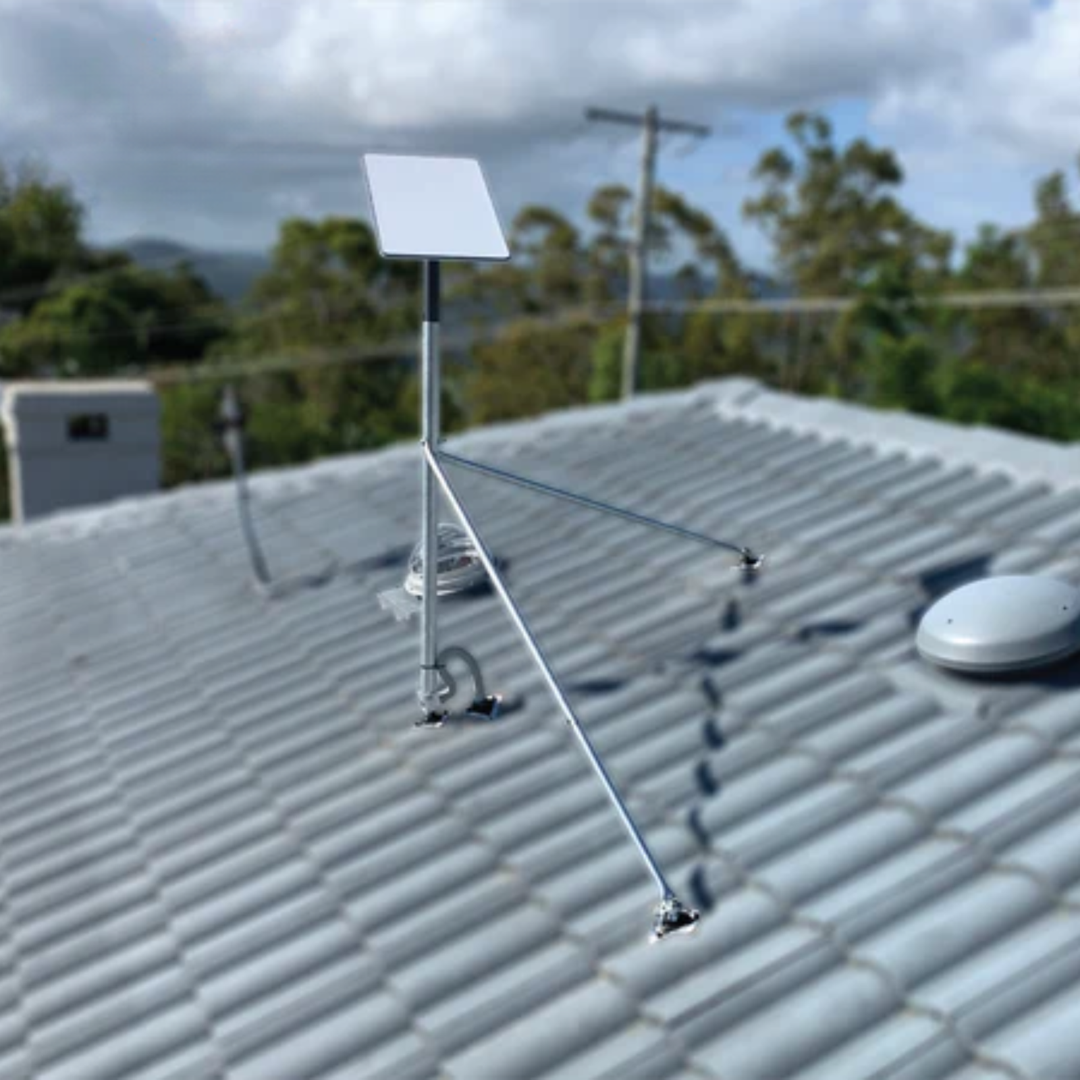
The thermal shut-off avoidance is perhaps the most crucial benefit of a proper Starlink tile roof mount. Our mounting systems are specifically designed to create an airflow gap between the dish and the roof surface, preventing the heat buildup that causes thermal shutdowns. This design consideration becomes even more important for Starlink for Remote Australia applications, where losing connectivity can mean losing contact with the outside world entirely.
Warranty protection is another massive advantage that many people overlook. Our mount kits allow the Starlink dish to clip into the top of the mast in its designed form, meaning no modifications or drilling into the dish leg is required. This maintains your manufacturer warranty while providing a secure, professional installation.
All our mounting hardware is constructed from rust-resistant steel with appropriate coatings for Australian coastal and inland conditions. This isn't just about longevity - it's about maintaining the structural integrity of your installation through years of harsh weather, salt spray, and UV exposure.
Challenges Unique to Tile Roofs
Tile roofs present several installation challenges that simply don't exist with other roofing materials. Brittle clay tiles can crack easily if not drilled properly with the right ceramic drill bits and techniques. The curved profile of most tiles also creates unique waterproofing challenges that require specific sealing approaches to prevent leaks.
Weight distribution becomes another critical factor that many DIY installers underestimate. Unlike metal roofing where you can distribute loads across multiple fasteners, tile installations require careful consideration of the underlying roof structure. Each mounting point must be properly secured to rafters or structural members, not just the tiles themselves.
It's worth noting that Starlink's own documentation explicitly states that their Pivot Mount is not recommended for tile, slate, or clay roofing. This highlights exactly why specialised mounting solutions like ours are essential for tile roof installations.
Choosing the Right Starlink Tile Roof Mount Kit
When it comes to selecting the perfect Starlink tile roof mount for your Australian installation, the choice really comes down to which generation of Starlink dish you're working with. Each generation has different mounting requirements, thermal characteristics, and installation considerations that make one mount better suited than another.
The mast height is another crucial decision point. Our 1.5-metre versions provide that extra clearance you need for obstructions like trees or neighbouring buildings. More importantly, they create valuable space under the dish for mounting secondary equipment like 4G failover antennas or local Wi-Fi links.
For detailed information about what these mounting solutions will cost and how they compare to other options, I recommend checking out our comprehensive guide on Starlink roof mount pricing.
Starlink Tile Roof Mount Roof Kit for Dishy Gen 3 (V4)
Our Tile Roof Mount Roof Kit for Gen 3 (V4) represents everything we've learned about mounting Starlink dishes in Australian conditions. This isn't just another mounting bracket - it's a complete system engineered specifically for the newest Starlink terminals and the unique challenges they present.
The weather-resistant design has been tested in conditions that would make other mounts fail. We're talking about tropical cyclones that batter Queensland's coast, the relentless desert heat of the outback, and the salt-laden winds that corrode everything they touch along our coastlines.
Installation requires drilling three 12mm holes into your tiles using a ceramic drill bit. The complete hardware set includes everything you need for a professional installation: stainless steel fasteners that won't rust in our harsh conditions, sealing compounds that keep the weather out, and detailed instructions that actually make sense.
Starlink Tile Roof Mount for Rectangle Gen 2
The Rectangle Gen 2 mount kit is our most popular solution, designed for the Gen 2 Starlink dishes that most Australian users currently have installed.
The clip-in mast design allows your dish to clip securely into the top of the mast in its designed form, meaning no modifications or drilling into the dish leg is required. This keeps your manufacturer warranty intact while providing the secure, professional installation that Australian conditions demand.
The 50°C shut-off spacing consideration is absolutely critical for Australian installations. During our summer months, tile roofs can reach surface temperatures that would cook an egg. Our mount design ensures adequate airflow around the dish, preventing those frustrating thermal shutdowns that plague poorly designed installations.
Starlink Tile Roof Mount for Round Gen 1
While the Round Gen 1 dishes are becoming less common as people upgrade to newer models, we haven't forgotten about the early adopters who took a chance on Starlink when it first arrived in Australia.
Our Round Gen 1 mount allows the dish to tightly clip into the top of the mast in its designed form, maintaining that all-important warranty protection while providing the secure attachment that's essential for long-term reliability. No modifications or drilling into the dish leg required.
The airflow considerations are even more critical with Gen 1 dishes, as they tend to run hotter than the newer rectangular models. Our mounting design ensures proper ventilation while maintaining the secure attachment that's essential for surviving Australian weather conditions.
Step-by-Step Installation Guide for a Starlink Tile Roof Mount
Installing a Starlink tile roof mount is a rewarding DIY project that can dramatically improve your internet performance, but it requires careful preparation and the right approach. The process involves working at height and drilling through roofing materials, so safety must be your absolute priority. For additional guidance on roof installations, our comprehensive roof installation guide provides valuable insights for Starlink installation Australia projects.
The beauty of our SpaceTek mounting systems is that they're designed specifically for Australian conditions and DIY installation. Whether you're setting up Starlink for Remote Australia properties or improving connectivity for remote communities, following these steps will ensure a professional-quality installation.
Prepare the Roof and Tools
Before you even think about climbing onto your roof, proper preparation is essential. Your personal protective equipment (PPE) isn't optional - safety glasses protect your eyes from tile fragments, work gloves give you better grip, and non-slip footwear prevents dangerous slips on tile surfaces.
Ladder safety deserves special attention. Position your ladder at the correct angle, ensure it's on stable ground, and have someone spot you if possible. For steep roofs, consider using a safety harness.
Locating rafters is crucial for a secure installation. You're not just attaching to the tiles themselves - you need to secure into the structural timber beneath. Use a stud finder designed for roof applications, or employ the traditional tap test to identify solid timber.
Your essential tool kit should include ceramic drill bits in both pilot and 12mm sizes, a variable speed drill, a complete socket set for fasteners, a spirit level, measuring tape, silicone sealant with a proper gun, cable clips and UV-stable ties, and a marker pen for marking hole positions.
Install the Bracket and Mast
The installation process begins with marking your hole positions using the mounting bracket as a template. Take your time to double-check measurements and ensure the bracket will sit level when installed. Starlink dishes must be mounted within 40 degrees of vertical for optimal performance.
Drilling through tiles requires patience and the right technique. Ceramic drill bits are essential - standard masonry bits will crack tiles almost instantly. Start your drill at slow speed to prevent the bit from wandering, begin with a pilot hole, then gradually increase to the full 12mm diameter.
When inserting fasteners, whether dynabolts or stainless steel lag screws, ensure they penetrate well into the underlying roof structure. The tiles themselves provide minimal holding power - it's the timber rafters that give your installation its strength.
Mount the Dish & Run Cables
One of the advantages of our SpaceTek mounting systems is the clip-in dish attachment. Your Starlink dish simply clips into the top of the mast without requiring any modifications. This preserves your manufacturer warranty while providing a secure connection.
Cable routing requires careful planning to protect your investment. Route cables under tiles where possible to shield them from UV exposure and weather damage. Use UV-stable cable ties and clips to secure the cable run - cheap ties will become brittle and fail within months in the Australian sun.
Starlink Tile Roof Mount Final Checks
Once your installation is complete, the Starlink app obstruction scan becomes your best friend. This tool provides real-time feedback on potential signal blockages and helps optimise your dish positioning.
Positioning verification is critical for performance. Ensure your dish sits within the 40-degree vertical tolerance specified by Starlink. The app will alert you to positioning issues, but it's worth double-checking with a spirit level during installation.
Finally, secure any cable slack to prevent wind damage and ensure a tidy installation. Loose cables can create noise in windy conditions and may suffer damage from constant movement.
Weatherproofing, Wind Protection & Maintenance
Australian weather doesn't mess around, and your Starlink tile roof mount needs to be ready for whatever Mother Nature throws at it. From the scorching heat of the outback to the salt-laden winds of our coastlines, proper weatherproofing and ongoing maintenance are what separate a reliable installation from a costly headache.
Keeping the Installation Watertight
Water is the enemy of any roof installation, and tile roofs present unique challenges for maintaining watertight seals. The key is creating multiple layers of protection that work together to keep moisture out of your home.
Start with silicone sealant as your primary defence against water ingress. Apply a generous bead around all penetrations, ensuring complete coverage. The sealant needs to bond properly with both the tile surface and the mounting hardware, so clean surfaces thoroughly before application.
Mastic tape provides an additional barrier, particularly useful for creating watertight seals around irregular surfaces. For extra protection in vulnerable areas, over-tile lead flashing can redirect water away from penetrations.
No seal lasts forever in Australian conditions. UV radiation, thermal cycling, and severe weather all take their toll. That's why annual inspection is absolutely essential. Check all seals for cracking or deterioration, particularly after severe weather events.
Protecting Against Aussie Weather Extremes
Australia's weather extremes demand special consideration for any outdoor installation. UV exposure is particularly brutal, capable of degrading plastic components and cable insulation within a few years if not properly protected. Our mounting systems use UV-stable materials specifically chosen for Australian conditions.
For properties in salt-spray zones near the coast, corrosion becomes a major concern. All SpaceTek hardware uses marine-grade stainless steel fasteners and corrosion-resistant coatings.
The most critical consideration for Australian installations is wind protection. Starlink mounts aren't designed for hurricane or tornado wind loads, which means tethering should be used in all cases to prevent failure during unexpected wind events. Secure Starlink dish installations require high-wind tethers as an additional safety measure beyond the standard mounting hardware.
Ongoing Care for Your Starlink Tile Roof Mount
Regular maintenance is what transforms a good installation into a great one that lasts for years. Re-torque all fasteners annually - thermal cycling from Australia's temperature extremes can cause loosening over time.
Clean debris from around the dish and mounting hardware regularly. Leaves, bird nests, and accumulated dust can interfere with proper airflow and create corrosion points.
Don't forget about cable protection. UV exposure can degrade cable insulation over time, particularly in areas where the cable is exposed to direct sunlight. Check cable runs annually and add additional protection if needed.
The investment in proper weatherproofing and regular maintenance pays dividends in system reliability and longevity. A well-maintained Starlink tile roof mount installation can provide years of reliable service, even in Australia's challenging conditions.
Frequently Asked Questions about Starlink Tile Roof Mounts
When it comes to installing a Starlink tile roof mount, I get the same questions time and time again. After helping hundreds of Australian customers get their systems up and running, I've noticed that most concerns centre around three main areas: drilling through tiles, warranty protection, and finding the perfect spot on the roof.
Do I have to drill through the tiles?
Yes, you absolutely need to drill through the tiles for a secure Starlink tile roof mount installation. Our SpaceTek tile roof mount kits require drilling three 12mm holes through the tiles to reach the underlying roof structure.
Those non-penetrating mounts you might see advertised simply don't work on tile roofs. The uneven surface of tiles means ballast weights can't provide stable support, and you risk damaging the tiles from movement and vibration.
The key to successful tile drilling is using the right ceramic drill bit and taking your time. Start with a slow speed to prevent cracking, and always use a pilot hole first. With proper technique, it's a straightforward process that any confident DIY installer can handle.
Can I install a Starlink tile roof mount without voiding warranty?
Absolutely, and this is one of the biggest advantages of using our SpaceTek mounting systems. Our Starlink tile roof mount kits are specifically designed to preserve your Starlink warranty completely. The dish clips directly into the top of the mast without any modifications whatsoever.
You won't need to drill holes in the dish leg or make any alterations to the Starlink hardware. This clip-in design maintains the manufacturer warranty while providing the secure, professional installation you need for Australian conditions.
Our mounting systems work with all Starlink generations - from the original Round Gen 1 dishes through to the latest Gen 3 (V4) models. Each kit is specifically engineered for its respective dish type, ensuring proper fit and performance.
How do I choose the best spot on a tiled roof?
Finding the optimal location for your Starlink tile roof mount involves balancing several important factors. The most obvious consideration is clear sky view - you need unobstructed access to the satellites overhead. Use the Starlink app's obstruction scan feature to identify potential signal blockages.
Structural support is equally critical. Your mounting point must be positioned over underlying rafters or structural members, not just attached to the tiles themselves. Use a stud finder or tap test to locate the roof structure before marking your holes.
Thermal considerations are particularly important in Australia's harsh climate. While our mounting systems provide thermal spacing to prevent the dreaded 50°C shutdown, positioning matters too. Avoid areas where the dish will be exposed to excessive heat reflection from the roof surface.
Consider practical factors like cable routing and maintenance access. You'll need to run cables from the dish to your indoor equipment, so choose a location that allows for clean cable management.
Stay Connected, No Matter Where You Are
At SpaceTek Australia, we understand that reliable internet connectivity isn't just a convenience—it's a lifeline for many Australians. Whether you're managing a remote station in the outback, running a business in regional Australia, or simply want the best possible performance from your suburban Starlink setup, our Starlink tile roof mount solutions are engineered specifically for the unique challenges of Australian conditions.
After 25 years of developing satellite mounting solutions across this vast continent, we've learned that one size definitely doesn't fit all when it comes to Australian installations. From the salt-laden winds of the coast to the dust storms of the interior, from tropical cyclones in the north to alpine snow in the south, our mounting systems have been tested in every environment Australia can throw at them.
The three products we offer for tile roof installations each serve specific needs. Our Tile Roof Mount Roof Kit for Gen 3 (V4) represents our latest engineering, designed specifically for the newest Starlink terminals with their updated mounting requirements. The weather-resistant construction and complete installation kit make it perfect for DIY installers who want professional results.
For those with the popular Rectangle Gen 2 dishes, our dedicated mount kit ensures your terminal clips securely into the mast without any modifications. The 50-degree shut-off temperature consideration is crucial for Australian summers—we've positioned the dish away from radiating roof heat whilst maximising airflow to prevent those frustrating thermal shutdowns.
Even if you're still running the original Round Gen 1 dish, we haven't forgotten about you. Our legacy mount kit maintains the same warranty-preserving design principles whilst accounting for the different thermal characteristics of the older terminals.
The investment in a proper Starlink tile roof mount transforms your internet experience from frustrating to fantastic. Instead of dealing with intermittent connections, thermal shutdowns, or weather damage, you can focus on what matters most—staying connected with family, running your business, or simply enjoying the high-speed internet that Starlink promises.
For personalised advice on your specific installation requirements, or to discuss our complete range of Starlink accessories Australia solutions, we encourage you to contact our experienced team. Our technicians understand the unique challenges of Australian installations and can help you choose the right mounting solution for your property.
Whether you're bringing Starlink in Australia to a remote homestead, supporting Starlink for Remote Communities, or optimising your existing setup, our tile roof mounting solutions provide the foundation for reliable, long-term connectivity. Don't let poor mounting compromise your Starlink investment—choose a solution that's built to last in Australian conditions and backed by decades of local experience.

Leave a comment
This site is protected by hCaptcha and the hCaptcha Privacy Policy and Terms of Service apply.